EasyManua.ls Logo

MACHINIST BTC-B250C - User Manual

MACHINIST BTC-B250C
16 pages
Print Icon
To Next Page IconTo Next Page
Loading...
BTC-B250C
User's Manual
Question and Answer IconNeed help?

Do you have a question about the MACHINIST BTC-B250C and is the answer not in the manual?

Summary

Motherboard Specifications

Motherboard Component Overview

Install CPU and Fan

Install Memory Modules

Back Panel Connectors

USB 2.0 Port Description

Details the USB 2.0 port specification and usage for connecting USB devices.

VGA Port Description

Explains VGA port functionality for analog video signal transmission and display quality.

HDMI Port Description

Covers HDMI port capabilities for 4K and 1080px resolutions, connecting monitors.

USB 3.0 Port Description

Outlines USB 3.0 port specification and compatibility for connecting USB devices.

RJ45 LAN Port Description

Details the Gigabit Ethernet LAN port for internet connectivity and LED status indicators.

PS;2 Port Usage

Internal Connectors Overview

F_PANEL1 Front Panel Connector

Details the F_PANEL1 connector for front panel power and LED indicators.

SPEAK1 Audio Connector

Explains the SPEAK1 connector for system audio feedback, such as buzzer or speaker.

SATA 2.0 Connectors

MSATA Slot Description

Describes the MSATA slot for high-speed SATA storage, offering efficient cable management.

CMOS Discharge Procedure (JCMOS1)

Serial Port Connector (JCOM1)

Power Connectors (ATXPWR1, JATXPWR1)

Fan Connectors (CPU_FAN1, SYS_FAN1)

USB 2.0 Front Panel Connectors (JUSB2, JUSB4)

USB 3.0 Front Panel Connector (FUSB3)

BIOS Setup Overview

Entering BIOS Setup Guide

Resetting BIOS Settings

Overview

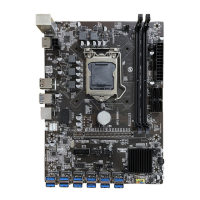
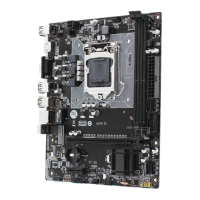
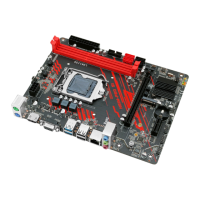
The MACHINIST BTC-B250C is a motherboard designed to support Intel 6th/7th Gen Core i3/i5/i7 (Intel Skylake full series), Xeon E3 1230V5, Celeron, and Pentium series processors, utilizing the B250 chipset. It is a compact motherboard with physical dimensions of 175*230 mm.

Technical Specifications:

  • Processor Support: Intel 6th/7th Gen Core i3/i5/i7 (Skylake full series), Xeon E3 1230V5, Celeron, and Pentium series processors.
  • Chipset: B250.
  • RAM:
    • Technology: Dual channel DDR4.
    • Maximum Capacity: 32GB (16GB*2).
    • Memory Slots: 2 * DDR4.
  • Rear I/O:
    • PS/2: 1 (Green for mouse, Purple for keyboard).
    • Display Interface: 1 * HDMI, 1 * VGA.
    • USB: 2 * USB 2.0, 2 * USB 3.0.
    • Ethernet: 1 * Gigabit LAN.
    • AUDIO: No dedicated audio port on the rear I/O.
  • Internal Connectors:
    • CFAN: 1 * 4PIN.
    • SFAN: 1 * 4PIN.
    • ATXPWR Interface: 24+4+6PIN Power Socket.
    • USB2.0 (front): 2 headers.
    • USB3.0 (front): 1 header.
    • MSATA: 1 slot.
    • SATA Interface: 4 * SATA2.0.
    • JPSON: 1 header.
    • SPEAK1: 1 header.
    • JCMOS Port: 1 header.
    • PCIe: 0 slots.
  • Environmental Conditions:
    • Working Temperature Range: 0~50°C.
    • Working Humidity: 5%~95%.
    • Storage Temperature Range: -20~70°C.
    • Storage Humidity: 5%~95%.

Usage Features:

  • CPU Installation: The manual provides a detailed, step-by-step guide for installing the CPU and its cooler. It emphasizes the importance of proper CPU placement, securing the locking lever, and connecting the CPU heatsink's 4-pin fan power connector. Users are warned against turning on the computer without a CPU cooler installed to prevent damage.
  • Memory Installation: The motherboard supports dual-channel DDR4 memory with a maximum capacity of 32GB across two DIMM slots. Installation involves opening the latches, aligning the memory module with the notch, and pressing it into the slot until the latches lock. It is recommended to use memory modules of the same capacity, brand, speed, and chips for optimal performance. Dual-Channel mode requires at least two memory modules.
  • Back Panel Connectors:
    • USB 2.0 Ports: Standard USB ports for connecting various USB devices.
    • VGA Port: Supports analog video signal transmission for high-resolution displays.
    • HDMI Port: Supports 4K and 1080px resolutions for connecting HDMI-compatible monitors.
    • USB 3.0 Ports: Offers faster data transfer rates compared to USB 2.0 and is backward compatible.
    • RJ45 LAN Port: Provides Gigabit Ethernet connectivity (up to 1000Mbps/s). The Link/Activity LED indicates connection status (Yellow for linked, Off for no link), and the Speed LED shows connection speed (Green for 100/1000 Mbps, Off for 10 Mbps).
    • PS/2 Port: A single port for connecting either a PS/2 keyboard (purple) or a PS/2 mouse (green).
  • Internal Connectors:
    • F_PANEL1 Connector: Used for connecting front panel indicators and switches, including Power LED, HDD LED, Power Switch, and Reset Switch. Proper connection is crucial to avoid device malfunction.
    • SPEAK1 Connector: For connecting a system speaker (buzzer).
    • 4*SATA 2.0 Connectors: Provides four SATA 2.0 ports with a theoretical speed of 3Gb/s for connecting storage devices.
    • MSATA Slot: Offers stable SATA 6GB/s transfer rates for more portable and efficient storage solutions, eliminating the need for separate data and power cables.
    • JCOM1 (Serial Port Connector): Allows for an optional serial port connection.
    • ATXPWR1, JATXPWR1 (Power Connectors): The main 24-pin ATX power connector and auxiliary power connectors ensure stable power delivery to all motherboard components. A power supply of at least 500W is recommended for stability.
    • CPU_FAN1, SYS_FAN1 (Fan Connectors): CPU_FAN1 is a 4-pin connector for the CPU cooler, supporting PWM intelligent speed regulation based on CPU load and temperature. SYS_FAN1 is for connecting a system cooling fan (case fan).
    • JUSB2, JUSB4 (USB 2.0 Connectors): Headers for connecting front panel USB 2.0 ports.
    • FUSB3 (USB 3.0 Connector): Header for connecting front panel USB 3.0 ports, compatible with USB 2.0.
  • BIOS Setup: The BIOS (Basic Input and Output System) manages hardware parameters and system configuration. Users can enter the BIOS setup by pressing the "DEL" key during startup. The default BIOS settings are optimized for stability, and altering them is generally not recommended unless necessary.

Maintenance Features:

  • CPU Protection: Users are advised to retain the CPU protective cap after installation and always protect the CPU socket pins with a plastic cap when the CPU is not installed.
  • Thermal Management: Applying an even layer of thermal paste between the CPU and heatsink is recommended to enhance heat dissipation.
  • Power Safety: Always unplug the power cord from the power outlet before installing or removing any components (CPU, memory, expansion cards) to prevent hardware damage.
  • CMOS Discharge (JCMOS1): The manual provides instructions for discharging the CMOS, which can be used to reset BIOS settings. This involves moving a jumper cap to cover pins 2 and 3 for about 3 minutes, then restoring it to pins 1 and 2. It is crucial to turn off the computer and unplug the power cord before performing a CMOS discharge.
  • BIOS Reset: If issues arise, the BIOS can be reset to default settings by either loading optimized defaults within the BIOS menu (F6) or by shorting the Clear CMOS jumper on the motherboard. Users are warned that BIOS flashing is potentially risky and should only be done with caution if problems persist, as inadequate flashing can lead to system malfunction. BIOS items are regularly updated, so descriptions may vary slightly from the latest BIOS versions.

MACHINIST BTC-B250C Specifications

General IconGeneral
BrandMACHINIST
ModelBTC-B250C
CategoryMotherboard
LanguageEnglish

Related product manuals