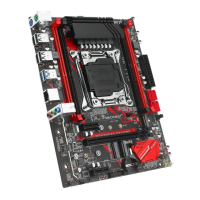
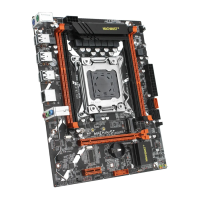
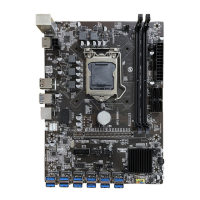
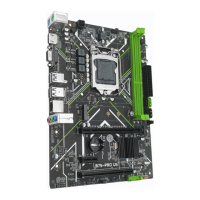
The MACHINIST X99-RS9 is a motherboard designed to support 5th/6th generation Intel Core i7 processors and XEON E5 V3/V4 series processors, utilizing the B85 chipset. It offers a robust platform for building a powerful computer system, with a focus on expandability and user-friendly features.
Function Description
The X99-RS9 motherboard serves as the central hub for your computer, connecting all essential components and enabling them to communicate. It provides a foundation for high-performance computing, supporting a 4-channel DDR4 memory architecture for efficient data processing. The board includes multiple expansion slots, allowing users to integrate various peripheral cards to enhance functionality. For connectivity, it features a comprehensive set of back panel and internal connectors, catering to a wide range of devices and internal components. The integrated Gigabit LAN port ensures fast and reliable internet access, while the audio ports provide versatile sound output and input options. The BIOS setup is a critical component, allowing users to configure system settings, monitor hardware, and troubleshoot issues.
Usage Features
The X99-RS9 is designed with user convenience in mind, offering straightforward installation and configuration processes.
- CPU & Fan Installation: The manual provides clear, step-by-step instructions for installing the CPU and its cooler. It emphasizes the importance of proper CPU placement, ensuring the locking lever is fully engaged, and applying thermal paste for optimal heat dissipation. The motherboard supports 4-pin CPU fan headers with PWM intelligent speed regulation, allowing the fan speed to adjust automatically based on load and temperature, ensuring efficient cooling and reduced noise.
- Memory Installation: The motherboard features four DDR4 ECC DIMM slots, supporting a 4-channel memory configuration. The installation process is simplified with latches that secure the memory modules in place. Users are advised to use memory modules of the same capacity, brand, speed, and chips for optimal performance and stability. The manual highlights that server memory and desktop memory cannot be used together.
- Expansion Card Installation: The X99-RS9 includes PCI Express 3.0 X16 and X1 expansion slots, enabling users to add graphics cards, sound cards, or other expansion cards. The installation involves simply inserting the card into an available slot until it is fully seated.
- Back Panel Connectors: The back panel offers a variety of ports for external devices. These include multiple USB 2.0 and USB 3.0 ports for connecting peripherals, an RJ45 LAN port for network connectivity, and a set of audio ports (Line-in, Line-out, Mic-in) for audio input and output. PS/2 ports are also provided for connecting a keyboard and mouse.
- Internal Connectors: For internal components, the motherboard provides several connectors:
- F_PANEL1 Connector: This connector is for the front panel buttons and LEDs, including power LED, HDD LED, power switch, and reset switch.
- SPEAK1 Connector: Used for connecting a system buzzer.
- JAUDIO1 Connector: Allows connection of front panel audio jacks.
- SATA 3.0 Connectors: Four SATA 3.0 connectors are available for connecting storage devices like HDDs and SSDs, supporting data rates up to 6Gb/s.
- M.2 Slot: The motherboard includes an M.2 slot for high-speed NVMe, SATA, and WiFi M.2 SSDs. Installation involves inserting the M.2 SSD at a 30-degree angle and securing it with a screw.
- JCOM1: Serial Port Connector: Provides a serial port via an optional COM port cable.
- ATXPWR1, JATXPWR1: Power Connectors: These connectors supply stable power to all motherboard components. It is recommended to use a power supply of at least 500W to ensure system stability.
- SYS_FAN1~3: Fan Connectors: These 3-pin fan headers are for system cooling fans and do not have PWM adjustment capability.
- JUSB2, JUSB4: USB 2.0 Connectors: Headers for connecting front panel USB 2.0 ports.
- FUSB3: USB 3.0 Connector: A header for connecting front panel USB 3.0 ports.
- BIOS Setup: The BIOS (Basic Input and Output System) is crucial for system configuration and hardware monitoring. Users can access the BIOS setup menu by pressing the key during startup. The BIOS allows for various settings adjustments, including boot order, system time, and hardware parameters.
Maintenance Features
The X99-RS9 incorporates features and guidelines to ensure system stability and ease of maintenance.
- CMOS Discharge (JCMOS1): The motherboard includes a JCMOS1 jumper for discharging the CMOS, which is useful for resetting BIOS settings to their default values. This process involves moving a cap to cover pins "2" and "3" for a few minutes, then restoring it to the initial state. It is crucial to turn off the computer and unplug the power cord before performing this action.
- BIOS Reset Options: If issues arise, the BIOS can be reset in several ways:
- Loading optimized defaults within the BIOS setup (F6 key).
- Shorting the Clear CMOS jumper on the motherboard.
- Hardware Protection: The manual emphasizes several important precautions to prevent hardware damage:
- Always unplug the power cord before installing or removing components.
- Retain the CPU protective cap when the CPU is not installed to protect the socket pins.
- Do not force components into their sockets; ensure proper alignment.
- Ensure the CPU cooler is installed before powering on the computer to prevent overheating.
- Confirm that the CPU heatsink has a tight seal with the CPU.
- Incorrect connections of internal module connectors can damage devices or the motherboard.
- BIOS Updates: The manual notes that BIOS items are regularly updated for better system performance, and descriptions are for reference. Keeping the BIOS updated can resolve potential issues and improve compatibility. However, it also warns that BIOS flashing is potentially risky if not done correctly, and it is recommended not to flash the BIOS unless necessary.
- Environmental Considerations: The motherboard is designed to operate within specific temperature and humidity ranges (0~50°C and 5%~95% humidity for working, -20~70°C and 5%~95% humidity for storage), ensuring reliability under typical conditions.