pg 3
BEFORE YOUR FIRST USE
BROWNING & SEARING IN THE COOKING POT
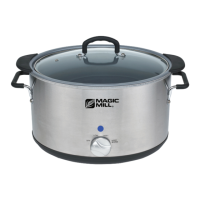
1. Carefully unpack your Slow Cooker and wash the cooking pot and glass lid
in warm, soapy water.
2. It is necessary to operate the Slow Cooker one time before cooking food
in the cooking pot. Pour 8 cups of water into the cooking pot and place it
inside the base unit. Cover with the glass lid.
3. Plug cord into a 120V AC outlet.
4. Turn the control dial to HIGH. The POWER indicator light will illuminate.
Allow water to heat for 60 minutes. NOTE: You may notice a slight odor;
this is normal and should quickly disappear.
5. Aer 60 minutes, turn the control dial to OFF. The POWER indicator light
will turn o. Unplug the Slow Cooker and allow the unit to cool.
6. Wearing oven mitts, remove the glass lid. Grasp the cooking pot handles
carefully to li and remove the cooking pot from the base unit; discard
water.
7. Rinse cooking pot, dry thoroughly and replace inside the base unit for
future use.• The nish is cleaned with lemon juice, vinegar or other
“food grade” mild acid which is oen used to remove the lm of oil that
develops over time.
1. Add depth of avor and rich color to your slow cooked dishes by browning
and searing your food in the cooking pot before slow cooking.
2. For best results: Remove meat from the refrigerator at least 20 minutes in
advance to allow food come to room temperature.
3. For a avorful, seared crust, generously season meat or poultry with your
favorite spice, herb, or nut rub before searing.
4. Li the lid. Remove the cooking pot from the Slow Cooker base unit,
and place it directly on the stovetop. WARNING: This cooking pot is not
intended for use on any induction burner.
5. Add 2 to 3 tablespoons of vegetable or peanut oil to the cooking pot. (Do
not use butter or olive oil as they tend to burn at high temperatures.)
NOTE: The amount of additional fat needed depends on the fattiness of the
meat.
6. Turn burner heat to HIGH.