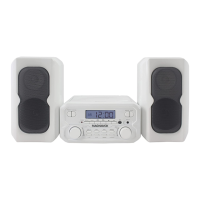
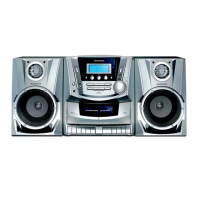
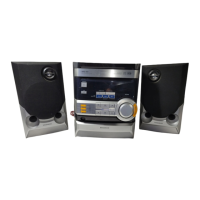
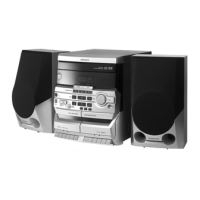
This document describes the Magnavox MM435M 3-Piece CD Shelf System, a versatile audio device featuring a CD player, digital PLL AM/FM stereo radio, and Bluetooth wireless technology. It is designed for home use, offering multiple playback options and user-friendly controls.
General Operation and Features
The system operates by connecting to an AC power source, after which it enters standby mode with the LCD display illuminated. To power on, the user presses the POWER button on either the main unit or the remote control, which also illuminates the POWER indicator. The FUNCTION button allows users to switch between different playback modes: CD, Bluetooth (BT), AUX, FM, and AM. The selected mode is indicated on the display (e.g., "Cd," "bt," "AUX," "FM," "AM").
During playback, the VOLUME control knob on the unit adjusts the audio level. The DBBS (Dynamic Bass Boost System) control knob enhances the bass output to the speakers, providing a richer sound experience. The DIMMER button on the main unit or remote control allows for adjustment of the display's brightness. When listening is complete, pressing the POWER button returns the unit to standby mode.
Clock and Alarm Functions
The system includes a clock function. To set or reset the time, the user presses and holds the TIME SET button in standby mode, causing the time on the display to blink. The Previous/Skip Backward (◄◄) or Next/Skip Forward (►►) buttons are used to set the hour, with a PM indicator appearing for afternoon times. Pressing the TIME SET button again allows for minute adjustment using the same buttons. Releasing the TIME SET button saves the settings and stops the time from blinking.
An alarm function is also available. To set or reset the alarm time, the AL SET (Alarm Set) button is pressed and held in standby mode, making the alarm time blink on the display. The ◄◄ or ►► buttons are used to set the hour (with PM indicator). Pressing AL SET again allows for minute adjustment. Another press of AL SET enables selection of the wake-up mode: CD (wake up by CD), BU (wake up by Buzzer), FM (wake up by FM Radio), or AM (wake up by AM Radio). The ◄◄ or ►► buttons are used to select the desired mode. Finally, pressing the AL ON/OFF (Alarm On/Off) button activates the alarm, indicated by a " " symbol on the display.
To set or reset the wake-up mode while the alarm is active, the AL SET button is pressed and held, causing the alarm time to blink. Repeatedly pressing AL SET allows cycling through and selecting the desired wake-up mode. It's important to note that the alarm will not operate if the unit is already powered on. If radio wake-up mode is selected, the desired radio station and volume level should be set beforehand to ensure proper sound output. Similarly, for CD wake-up, a CD disc must be placed in the unit and the sound level adjusted.
To shut off a sounding alarm, pressing the AL ON/OFF button once will turn it off for the day, and it will reactivate the next day. To completely disable the alarm, the AL ON/OFF button is pressed repeatedly until all corresponding alarm indicators disappear from the display.
The system also features a Sleep function. After powering on the unit, pressing the SLEEP button allows the user to set a timer for 120, 90, 60, 30, 20, or 10 minutes, or to turn it OFF. Once the set sleep time expires, the clock radio automatically powers off.
A Snooze function is available when the alarm sounds. Tapping the SNOOZE button temporarily silences the alarm, which will sound again after 9 minutes. This can be repeated.
CD Playback
To play a CD, the CD door is opened by pressing the CD OPEN (Close) area. A CD disc is placed on the center spindle with the printed label side up, and the CD door is closed. After powering on and entering CD mode (indicated by "Cd" on the display), the unit will show the total number of tracks. Pressing the Play/Pause (►II) button starts playback. During playback, the Play/Pause button can be used to pause and resume. The Next/Skip Forward (►►) or Previous/Skip Backward (◄◄) buttons skip tracks. Pressing and holding these buttons enables fast searching within a track. To stop playback, the Stop (■) button is pressed.
The system offers Repeat and Random playback options. Pressing the REPEAT button once during playback activates "REP," repeating the current track. Pressing it twice activates "REP ALL," repeating all tracks on the disc. Pressing it three times activates "RAND," playing tracks randomly. To cancel these functions, the REPEAT button is pressed repeatedly until the indicators disappear.
Programmed playback allows users to program up to 20 tracks. In CD stop mode, pressing the PROG (Program) button makes "P01" blink on the display. The ◄◄ or ►► buttons are used to select the first track, and PROG is pressed again to store it. This process is repeated for subsequent tracks. Pressing Play/Pause (►II) starts programmed playback. The Stop (■) button can temporarily stop playback, with "PROG" remaining on the display, and Play/Pause (►II) can resume it. To stop and cancel the program, the Stop (■) button is pressed twice, and the "PROG" indicator disappears.
Bluetooth (BT) Wireless Technology
For Bluetooth pairing, the unit is powered on and set to BT mode, causing "bt" to blink on the display. The external Bluetooth device is then powered on and put into searching mode. Following the on-screen instructions of the external device, pairing is initiated. Once paired, the "bt" indicator stops blinking. Music can then be played from the external BT device. During BT playback, the Play/Pause (►II) button pauses and resumes audio. The ◄◄ or ►► buttons skip tracks. When searching for the unit, the external BT device will display "MM435M." If a code is requested during pairing, "0000" or "1234" can be tried.
For normal operation after initial pairing, the BT function on the external device is turned on, and the unit is set to BT mode. The "bt" indicator will blink, and after a few seconds, the unit should automatically pair with the external device, at which point the "bt" indicator will stop blinking.
AUX IN Function
The AUX IN function allows connection of external audio devices. A 3.5mm AUX cable (not included) is connected from the external audio device's Phone, Line Out, or AUX Out jack to the AUX In port on the front of the main unit. The unit is powered on and set to AUX In mode, indicated by "AUX" on the display. Music can then be played from the connected device, ensuring its volume level is set to high.
AM/FM Radio
To use the radio, the unit is powered on and set to Radio mode, displaying "AM" or "FM" and the radio frequency. The ◄◄ or ►► buttons are used to select the desired radio station.
The Auto Scan Radio feature allows the unit to automatically scan and store available stations. Pressing and holding the Play/Pause (►II) button for 2 seconds initiates an auto scan in either AM or FM band, storing stations in preset memory. The MEM+ or MEM- buttons are used to navigate through these stored presets.
To manually set AM/FM radio presets, the desired station is found, and the MEMORY button on the main unit or remote control is pressed. The display will show "P01, P02, etc..." The ◄◄ or ►► buttons are used to select the preferred preset number. Pressing the MEMORY button again saves the station. This process is repeated for all desired presets. The unit can store up to 30 FM and 20 AM radio stations. If a stereo FM radio station is received, the "ST" indicator will appear automatically.
Antennas
The unit has a built-in ferrite rod antenna for AM reception, which generally provides adequate reception. If AM reception is weak, turning the unit may improve it. For FM reception, the FM Wire Antenna is used. If FM reception is weak, unwinding and relocating the wire antenna may help.
Maintenance
Caring for Compact Discs:
Discs should be handled carefully, touching only the edges and avoiding the shiny, unprinted side. Adhesive tape or stickers should not be attached to the disc label. Discs should be cleaned periodically with a soft, lint-free, dry cloth, wiping in straight lines from the center to the outer edge. Detergents or abrasive cleaners should not be used; a CD cleaning kit is recommended if necessary. Skipping or stuck sections on a disc may indicate dirt or scratches.
Compact discs should be stored in their cases after each use to prevent damage. They should not be exposed to direct sunlight, high humidity, high temperatures, or dust, as prolonged exposure can warp the disc. Nothing should be stuck or written on either side of the disc, as sharp instruments or ink can damage the surface. The unit is designed to play only compact discs bearing the "COMPACT disc DIGITAL AUDIO" logo.
Cleaning the Unit:
To prevent fire or shock hazards, the unit should be disconnected from the AC power source before cleaning. The unit's finish can be cleaned with a dust cloth, similar to other furniture. Caution should be exercised when cleaning and wiping plastic parts. A mild soap and a damp cloth can be used on the front panel.
Remote Control Battery:
For first-time use, the insulation film must be removed and discarded from the remote control's battery compartment. When the button cell battery is drained, it needs to be replaced. To do this, push and slide out the battery holder. Replace the old CR2025 button cell with a new one, ensuring correct polarity as marked on the rear of the remote control. Then, close the battery holder.
Battery Precautions:
Only the specified size and type of battery should be used. Correct polarity must be observed during installation to prevent damage. Different types of batteries (e.g., Alkaline and Carbon-zinc) or old and fresh batteries should not be mixed. If batteries are consumed or the device will not be used for a long period, they should be removed to prevent damage or injury from battery leakage. Batteries should not be recharged if not intended for recharging, as they can overheat and rupture. Batteries should not be disposed of in fire, as they may explode or leak. Battery contacts and device contacts should be cleaned before installation.
The product contains a coin/button cell battery. If swallowed, it can cause severe internal burns in just 2 hours and can be fatal. New and used batteries should be kept away from children. If the battery compartment does not close securely, the product should be stopped from use and kept away from children. If batteries are suspected to have been swallowed or placed inside any part of the body, immediate medical attention should be sought.
Remote Control Effective Distance:
The remote control operates effectively within a range of 25 feet and an angle of ±45 degrees. Obstacles between the sensor and the remote may hinder its operation. Direct sunlight or strong light shining on the remote control can also make its operation unstable.