EasyManua.ls Logo

Maier 251 - User Manual

Default Icon
34 pages
Print Icon
To Next Page IconTo Next Page
Loading...
Bedienungsanleitung
Operating instructions
Manuel d´instructions
Instrucciones de servicio
220, 221, 240, 241, 251, 261,
271, 281, 252, 352

Table of Contents

Question and Answer IconNeed help?

Do you have a question about the Maier 251 and is the answer not in the manual?

Summary

General Notes and Safety

Directives and Regulations

Machine built according to EC regulations and statutory provisions.

Safety Notes for Operation

Machine operation by trained persons, safety warnings, intended use, isolation from mains.

Safety Symbols and Operator Responsibilities

Safety Symbols Explained

Explains danger spots and injury warnings.

Operators Special Attention Points

Instructions part of machine, training on safety devices, machine condition.

Personnel Roles and Responsibilities

Operator Duties

Responsible for preparation, operation, cleaning, troubleshooting. Duty to observe safety.

Specialist Staff Roles

Technical personnel for maintenance, repair, and adjustment.

Machine Handling and Initial Steps

Hazard Warnings

Working area, table objects, eye protection, belt guards, intended use.

Transport, Packaging, and Storage

Guidelines for moving, storing, and disposing of packaging.

Installation and Commissioning Requirements

Requirements for specialist installation and safety compliance.

Initial Machine Care Step

Initial step for care: switch off the machine.

Machine Care and Disposal Procedures

Machine Oiling and Maintenance

Risk of inadvertent start, oiling points, and material soiling.

Machine Disposal Guidelines

Customer responsibility, materials, environmental regulations.

Machine Assembly and Installation

Assembly Safety and Electrical Work

Safety precautions and electrical assembly by qualified personnel.

Step-by-Step Installation

Steps for assembling stand, motor, table, and connecting components.

Mini-Motor Attachment Kit Mounting

Mounting for Classes 221, 241, 251, 261, 271

Specific steps for attaching the kit to these models.

Mounting for Classes 252, 352

Specific steps for attaching the kit to these models.

Automatic Frame Drop Device and Accessories

Frame Drop Device PFL-M Details

Components and order reference for PFL-M model.

Frame Drop Device PFL-P Details

Components and order reference for PFL-P model.

Machine Accessories

Sewing Machine Table Top Specifications

Table Tops for Models 220, 221, 271

Technical drawings with dimensions for table top.

Table Tops for Models 220, 221, 271 (Sub-class 46)

Technical drawings with dimensions for table top.

Sewing Machine Table Top Specifications (Continued)

Table Tops for Models 240-352

Technical drawings with dimensions for table top.

Table Tops for Models 240-352 (Sub-class 46;2)

Technical drawings with dimensions for table top.

Operation and Threading Procedures

Detailed Threading Instructions

Detailed steps for threading the machine with/without thread cutter.

Cloth Insertion and Hemming Techniques

Inserting Cloth for Sewing

Steps for placing cloth and starting sewing.

Blind Stitch Hems on Hem Edge

Guiding cloth along hem edge with guide rule.

Blind Stitch Hems on Cloth Tuck

Using front guide rule for tuck hems.

Sewing Operations and Adjustments

Operation with Stop Motor and Accessories

Using stop motor, frame drop, thread cutter.

Thread Tension Adjustment Guide

Adjusting tension for visible thread pulls or loose seams.

Stitch Depth Adjustment (Penetration)

Stitch Depth for Classes 220-271

Adjusting stitch depth using screw and plunger.

Stitch Depth and Cloth Guide Settings

Stitch Depth for Classes 252, 352

Inserting cloth in "S" shape and adjusting cloth guide.

Plunger;Rib Shaft Stitch Depth Adjustment

Left-Hand Plunger Stitch Depth Setting

Adjusting left plunger for outside hem penetration.

Right-Hand Plunger Stitch Depth Setting

Adjusting right plunger for inside hem penetration.

Cloth Retainer Adjustment for Seams

Needle Fitting and Motion Verification

Procedure for Fitting the Needle

Procedure for fitting new needle, system, and size.

Checking Needle Motion Accuracy

Verifying needle path and clearance with stitch plate.

Skip Stitch Device Operation

Mechanics Instructions: Stitch Plate Setting

Needle Movement and Looper Setup

Basic Setting of Needle Movement

Setting needle position at dead centre points.

Looper Fitting and Movement Check

Fitting new looper and checking movement.

Looper Adjustment Procedures

Adjusting Looper Height

Modifying looper height to prevent contact.

Adjusting Looper Lateral Position

Shifting looper to avoid hitting components.

Looper Stroke and Take-up Cam Adjustments

Adjusting the Looper Stroke

Setting looper movement for thread uptake.

Setting the Thread Take-up Cam

Adjusting cam for thread tension and loop size.

Stitch Length Adjustment

Plunger (Rib Shaft) Position Adjustment

Radial Position Adjustment

Ensuring plunger tip stops correctly before needle.

Axial Position Adjustment

Aligning plunger under cloth retainer.

Plunger (Rib Shaft) Fine Tuning

Play Adjustment in Plunger Shaft

Correcting axial and radial play in plunger shaft.

Setting Plunger (Rib Shaft) Timing

Setting plunger stop and return movement timing.

Plunger Skip Stitch Timing

Adjusting eccentric for alternate plunger strokes.
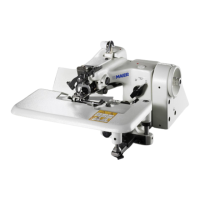
Feed Dog Adjustment Procedure

Sewing Faults and Their Remedies

Specialized Sewing Tools

Technical Data and Specifications

Maier 251 Specifications

General IconGeneral
TypeIndustrial Sewing Machine
Stitch TypeLockstitch
Stitch LengthUp to 5mm
Speed5000 stitches per minute
Needle SystemDBx1

Related product manuals