Do you have a question about the Makita 3700B and is the answer not in the manual?
Describes symbols used in the manual for understanding.
Describes the tool's intended purpose for woodworking.
Details power connection requirements and safety.
Guidelines for safe environment and electrical precautions.
User protection, proper handling, and maintenance advice.
Precautions for bit safety, workpiece stability, and cord contact.
Recommendations for hearing protection and careful bit handling.
How to set and adjust the cutting depth accurately.
Operation of the power switch for starting and stopping.
Safety advice before performing any assembly work.
Procedures for installing and removing the trimmer bit.
General guidelines for operating the tool safely.
Techniques for templet, straight guides, and circular cuts.
Details and specifications for various router bits.
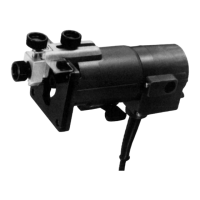
This document provides the instruction manual for the Makita Trimmer model 3700B, a double-insulated power tool designed for flush trimming and profiling wood, plastic, and similar materials.
The trimmer is equipped with a switch lever for operation. To start the tool, move the switch lever to the "ON" position, and to stop it, move the lever to the "OFF" position.
The depth of cut can be adjusted by loosening the clamp screw and moving the tool body until the bit touches a flat surface. After a slight tightening of the clamp screw, the tool is placed on its side, and the clamp screw is loosened again. The tool base is then moved to achieve the desired depth of cut, which can be checked using the scale label (1 mm per graduation). Once the desired depth is set, the clamp screw must be securely tightened.
Installing or Removing Trimmer Bit: To install a trimmer bit, insert it all the way into the collet cone and securely tighten the collet nut using the two provided wrenches. It is crucial not to tighten the collet nut without a bit inserted, as this can break the collet cone. Only the wrenches provided with the tool should be used. To remove the bit, reverse the installation procedure.
Operation: Before starting, ensure the tool base is on the workpiece without the bit making contact. Turn the tool on and wait for the bit to reach full speed. Then, move the tool forward smoothly over the workpiece surface, keeping the tool base flush until the cut is complete. Moving the tool too fast can result in a poor-quality cut or damage to the bit or motor, while moving too slowly may burn the cut. The proper feed rate depends on the bit size, workpiece type, and depth of cut. It is advisable to make a sample cut on scrap lumber first to check the cut and dimensions.
Templet Guide: The templet guide allows the use of the trimmer with templet patterns by providing a sleeve through which the bit passes. To use it, loosen clamp screw (A), remove the guide holder and chip deflector. Then, remove the base protector, place the templet guide on the base, and reattach the base protector by tightening the screws. Secure the templet to the workpiece and move the tool with the templet guide sliding along its side. Note that the workpiece will be cut slightly differently from the templet due to the distance (X) between the router bit and the outside of the templet guide. This distance can be calculated using the equation: (outside diameter of the templet guide - router bit diameter) / 2.
Straight Guide (Optional Accessory): The straight guide is effective for straight cuts, chamfering, or grooving. Attach the guide plate to the straight guide using the bolt, flat washer, wave washer, and wing nut. Remove the guide holder and chip deflector. Attach the straight guide with clamp screw (A). Loosen the wing nut on the straight guide and adjust the distance between the bit and the straight guide. Once the desired distance is set, tighten the wing nut securely. When cutting, move the tool with the straight guide flush with the side of the workpiece. If the distance between the workpiece side and the cutting position is too wide or the workpiece side is not straight, a straight board can be clamped to the workpiece and used as a guide against the trimmer base.
Circular Work: Circular work can be accomplished by assembling the straight guide and guide plate. The minimum radius of circles to be cut is 70 mm, and the maximum is 221 mm. For circles between 70 mm and 121 mm, attach the guide holder, clamp screw (A), adjusting screw, clamp screw (B), trimmer guide, and chip deflector. For circles between 121 mm and 221 mm, the setup is similar, with specific components for the larger radius. To cut circles, align the center hole in the straight guide with the center of the circle to be cut. Drive a nail (less than 6 mm in diameter) into the center hole to secure the straight guide and pivot the tool around the nail in a clockwise direction.
Trimmer Guide: The trimmer guide facilitates trimming and curved cuts in veneers for furniture. The guide roller rides the curve, ensuring a fine cut. To install, attach the chip deflector on the groove of the base, then install the trimmer guide and guide holder on the tool base with clamp screw (A). Loosen clamp screw (B) and adjust the distance between the bit and the trimmer guide by turning the adjusting screw (1 mm per turn). Tighten clamp screw (B) to secure the trimmer guide in place. When cutting, move the tool with the guide roller riding the side of the workpiece.
Trimmer Shoe (Optional Accessory): Attaching the trimmer shoe provides a right-angle guide surface for the trimmer base guide, enabling accurate chamfering and similar edge work. Remove the trimmer guide from the tool. Install the trimmer shoe on the guide holder with the adjusting screw and clamp screw (B). Loosen clamp screw (B) and adjust the distance between the bit and the trimmer shoe by turning the adjusting screw (1 mm per turn). At the desired distance, tighten clamp screw (B) to secure the trimmer shoe in place. When cutting, feed the tool in the direction of the arrow on the trimmer shoe.
General Maintenance: Always ensure the tool is switched off and unplugged before performing any inspection or maintenance. Avoid using gasoline, benzine, thinner, alcohol, or similar substances, as they can cause discoloration, deformation, or cracks.
Replacing Carbon Brushes: Regularly remove and check the carbon brushes. Replace them when they wear down to the limit mark. Keep the carbon brushes clean and free to slip in their holders. Both carbon brushes should be replaced at the same time, using only identical carbon brushes. To replace, use a screwdriver to remove the brush holder caps, take out the worn brushes, insert the new ones, and secure the brush holder caps.
For product safety and reliability, all repairs, maintenance, or adjustments should be performed by Makita Authorized Service Centers, using genuine Makita replacement parts.
| Power Input | 530 W |
|---|---|
| No Load Speed | 30, 000 rpm |
| Collet Size | 6.35 mm (1/4") |
| Input Power | 370 W |
| Net Weight | 1.6 kg |
| Weight | 1.6 kg |