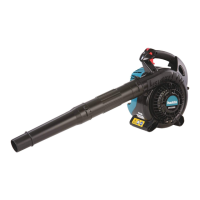
The Makita BHX2500 blower is a professional-grade tool designed for a variety of applications, combining state-of-the-art technology with ergonomic design. It is lightweight, handy, and compact, making it suitable for both general and specialized tasks. This manual provides detailed instructions for its safe and effective operation, maintenance, and troubleshooting.
Function Description
The Makita BHX2500 functions primarily as a blower, designed to generate a high-pressure air blast for clearing debris, leaves, and other light materials from various surfaces. It can also be converted into a vacuum for collecting dust and light debris, offering versatility for different cleaning needs. The engine is a four-stroke type, requiring automobile gasoline (regular or premium) and SAE 10W-30 oil of API Classification, Class SF or higher.
Usage Features
Starting the Blower:
Before starting, ensure the blower is fully assembled and all protective parts and guards are in place. The stop switch should be set to the "I" position. For a cold engine or after refueling, push the primer pump 7 to 10 times until fuel enters the pump. Then, close the choke lever by lifting it on the air cleaner's right side. Hold the main handle firmly with your left hand to stabilize the engine. Slowly pull the starter handle until resistance is felt, then return it once before pulling it out with force. Avoid pulling the rope to its full extent and hold the start knob until it returns to its original point. Once the engine starts, progressively open the choke lever, ensuring it is fully open at the end. Allow the engine to warm up for 2 to 3 minutes until its speed stabilizes and accelerates smoothly. For a warm engine, press the primer pump several times, confirm the choke lever is open, and then follow the same starting procedure.
Stopping the Blower:
To stop the engine, release the trigger lever to reduce engine speed and set the stop switch to the "O" position. If the cruise control lever is ON, set it to the OFF position before reducing engine speed and setting the stop switch to "O".
Blower Operation:
During operation, hold the machine firmly. Direct the nozzle end towards the object to be cleared and pull the trigger lever. The trigger lever can be fixed in an arbitrary position using the cruise control lever. To maintain a desired engine speed, set the trigger lever to the appropriate position and then set the cruise control lever to "ON". To adjust speed, set the cruise control lever to "OFF", adjust the trigger lever, and then reset the cruise control lever to "ON". The lower portion of the fuel tank can serve as an assist handle for two-handed operation; ensure to hold it with your right hand.
Dust Collection Operation (Optional):
For dust collection, attach the vacuum pipe and dust bag. Ensure the dust bag belt is carried on the shoulder and adjusted for easy operation. Confirm the dust bag is not twisted and pull the trigger lever to start dust collection. When the dust bag is full, remove it from the machine, open the fastener, and empty it. Do not attempt to pick up large wood chips, metals, glass, stones, liquids, lighted cigarettes, or fireworks, as this can cause damage or fire. Overfilling the dust bag can lead to overflow towards the engine, posing a fire risk.
Safety Precautions:
Always read, understand, and follow the instruction manual. Only experienced individuals should operate the blower. Children and young persons under 18 should not operate the blower, except for training purposes under direct supervision. Operate the blower only when in good physical condition and never under the influence of alcohol or drugs. Wear appropriate personal protective equipment, including sturdy, snug-fitting clothing, sound barriers (ear plugs or mufflers), protective gloves, sturdy non-slip shoes, and eye protection (goggles or safety glasses complying with ANSI Z87.1). Keep the working area clear of children, other people, and pets (at least 15 meters). Never operate the blower in urban areas. Avoid inhaling exhaust gases and never run the engine in enclosed rooms due to the risk of suffocation and gas poisoning. Switch off the engine when resting, leaving it unattended, or during transport. Never lay a hot blower on dry grass or combustible materials. Ensure all protective parts and guards are used. Do not operate with a faulty exhaust muffler. When transporting, position the blower safely to prevent fuel leakage and ensure the fuel tank is completely empty.
Refueling:
Always shut off the engine and allow it to cool before refueling. Keep away from open flames and do not smoke. Avoid skin contact with petroleum products and do not inhale fuel vapor; wear protective gloves. Clean up any spilled fuel immediately. Inspect the fuel cap regularly for secure fastening and replace it if flawed or damaged (recommended every two to three years). After refueling, tighten the cap securely and move at least 3 meters away from the refueling spot before starting the engine. Never refuel in closed rooms due to the risk of explosions from fuel vapors. Store fuel only in approved containers, out of reach of children. Do not refuel a hot or running engine.
Maintenance Features
Engine Oil Inspection and Refill:
Perform engine oil inspection and refill when the engine is cooled down. Ensure the machine is horizontal, remove the oil cap, and check the oil level using the gauge. If the oil level is below the lower limit, refill with new oil. For refill, position the machine vertically (under the suction port cover), remove the oil cap, and supply oil until the level reaches the shelf inside the oil pipe. The oil refill time is approximately every 10 operating hours. Replace oil if it changes color or mixes with dirt (initially after 20 operating hours, then every 50 hours, or every 6 months if unused). Always remove dust or dirt near the oil refill port and keep the oil gauge clean to prevent irregular oil circulation or wear. Wipe up any spilled oil before starting operation.
Fuel Supply and Storage:
Fuel should be used within 4 weeks, even if stored in a special container in a well-ventilated shade. If not stored properly, fuel can deteriorate in one day. Keep the machine and tank in a cool place away from direct sunshine. Never store fuel in a cabin or trunk. The engine is a four-stroke engine and requires automobile gasoline (regular or premium). Never use a gasoline mixture containing engine oil, as this can cause excessive carbon accumulation or mechanical troubles. Deteriorated oil can lead to irregular startup.
Adjustment of Idling:
The carburetor is factory-adjusted. If idling adjustment is necessary, consult an authorized service agent. To check low-speed rotation, set it to 3500 rpm. If adjustment is needed, use a Phillips screwdriver to turn the adjusting screw: right to increase rotation, left to decrease.
Cleaning the Fuel Filter:
Regularly check the fuel filter. A clogged filter can cause startup difficulty or engine speed issues. Remove the fuel tank cap, drain the fuel, and check for foreign materials. Pull out the fuel filter with a wire through the oil filling port. Clean contaminated filter surfaces with gasoline; excessively foul filters must be replaced. Dispose of foul gasoline according to local authority guidelines. Reset the fuel filter and tighten the cap firmly.
Inspection of Bolts, Nuts, and Screws:
Regularly retighten any loose bolts, nuts, or screws. Check for fuel and oil leakage. Replace damaged parts for safety.
Cleaning of Parts:
Keep the engine clean at all times. Ensure cylinder fins are free of dust or dirt to prevent seizure.
Replacement of Gaskets and Packings:
When reassembling after engine dismounting, replace gaskets and packings with new ones. Any maintenance or adjustment work not described in this manual should be performed by Authorized Service Agents.
Storage:
For long-term storage, drain all fuel from the fuel tank and carburetor. Remove the spark plug, drip several drops of engine oil into the spark plug hole, and gently pull the starter handle to spread the oil. Reattach the spark plug. Store the machine upright in a dry and clean place. Keep drained fuel in a special, well-ventilated container.
Troubleshooting:
The manual includes a troubleshooting guide to help identify and remedy common issues such as the engine not starting, stopping soon, or having insufficient performance. For any abnormalities not covered, or if tampering/dismounting is required, contact an Authorized Service Agent or local dealership.
First Aid:
Always have a well-stocked first-aid kit available. In case of an accident, provide information on the place, what happened, number of injured persons, extent of injuries, and your name.
Packaging:
The Makita blower is delivered in a protective cardboard box. Cardboard is a reusable and recyclable material.