6 ENGLISH
Adjusting the fastening torque
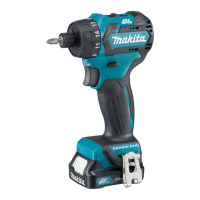
1
3
2
4
►1.Adjustingring2. Graduation 3. marking 4. Arrow
Thefasteningtorquecanbeadjustedin21levelsbyturningtheadjustingring.Alignthegraduationswiththearrow
on the tool body. You can get the minimum fastening torque at 1 and maximum torque at
marking.
The clutch will slip at various torque levels when set at the number 1 to 20. The clutch does not work at
the marking.
Before actual operation, drive a trial screw into your material or a piece of duplicate material to determine which
torque level is required for a particular application.
The following shows the rough guide of the relationship between the screw size and graduation.
Graduation 1 2 3 4 5 6 7 8 9 10 11 12 13 14 15 16 17 18 19 20
Machine screw M4 M5 M6
Wood
screw
Soft wood
(e.g. pine)
– ɸ3.5 x 22 ɸ4.1 x 38 –
Hard wood
(e.g. lauan)
– ɸ3.5 x 22 ɸ4.1 x 38 –
ASSEMBLY
CAUTION: Always be sure that the tool is
switched off and unplugged before adjusting or
checking function on the tool.
Installing or removing driver bit/
drill bit
CAUTION: After inserting the driver bit/drill bit,
makesurethatitisrmlysecured.Ifitcomesout,do
not use it.
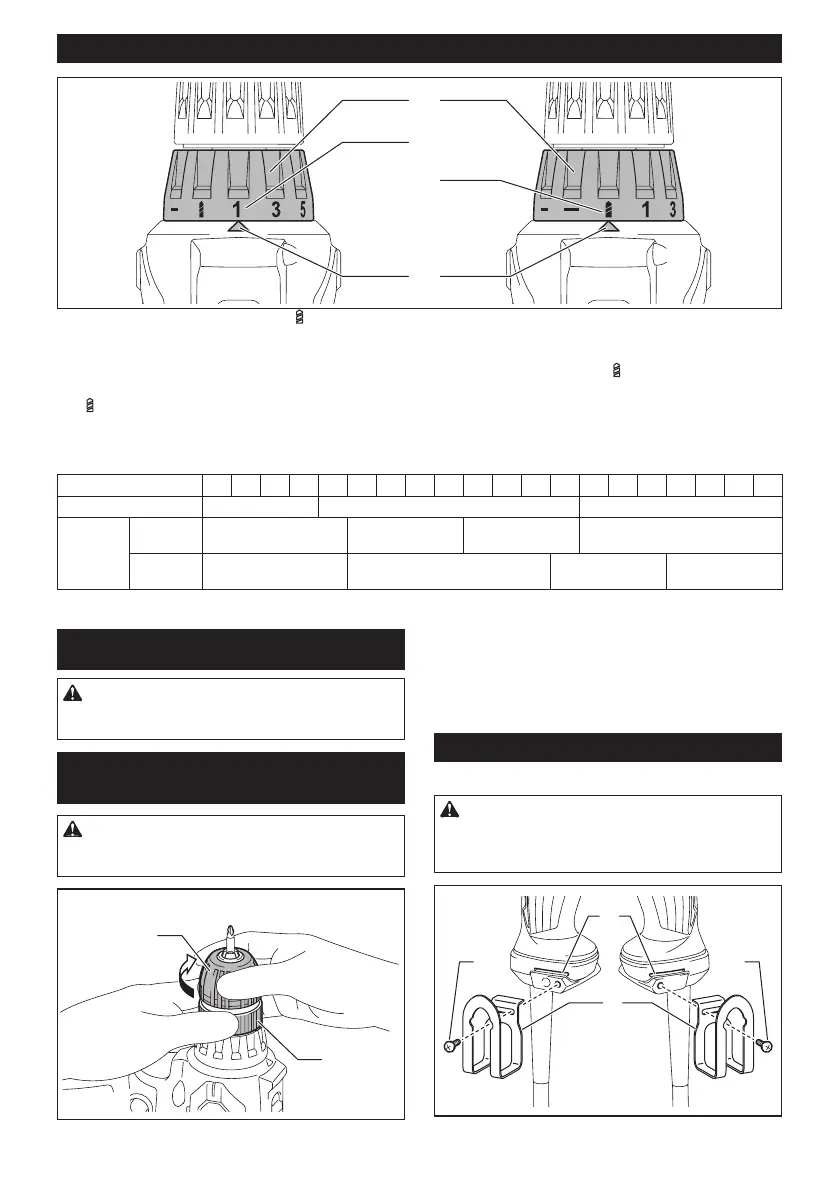
2
3
1
►1. Tighten 2. Sleeve 3. Ring
Hold the ring and turn the sleeve counterclockwise to
openthechuckjaws.Placethedriverbit/drillbitinthe
chuckasfarasitwillgo.Holdtheringrmlyandturn
the sleeve clockwise to tighten the chuck.
To remove the driver bit/drill bit, hold the ring and turn
the sleeve counterclockwise.
Installing hook
Optional accessory
CAUTION: When installing the hook, always
secure it with the screw rmly. If not, the hook
may come off from the tool and result in the personal
injury.
1
33
2
►1. Groove 2. Hook 3. Screw

 Loading...