Do you have a question about the Makita DSS611 and is the answer not in the manual?
Explains symbols used on the equipment and their meanings.
Guidelines for disposing of electric equipment and batteries in EU countries.
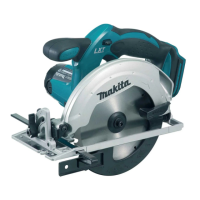
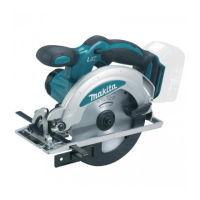
The tool is designed for straight and mitre cuts in wood.
Details typical A-weighted noise levels and precautions.
Presents vibration emission values for wood cutting.
Manufacturer's declaration of conformity to European directives.
Ensures a clean, well-lit, and safe work environment.
Guidelines for safe electrical connections and usage.
Covers alertness, protective equipment, and proper handling.
Instructions for proper usage, maintenance, and care of the power tool.
Disconnect power before making adjustments or changing accessories.
Detailed safety instructions for cutting operations.
Use insulated surfaces to avoid electric shock from hidden wires.
Use rip fence for accurate cuts and to prevent blade binding.
Ensure blades match mounting hardware to prevent vibration.
Use only specially designed washers and bolts for safety.
Maintain a firm grip and position body to resist kickback forces.
Release trigger, stop saw, and investigate binding causes.
Center blade in kerf and check for engagement before restarting.
Support panels to minimize blade pinching and kickback risk.
Use sharp, well-set blades to prevent binding and kickback.
Ensure adjustment levers are tight to prevent binding.
Be cautious of hidden objects that may cause kickback.
Always hold tool firmly with both hands, keeping hands away from blade path.
Advance saw smoothly to prevent uneven cuts and kickback.
Details on the operation and safety features of the lower guard.
Ensure lower guard moves freely and closes instantly.
Manual retraction for special cuts; release guard when blade enters material.
Ensure lower guard covers blade before setting saw down.
Check guard movement and ensure retracting handle doesn't interfere.
Exercise caution with damp wood, use steady advancement.
Wait for the blade to stop completely before removing cut material.
Remove nails from lumber before cutting to prevent damage and injury.
Support workpiece on solid sections, clamp small pieces.
Ensure blade has stopped and guard is closed before setting down.
Never operate saw upside down; it is extremely dangerous.
Take precautions for dust inhalation and skin contact with chemicals.
Do not use side pressure to stop the blade; wait for it to stop naturally.
Use only recommended blades; do not use abrasive wheels.
Keep blades sharp and clean to prevent binding and kickback.
Wear dust mask and hearing protection when operating the tool.
Critical safety guidelines for handling and using battery cartridges.
Advice on charging, usage, and storage for maximum battery life.
Overview of the tool's components and features.
Step-by-step guide for inserting and removing the battery pack.
How the tool reacts to overload and how to reset.
How the tool indicates low battery and the required action.
Instructions for setting the blade depth for optimal cutting.
Set cut depth to expose no more than one blade tooth for safety.
Instructions for performing bevel cuts and adjusting angles.
Instructions for setting bevel angles on DSS610 model.
Instructions for setting bevel angles on DSS611 model.
Aligning the base with the cutting line for straight and bevel cuts.
Check switch trigger function and return to OFF before use.
Properly use the lock-off lever to prevent accidental starting.
Never disable or tape the lock-off lever; return for repair if faulty.
Instructions for operating the lamp on the DSS610 model.
Instructions for assembling and preparing the tool for use.
Step-by-step guide for changing the saw blade.
Ensure correct ring is installed between flanges to prevent vibration.
Clean blade guards for sawdust accumulation during blade changes.
Information regarding the use of a ring accessory in certain countries.
Guide to connecting a vacuum cleaner for dust extraction.
Instructions for safe and effective operation of the saw.
How to use the rip fence for accurate straight cuts.
Adjusting the blade angle for 90° and 45° cuts on DSS610.
Adjusting the blade angle for 90° cuts on DSS611.
Procedure for checking and replacing carbon brushes.
List of recommended accessories for the tool.
| Blade Diameter | 165 mm |
|---|---|
| Max Cutting Depth at 90° | 57 mm |
| Max Cutting Depth at 45° | 40 mm |
| Battery Type | Lithium-Ion |
| Voltage | 18V |
| Max Cutting Capacity at 50° | 36 mm |
| Bevel Capacity | 0° - 50° |
| Arbor Size | 20 mm |
| Power Source | Cordless |
| No Load Speed | 3700 RPM |