Do you have a question about the Makita DTW700Z and is the answer not in the manual?
Lists compatible battery cartridges and chargers for the tool.
Details noise levels (sound pressure and power) for DTW700 and DTW701.
Precautions to prevent electric shock when using the power tool.
Measures to protect the operator's physical well-being during use.
Instructions for safe and proper handling, charging, and storage of battery packs.
Crucial safety guidelines for handling and using the battery cartridge.
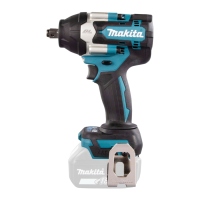
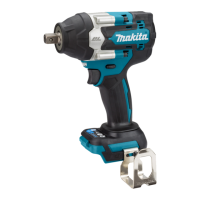
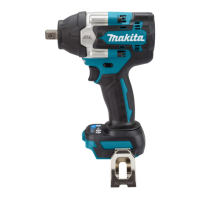
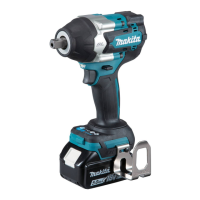
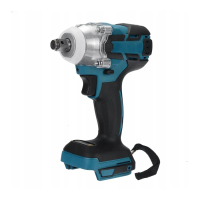
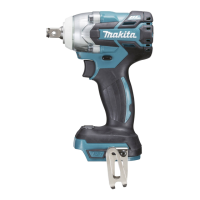
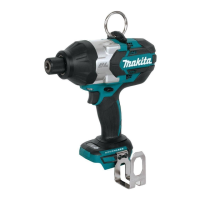
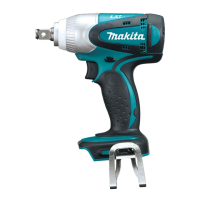
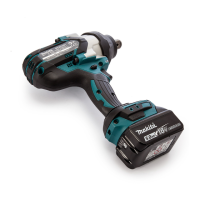
This document describes the Makita Cordless Impact Wrench models DTW700 and DTW701, providing detailed instructions for safe operation, various application modes, and maintenance.
The Makita Cordless Impact Wrench is designed for fastening bolts and nuts. It operates on a D.C. 18V battery and offers multiple impact force settings and application modes to suit different tasks. The tool is equipped with a tool/battery protection system that automatically cuts off power to extend tool and battery life under conditions such as overload, overheating, or low battery capacity.
Battery Cartridge Installation and Removal: To install the battery cartridge, align the tongue on the cartridge with the groove in the tool's housing and slide it in until it locks with a click. A red indicator on the button should no longer be visible when fully inserted. To remove, slide the button on the front of the cartridge and pull it out. Always ensure the tool is switched off before installing or removing the battery. Hold both the tool and battery cartridge firmly to prevent accidental drops and potential injury or damage.
Switch Action: The tool is started by pulling the switch trigger. Tool speed increases with increased pressure on the trigger and stops when the trigger is released. The tool will automatically stop if the trigger is pulled continuously for 6 minutes. The front lamp can be turned on or off by pressing the lamp status button for one second. When the lamp status is ON, pulling the switch trigger illuminates the lamp, which then turns off approximately 10 seconds after the trigger is released. If the tool overheats, the lamp will flash for one minute before turning off, indicating the need to cool down the tool.
Reversing Switch Action: The tool features a reversing switch to change the direction of rotation. Depress the lever from side A for clockwise rotation or from side B for counterclockwise rotation. Always check the direction of rotation before operating the tool and only change direction after the tool has come to a complete stop to prevent damage. When not in use, set the reversing switch lever to the neutral position, which also prevents the switch trigger from being pulled.
Changing Impact Force: The impact force can be adjusted in four steps: 4 (Max), 3 (Hard), 2 (Medium), and 1 (Soft). This allows for tightening suitable to the specific work. The impact force level changes each time the impact force button is pressed. This adjustment can be made within approximately one minute after releasing the switch trigger. The time to change the impact force can be extended by pressing the impact force button or the mode button. The panel displays the current impact force grade, with illuminated lamps indicating the selected level. All lamps on the switch panel turn off when the tool is switched off to conserve battery power.
Changing Application Mode: The tool offers several easy-to-use application modes for driving bolts with good control. The type of application mode changes each time the mode button is pressed. Similar to impact force, the application mode can be changed within approximately one minute after releasing the switch trigger, with the option to extend this time by pressing the mode button or the impact force button.
Full Speed Mode: When full speed mode is activated, the tool operates at its fastest speed without needing to fully pull the switch trigger. When off, speed increases with trigger pressure. To toggle full speed mode, press and hold the mode button. The lamp on the panel illuminates when full speed mode is on. This mode remains active even when switching between impact force and auto stop modes.
Installing Impact Sockets: For Model DTW700 (tool with ring spring, for sockets without O-ring and pin), push the impact socket onto the square drive until it locks into place. Pull it off to remove. For Model DTW701 (tool with detent pin):
Always ensure the impact socket and mounting portion are undamaged and firmly secured before use.
Installing Hook: The hook can be installed on either side of the tool for temporary hanging. Insert it into a groove in the tool housing and secure it with a screw. To remove, loosen the screw and take it out. Always secure the hook firmly to prevent personal injury.
Operation for Fastening: Hold the tool firmly and place the impact socket over the bolt or nut. Turn the tool on and fasten for the proper time. The fastening torque can vary based on bolt type, size, and workpiece material. Always perform a test operation to determine the correct fastening time for your specific bolt or nut. Avoid excessive fastening torque, which can damage the bolt/nut or impact socket. If the battery cartridge is discharged after continuous operation, allow the tool to rest for 15 minutes before using a fresh battery cartridge.
Factors affecting fastening torque include:
General Maintenance: Always ensure the tool is switched off and the battery cartridge is removed before performing any inspection or maintenance. Never use gasoline, benzine, thinner, alcohol, or similar substances, as they can cause discoloration, deformation, or cracks. For product safety and reliability, all repairs and adjustments should be performed by Makita Authorized or Factory Service Centers using genuine Makita replacement parts.
Battery Cartridge Care:
Cleaning: Use a dry cloth to wipe dirt off the lamp lens. Be careful not to scratch the lens, as this may reduce illumination.
| Motor type | Brushless |
|---|---|
| Product type | Impact wrench |
| Product color | Green |
| Built-in light | - |
| Adjustable speed | Yes |
| Drive size | 1/2 \ |
| Torque (max) | 700 N⋅m |
| Number of gears | 4 |
| Idle speed (max) | 2200 RPM |
| Idle speed (min) | 500 RPM |
| Idle speed (2nd gear) | 1200 RPM |
| Idle speed (3rd gear) | 1900 RPM |
| Idle impact rate (max) | 2700 IPM |
| Idle impact rate (min) | 1000 IPM |
| Power source | Battery |
| Battery included | No |