Do you have a question about the Makita XCV11Z and is the answer not in the manual?
Lists compatible Makita battery cartridges and chargers for the vacuum cleaner.
Ensure the tool is switched off and battery removed before adjustments or checks.
Remove battery before adjustments, accessory changes, or storage to prevent accidental starting.
Use only the manufacturer's specified charger to prevent fire risk.
Review all cautionary markings on the battery, charger, and product before initial use.
Disassembly of the battery cartridge is prohibited and can be dangerous.
Stop operation if battery life significantly decreases to prevent overheating or explosion risks.
Flush eyes with water and seek medical attention immediately if battery electrolyte contacts eyes.
Avoid shorting battery terminals with conductive materials or storing with metal objects.
Charge the battery when tool power is low to maximize service life.
Do not recharge a fully charged battery cartridge to prevent shortening its service life.
Charge battery cartridges at room temperature (10-40°C) and let hot ones cool first.
Recharge the battery cartridge if it will be stored for more than six months.
Instructions on how to correctly insert and remove the battery pack from the tool.
How to check the remaining battery charge using indicator lamps on the battery cartridge.
Details on the tool's systems that protect it and the battery during operation.
The tool automatically stops if it draws an abnormally high current to prevent damage.
The tool stops automatically if it overheats; allow it to cool before restarting.
The tool stops automatically when battery capacity is low; recharge the batteries.
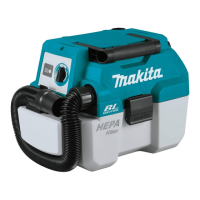
Shows battery capacity using indicator lamps and a check button on the tool itself.
Explains how to use the switch lever for vacuuming and blowing modes.
Float mechanism prevents motor immersion when tank is full during wet pickup.
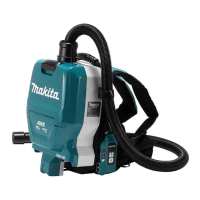
Details on how to use the retractable handle for carrying the cleaner.
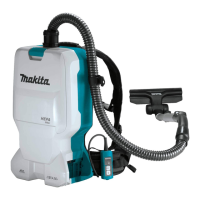
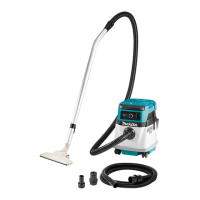
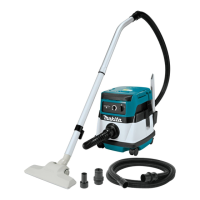
Instructions for connecting the hose and nozzle for vacuum cleaning.
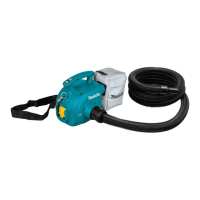
Instructions for connecting the hose to the blower outlet for blowing air.
Guidance on properly connecting the hose to the tool for various functions.
Steps for operating the tool for vacuum cleaning and emptying the tank.
Instructions on how to operate the tool for blowing air and safety precautions.
Procedure and safety warnings for emptying the vacuum cleaner's tank.
This document provides instructions for the Makita Cordless Portable Vacuum Cleaner, model XCV11. It covers safety warnings, functional descriptions, assembly, operation, and maintenance.
The manual emphasizes several important safety instructions for using the appliance. Users are warned not to leave the appliance unattended when the battery is fitted and to remove the battery before servicing. It should not be used as a toy, especially near children, and must only be used as described in the manual with manufacturer-recommended attachments. The appliance should not be used with a damaged battery. If it malfunctions, is dropped, damaged, left outdoors, or dropped into water, it should be returned to a service center. Users should avoid handling the battery or appliance with wet hands.
Further safety guidelines include not putting objects into openings, ensuring openings are free of dust, lint, hair, and anything that might reduce airflow. Hair, loose clothing, fingers, and all body parts should be kept away from openings and moving parts. All controls must be turned off before removing the battery cartridge. Extra care is advised when cleaning on stairs. The cleaner should not be used to pick up flammable or combustible liquids like gasoline, nor in areas where such substances may be present. Only the manufacturer-supplied charger should be used for recharging. Users should not pick up burning or smoking items such as cigarettes, matches, or hot ashes. The cleaner must not be used without filters, and damaged filters should be replaced immediately. The battery should not be charged outdoors or exposed to rain; it should be stored indoors. The cleaner should not be used as a stool or workbench to prevent personal injury from falling.
The manual lists specific substances that should not be vacuumed, including:
Such actions can cause fire, injury, and/or property damage. To reduce exposure to chemicals, approved respiratory protection, such as dust masks designed to filter microscopic particles, should always be worn. Exhaust air should be directed away from the face and body. The manual also advises reading OSHA regulations on silica dust for requirements to reduce exposure at job sites, noting specific rules for drilling, demolition cutting, and grinding materials containing silica.
To prevent unintentional starting, ensure the switch is in the off position before connecting the battery pack, picking up, or carrying the appliance. Disconnect the battery pack before making adjustments, changing accessories, or storing the appliance. Recharge only with the manufacturer-specified charger. Using an unsuitable charger can create a fire risk. Use appliances only with specifically designated battery packs; other battery packs may cause injury and fire. When not in use, keep the battery pack away from other metal objects that could short the terminals, which can cause burns or fire.
Under abusive conditions, liquid may be ejected from the battery; avoid contact. If contact occurs, flush with water and seek medical attention if liquid contacts eyes. Do not use a damaged or modified battery pack or appliance, as they may exhibit unpredictable behavior leading to fire, explosion, or injury. Do not expose the battery pack or appliance to fire or excessive temperature (above 130 °C) to prevent explosion. Follow all charging instructions and charge the battery pack within the specified temperature range; improper charging can damage the battery and increase fire risk. Servicing should be performed by a qualified repair person using identical replacement parts to maintain product safety. Do not modify or attempt to repair the appliance or battery pack except as indicated in the instructions for use and care. These instructions are intended for commercial use.
The manual also provides important safety instructions for the battery cartridge:
Users are cautioned to use only genuine Makita batteries, as non-genuine or altered batteries may burst, causing fires, personal injury, and damage, and will void the Makita warranty.
Tips for maintaining maximum battery life include:
Before adjusting or checking the tool's function, ensure it is switched off and the battery cartridge is removed.
Always switch off the tool before installing or removing the battery cartridge. Hold the tool and battery cartridge firmly during installation or removal to prevent them from slipping and causing damage or personal injury. Be careful not to pinch fingers when opening or closing the battery cover. To install, open the battery cover, align the tongue on the battery cartridge with the groove in the housing, and insert it until it clicks into place. Then close the battery cover. The battery cover locks when opened to the upright position. To remove, slide the battery cartridge from the tool while sliding the button on the front of the cartridge. Always install the battery cartridge fully until the red indicator is no longer visible to prevent it from accidentally falling out. Do not force the battery cartridge; if it does not slide in easily, it is not inserted correctly.
For battery cartridges with an indicator, press the check button to illuminate indicator lamps for a few seconds, showing the remaining battery capacity. The manual provides a table correlating the number of lit lamps with remaining capacity (75-100%, 50-75%, 25-50%, 0-25%, charge battery, or battery malfunction). Note that the indication may differ slightly from actual capacity depending on use conditions and ambient temperature.
The tool is equipped with a protection system that automatically cuts off power to the motor to extend tool and battery life under certain conditions:
Before installing the battery cartridge, ensure the slide switch actuates properly and returns to the "OFF" position when depressed. The cleaner offers two suction power types: normal "1" or high "2," selectable based on work needs. To start, set the switch lever to "1" or "2." To turn off, set it to "O."
The cleaner has a float mechanism that prevents water from immersing the motor when a certain amount of water is picked up. When the tank is full and the cleaner no longer picks up water, switch it off and empty the tank. Warnings: Do not use for a long time while the float is at work, as this can cause overheating, deformation, smoke emission, or fire. Do not pick up foam or soapy liquid, as foam can exit the air vent before the float works, potentially causing electric shock and cleaner breakage.
When carrying the cleaner, hold it by the handle on the head. The handle is retractable when not in use. If water is in the tank, switch off the cleaner and empty the tank before carrying to prevent leaks.
Always ensure the tool is switched off and the battery cartridge is removed before performing any work on the tool. Always wear a dust mask during assembly or maintenance.
Never force the hose for bending or stamping, and never move the cleaner by the hose, as this can cause breakage or deformation. Do not pick up large wastes like planer carvings or concrete pieces, as this can cause hose stuffing and damage.
Attach the wide nozzle, sash nozzle, or other optional nozzles depending on the purpose. Twist and insert the nozzle to the end of the hose.
To connect a tool, connect the end of the hose to the tool's extraction outlet. Depending on the tool, an optional joint 22-38 or front cuff 24 may be needed. When connecting the tool, always ensure the hose is connected to the suction inlet on the cleaner.
The hose and nozzles can be stored on the tool. The sash nozzle and wide nozzle can be stored as illustrated. When storing the hose, loop it on the tool and fix it with the hook.
Attach the hooks of the shoulder strap onto the mounts of the cleaner as shown in the figure.
Before use, ensure the HEPA filter, damper, prefilter, and tank are dry after picking up water or wet dust, as wet filters can reduce suction power.
Always ensure the tool is switched off and the battery cartridge is removed before attempting inspection or maintenance. To reduce contact with dust, use goggles and a dust mask when emptying the tank or cleaning the filter. Never use gasoline, benzine, thinner, alcohol, or similar substances, as they can cause discoloration, deformation, or cracks. For product safety and reliability, repairs and other maintenance should be performed by Makita Authorized or Factory Service Centers using genuine Makita replacement parts.
Warnings: Always ensure the cleaner is switched off and the battery cartridge is removed before emptying the tank to prevent electric shock and serious personal injury. Do not apply great impact on the tank, as it can cause deformation and damage. Empty the tank at least once a day, depending on picked-up dust volume, as suction force will weaken and the motor may break. Do not grab the hook when emptying the tank, as it may break. Unhook and lift up the tank cover. Shake off the dust from the HEPA filter and dispose of the dust from the tank.
Do not rub or scratch the HEPA filter with hard objects such as a brush or paddle. A clogged HEPA filter causes poor suction performance, so clean it regularly.
These accessories or attachments are recommended for use with the Makita tool specified in this manual. Using other accessories or attachments may present a risk of injury. Only use accessories or attachments for their stated purpose. For assistance or more details, contact a local Makita Service Center. Optional accessories include:
| Quantity per pack | 1 pc(s) |
|---|