R
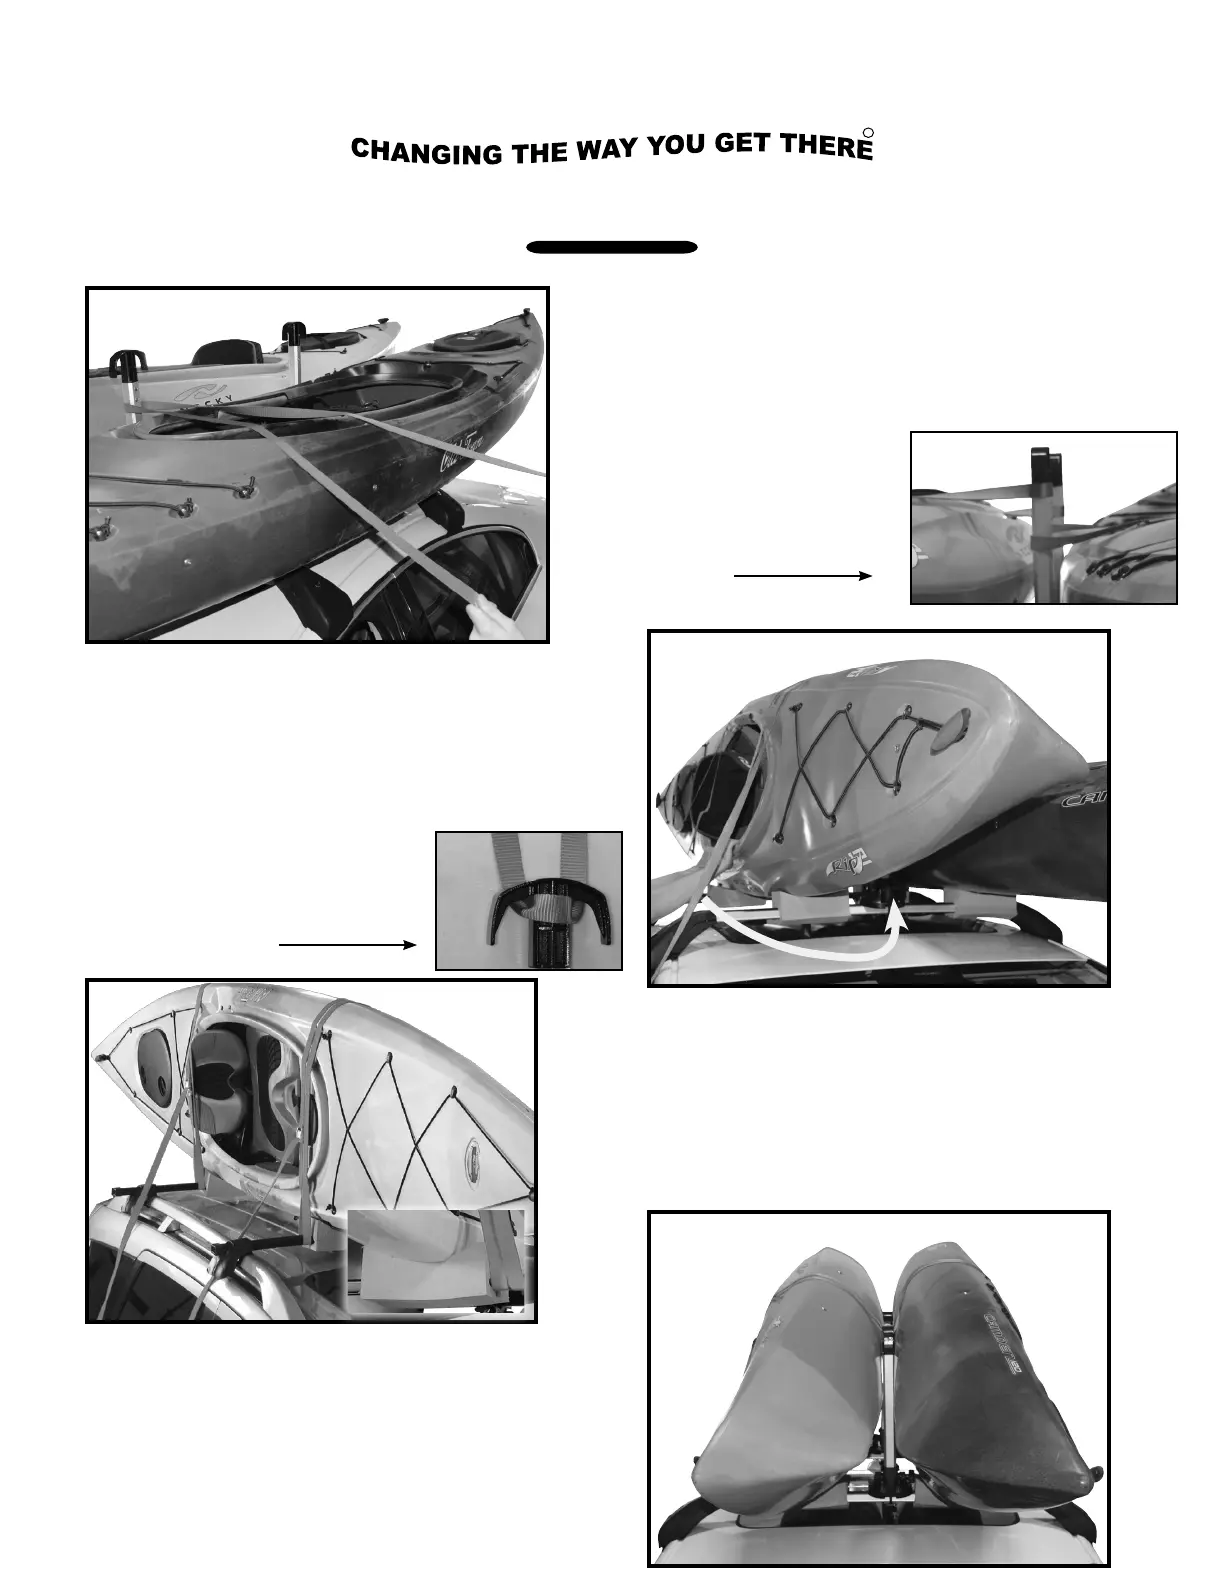
. Place the 1st kayak onto the foam
blocks and against the carriers. Place
the loops over the kayak. Dress the
free ends of the straps under the
cross bar and back up and through the
buckles. Pull down to tighten.
See image 13.
. Place the strap loops parallel to the carriers
with the front strap loop on the windshield
and the rear strap loop on the back of the
vehicle. See image 12. Note: If only one
kayak will be transported, route the free end
of each load strap under the cross bar (behind
the carrier) prior to placing the loop in image
12. This will engage the cross bar providing
more strength to the installation.
. Confirm that the kayak is evenly seated on
the foam blocks and securely strapped to
the carriers. See image 14.
Installation & Loading Instructions - MPG115MD Stax Pro2
TM
12
13
. Repeat steps 11-14 for loading the
second kayak. See image 15.
14
15
En tenant la boucle d’une main et l’extrémité libre
de l’autre, lancer ou projeter la sangle par-dessus le
kayak et autour de la tige Stax. Voir image 12.
Répéter l’opération pour
le Stax arrière et ensuite
pour le deuxième kayak.
Voir image 12A.
13
Serrer à fond les sangles en faisant passer l’ex-
trémité libre sous la barre transversale et ensuite
dans les boucles. Tirer pour serrer. S’assurer que le
kayak repose également sur les coussinets et qu’il
est attaché solidement au support. Répéter l’opéra-
tion pour la sangle de fixation arrière. Voir image 14.
12
Faire pivoter le « deuxième » kayak vers le
haut jusqu’en position sur le côté et l’attacher
en premier. Voir image 13.
Ce mouvement rotatif sert à tirer les sangles
vers le haut en position
sous la tête du support.
Voir image 13A.
Faire pivoter le « premier » kayak jusqu’en
position. Ce procédé permet encore une fois
de tirer le deuxième ensemble de sangles
vers le haut et sous les premières sangles
déjà serrées. Répéter les étapes 12 à 14
pour arrimer le « premier » kayak. Voir image
15.
. Place the 1st kayak onto the foam
blocks and against the carriers. Place
the loops over the kayak. Dress the
free ends of the straps under the
cross bar and back up and through the
buckles. Pull down to tighten.
See image 13.
. Place the strap loops parallel to the carriers
with the front strap loop on the windshield
and the rear strap loop on the back of the
vehicle. See image 12. Note: If only one
kayak will be transported, route the free end
of each load strap under the cross bar (behind
the carrier) prior to placing the loop in image
12. This will engage the cross bar providing
more strength to the installation.
. Confirm that the kayak is evenly seated on
the foam blocks and securely strapped to
the carriers. See image 14.
Installation & Loading Instructions - MPG115MD Stax Pro2
TM
12
13
. Repeat steps 11-14 for loading the
second kayak. See image 15.
14
15
14
. Place the 1st kayak onto the foam
blocks and against the carriers. Place
the loops over the kayak. Dress the
free ends of the straps under the
cross bar and back up and through the
buckles. Pull down to tighten.
See image 13.
. Place the strap loops parallel to the carriers
with the front strap loop on the windshield
and the rear strap loop on the back of the
vehicle. See image 12. Note: If only one
kayak will be transported, route the free end
of each load strap under the cross bar (behind
the carrier) prior to placing the loop in image
12. This will engage the cross bar providing
more strength to the installation.
. Confirm that the kayak is evenly seated on
the foam blocks and securely strapped to
the carriers. See image 14.
Installation & Loading Instructions - MPG115MD Stax Pro2
TM
12
13
. Repeat steps 11-14 for loading the
second kayak. See image 15.
14
15
12A
15
13A
 Loading...