Installation & Loading Instructions - Please Read Before Beginning
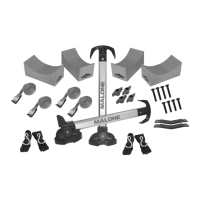
12’ Tie-Downs
Jawz Adapters Mounting Bolts
40mm
50mm
Stax Pro2 Kayak Carrier
Red Load Straps
Cogs
1
2
3
. Insert a 100mm bolt into the square
hole located in the top of the base.
See image 2.
Step 1: Assembling the Stax Pro2
. Insert the bottom of the post into the
top of the base. Position so the cogs
on the post are in contact with the
cogs on the base. See image 1.
. With the holes in the base and post aligned,
push the bolt through the two assemblies
until the end of the bolt is exposed.
Note: Confirm that the head of the bolt is
fully seated into the base. See image 3.
TM
Foam Blocks
9’ Safety Strap
TWO KAYAK VERTICAL FOLD-DOWN CARRIER
S P
O
XTA
R
2
TM
TM
Cogs
1
2
3
60mm
Installation & Loading Instructions - Please Read Before Beginning
12’ Tie-Downs
Jawz Adapters Mounting Bolts
40mm
50mm
Stax Pro2 Kayak Carrier
Red Load Straps
Cogs
1
2
3
. Insert a 100mm bolt into the square
hole located in the top of the base.
See image 2.
Step 1: Assembling the Stax Pro2
. Insert the bottom of the post into the
top of the base. Position so the cogs
on the post are in contact with the
cogs on the base. See image 1.
. With the holes in the base and post aligned,
push the bolt through the two assemblies
until the end of the bolt is exposed.
Note: Confirm that the head of the bolt is
fully seated into the base. See image 3.
TM
Foam Blocks
9’ Safety Strap
TWO KAYAK VERTICAL FOLD-DOWN CARRIER
S P
O
XTA
R
2
TM
TM
Blue Safety Strap
Safety Tie-Downs
Load Straps (4)
StaxPro2 Carriers
T-Knobs
50mm
60mm
Jawz Brackets
R
Installation & Loading Instructions - Please Read Before Beginning
12’ Tie-Downs
Jawz Adapters Mounting Bolts
40mm
50mm
Stax Pro2 Kayak Carrier
Red Load Straps
Cogs
1
2
3
. Insert a 100mm bolt into the square
hole located in the top of the base.
See image 2.
Step 1: Assembling the Stax Pro2
. Insert the bottom of the post into the
top of the base. Position so the cogs
on the post are in contact with the
cogs on the base. See image 1.
. With the holes in the base and post aligned,
push the bolt through the two assemblies
until the end of the bolt is exposed.
Note: Confirm that the head of the bolt is
fully seated into the base. See image 3.
TM
Foam Blocks
9’ Safety Strap
TWO KAYAK VERTICAL FOLD-DOWN CARRIER
S P
O
XTA
R
2
TM
TM
 Loading...