Press MENU
Select 'Settings'
Select 'Tuning'
Select 'Smart Retune' and follow the on-screen instructions
An incompatible HDMI resolution has been selected
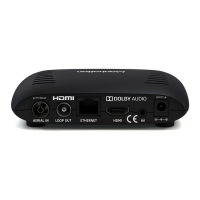
If you are using HDMI, the T1 may be set to an HDMI resolution that your TV does not support:
Normally the T1 is set to auto detect the HDMI resolution but this can fail with some
TVs.
The T1 can also be manually set to a resolution in the Picture & Sound section of the
Settings menu. This could cause an issue if you set a resolution (e.g. 1080p), then move
the T1 to another TV that doesn't support that resolution.
The T1 can automatically cycle through the available resolutions until you find one that works:
Turn the T1 on and wait 30 seconds.
Press MENU.
Press & Hold ‘0’ for 5 seconds.
The T1 will try each of the 3 HD resolutions for 15 seconds in this order: 1080p, 1080i
and 720p. Select ‘Confirm’ when you can see the picture.
Why is my Manhattan T1 not tuning all the channels? Why are some channels not working?
It is likely that the signal from your TV aerial is weak. Indoor aerials are particularly poor and
extremely sensitive to direction, meaning they will often tune some channels when placed in one
position and a whole different set when placed in another. If you have an outdoor aerial, it may
not be aligned correctly to receive signals from your local transmitter.
If you've moved your T1 to a new location (e.g. you've moved house), you should try retuning:
Press MENU
Select 'Settings'
Select 'Tuning'
Select 'Smart Retune' and follow the on-screen instructions
Why there is no sound on HD channels?
HD channels are broadcast with Dolby Digital audio. If you cannot hear any sound on HD
channels, it is likely that your TV does not support Dolby Digital but Surround Sound is selected
in the Picture & Sound section of the Settings menu. Change the 'Audio Output' setting to 'Stereo
PCM' to resolve the issue.
 Loading...