Do you have a question about the ManoMano ME901 and is the answer not in the manual?
Overview of the ME901 smart Wi-Fi wireless low power consumption heating thermostat for electric actuated valve control.
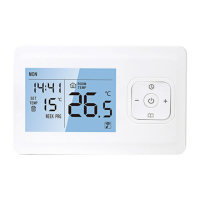
Instructions for basic thermostat operations: power, mode, temperature setting, clock, and lock functions.
Details on how the thermostat automatically manages heating to prevent freezing below 5°C.
Guide to setting up weekly programmable schedules with different temperatures for 6 periods daily.
Key technical specifications for the thermostat and wireless receiver, including power, accuracy, and operating ranges.
Step-by-step instructions for pairing the thermostat with the wireless receiver using the 'Pair Code' function.
Instructions for physically mounting the thermostat unit and placing it on a desk with a stand.
Guide to accessing and configuring advanced settings by holding the mode key for 5 seconds.
Steps to put the receiver into network initial state and connect it to the router.
Instructions for downloading the 'Tuya Smart' app and adding the thermostat to the network.
Guide on how to share the thermostat device control with other users via the app.
Procedure for exiting the network configuration state for both the thermostat receiver and mobile app.
The ME901 is a smart Wi-Fi wireless low-power consumption heating thermostat featuring an LCD display. It is designed for electric actuated valve control of water heating systems and offers weekly programmability with up to six periods per day, each with a different temperature setting. The thermostat allows for heating control via wireless remote access and a dedicated app, in addition to manual and period control modes.
The thermostat's primary function is to regulate room temperature by controlling a heating device based on a set temperature. It supports both manual and programmable modes. The programmable mode allows users to define specific temperature settings for different times of the day across a weekly schedule. An anti-frozen function automatically activates heating if the room temperature drops below 5°C and deactivates it when the temperature rises above 7°C, even when the thermostat is in shutdown mode. The device also includes a locking mechanism to prevent unauthorized changes to settings.
To enter programming mode, long press the "mode" key for 5 seconds while the thermostat is off. Users can switch parameters using the "mode" key. For each period, the "mode" key adjusts hours, then minutes, and finally temperature. The programming icon indicates the current period: 1. Wake-up, 2. Leave, 3. Return (am), 4. Leave (pm), 5. Return (pm), 6. Sleep.
Press the "mode" key for 5 seconds while the thermostat is off to enter advanced settings. Parameters like temperature calibration, switching differential, anti-frozen function, period modes (5+2, 6+1, 7+0 day), maximum temperature limit, and lower temperature limit can be adjusted. A factory reset option is available by pressing and holding "+" for 5 seconds in this mode.
Press the "mode" key on the receiver for 5 seconds. When the power indicator is off and the heating on indicator flickers, the control panel enters the initial network state. At this point, the receiver exits the network (also known as the distribution network state).
The product comes with a 2-year warranty. Damages caused by human factors, irresistible forces, or power failure are not covered. Beyond the warranty period or for damages caused by human factors, the product needs to be returned to the maintenance company, and a maintenance fee will be charged.
| Brand | ManoMano |
|---|---|
| Model | ME901 |
| Category | Thermostat |
| Language | English |