EasyManua.ls Logo

MantelMount MM340 - User Manual

MantelMount MM340
5 pages
Print Icon
To Next Page IconTo Next Page
Loading...
!
Caution this product is intended to be
installed by professional installation contractors,
or persons familiar with the tools and methods
required for this installation. If you are not sure
about your ability to perform this installation,
you must contact a professional. MantelMount is
not responsible for damage or injury caused by
incorrect installation or improper use.
!
Caution do not let children operate, pull on,
or hang from MantelMount. Do not let children
push MantelMount upward to the top position
- this will cause the mount to slam against the
wall due to the upward force of the springs. Only
a person tall enough to control the mount all the
way to the top should operate MantelMount.
!
Caution do not use this product in any
way, or for any purpose, that is not specically
described in these instructions. MantelMount is
not responsible for damage or injury caused by
incorrect installation or improper use.
!
Warning this product contains small parts
that can be a choking hazard. Do not let children
play with any of these small parts! Keep children
away from the work area during installation.
RB100 Recess Box Kit Installation Instructions
For Use with MantelMount Models
This Addendum is not a stand-alone set of instructions,
it is only to be used together with your MantelMount
Installation Manual.
This addendum replaces Steps 1.5, ALL OF Step Two
(Determine Wall Placement), and Step Three (Attach
Mount to Wall) of your installation guide.
You must complete every step in the Installation Manual
unless there is a replacement step in this Addendum.
Please read the entire Installation Manual and also this
entire Addendum before you begin. Do not unpack the
contents of any MantelMount package until you verify that
your installation meets all of the requirements listed in
both documents.
MM340 MM540 MM700
MM710 MM720
Please read this entire manual
before you begin.
Do not unpack any contents
until you verify additional
requirement on PAGE 2.
If you need help, call 1.800.897.9755 ext.1
For missing/damaged parts or questions during installation, contact our Customer Support team at 1.800.897.9755 ext.
or support@mantelmount.com. Customer satisfaction is our highest priority!

Other manuals for MantelMount MM340

Question and Answer IconNeed help?

Do you have a question about the MantelMount MM340 and is the answer not in the manual?

Summary

Before Installation

Verify All Parts Included

Confirm all components are present and undamaged before proceeding with installation.

Review Recess Box Installation Options

Examine different methods for installing the RB100 Recess Box on custom or standard wall studs.

STEP 2 Determine Wall Placement

Vertical Brace Mounting Height

Mount vertical braces between 7-10 inches from the bottom of the TV or soundbar.

Measure Final Vertical Brace Distance

Record the measured distance of the vertical braces for use in subsequent steps.

Determine Mantel to Recess Opening Distance

Use the provided table to find the minimum distance between the mantel and the cutout opening.

Locate Wall Studs and Centerline

Mark the mantle centerline and locate wall studs for precise mounting.

Cut Drywall Opening

Trace and cut the drywall opening using the template, ensuring plumb and avoiding fireplace components.

STEP 3 Attach Mount to Wall

Align Recess Brace to Studs

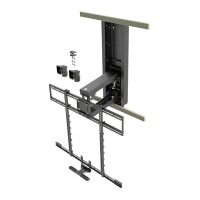
Align a recess brace to the studs, ensuring an equal amount extends past each stud.

Install Recess Braces to Recess Box

Attach recess braces to the recess box using screws and locknuts, tightening securely.

Mark Lag Bolt Locations

Temporarily fit the recess kit and mark lag bolt locations on the stud centers.

Pre-drill Pilot Holes

Pre-drill four holes with a 7/32" drill bit to a depth of 2.5 inches.

Attach Recess Kit with Lag Bolts

Secure the recess kit to the studs using lag bolts and washers, compensating for drywall thickness.

Attach TV Brace to Lifting Arm

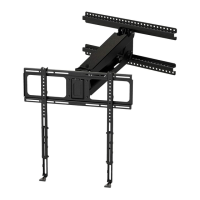
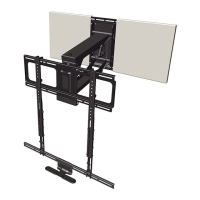
Hang the TV brace onto the lifting arm and ensure it is level when tightening leveling screws.

Install Adapter Plate for MM340;MM540

Attach the SSB40 adapter plate to the lifting mechanism for MM340/MM540 models.

Insert Cable Tie Anchors

Insert cable tie anchors into the front holes on the lower part of the lifting arm.

Attach Cables with Cable Ties

Use cable ties to attach cables to the lifting arm, ensuring sufficient length for movement.

Overview

The MantelMount RB100 Recess Box Kit is an accessory designed to be used with specific MantelMount models (MM340, MM540, MM700, MM710, MM720) to allow for a recessed installation of the television mount. This addendum serves as a replacement for certain steps in the standard MantelMount Installation Manual, specifically Steps 1.5, all of Step Two (Determine Wall Placement), and Step Three (Attach Mount to Wall). It is crucial to use this addendum in conjunction with the main installation manual, completing all steps from the manual unless explicitly replaced by this document. Users are advised to read both the entire Installation Manual and this Addendum thoroughly before beginning the installation process.

Function Description:

The primary function of the RB100 Recess Box Kit is to enable a flush-to-wall installation of compatible MantelMounts. By recessing the mount into the wall, it provides a cleaner, more integrated aesthetic, reducing the projection of the mount and TV from the wall when in the stowed position. This kit modifies the installation process to accommodate the recess box, which houses a significant portion of the mount's mechanism within the wall cavity. It is designed to work with both custom-built wall studs and standard wall stud configurations, offering flexibility in installation. The recess box also incorporates features to manage cable routing and ensure proper functionality of the MantelMount's lowering and swiveling actions.

Important Technical Specifications:

  • Compatibility: Designed for MantelMount models MM340, MM540, MM700, MM710, MM720.
  • Recess Box Dimensions (Cutout Size):
    • Width: 7.4 inches (188mm)
    • Height: 28.2 inches (717mm)
  • Recess Box Depth: 3.7 inches.
  • Overall Dimensions (Recess Box):
    • Thickness: 1.75 inches (flange thickness)
    • Maximum Drop: 27.0 inches
    • Minimum Clearance: 12.0 inches
    • Maximum Clearance: 16.0 inches
  • Wall Stud Requirements:
    • Custom Built Wall Studs: Requires new wall studs to fit the exact dimensions of the Recess Box. The stud opening is 716mm tall and 187mm wide. The Recess Box is installed using wood screws (not included), with at least six screws per inner side and two per top and bottom flanges.
    • Standard Wall Studs: The Recess Box attaches to Recess Braces {63} which span horizontally to reach nearest studs. Braces are attached to studs with Lag Bolts. Drywall opening is cut using an included cardboard template. Longer Braces are available if existing studs are too far apart.
  • Wall Covering Thickness: Pre-drilling for lag bolts requires a 7/32" drill bit to a depth of 2.5 inches (65mm), including wall covering. Wall covering (drywall) must not exceed 5/8" thickness.
  • Mantel Depth Reduction: Installation with the Recess Box will reduce the maximum allowable mantel depth depending on the MantelMount model:
    • MM340, MM540, MM720: Maximum Mantel Depth reduced to 15 inches.
    • MM700, MM710: Maximum Mantel Depth reduced to 12 inches.
  • Vertical Brace Placement: Vertical Braces {31} must be mounted between 7 and 10 inches from the bottom of the TV (or soundbar if used) to hide the bottom of the Recess Box.
  • Parts Included (RB100 Addendum Kit):
    • Washer M8 {11} x4
    • Round Head Screw M8 x 16 {14} x4
    • Round Head Screw M6 x 10 {15} x2
    • Nut M6 {23} x2
    • Locknut M8 {52} x4
    • Recess Box {61} x1
    • Recess Brace 26" max spacing {63} x2
    • Brace Cover {64} x4
    • Cardboard Template {66} x1
    • Addendum MM340-MM540 {67} x1 (This likely refers to the SSB40 Adapter Plate, which is required for MM340/MM540 models and sold separately, but the addendum kit itself includes a reference to it).
  • Additional Components Required (Sold Separately/Not Included):
    • SSB40 Adapter Plate (for MM340 and MM540 models).
    • Wood screws (for custom stud installation and attaching cut stud ends to recess box).
    • Lag Bolts (included with MantelMount MM340-MM540 for standard wall stud installation).

Usage Features:

  • Recessed Installation: Allows the MantelMount to be installed flush with the wall, providing a sleek, integrated look.
  • Reduced Projection: Minimizes the distance the TV and mount project from the wall when in the stowed position.
  • Compatibility with Existing Studs: Offers an installation option for standard wall stud configurations using horizontal Recess Braces.
  • Custom Stud Option: Provides instructions for installing new wall studs to perfectly frame the Recess Box for a highly customized setup.
  • Cable Management: Includes provisions for routing cables, ensuring they are not pinched or damaged during the mount's operation. Cable Tie Anchors {22} are inserted into the Lifting Arm, and Cable Ties {24} are used to secure cables, allowing for the mount's full range of motion.
  • Adjustable Placement: The installation guide provides detailed tables (Look-Up Tables) to determine the minimum distance between the mantel and the bottom of the cutout opening, based on mantel depth and vertical brace placement, ensuring proper clearance for the TV's movement.
  • Brace Covers: Paintable Brace Covers {64} are included to conceal the Recess Braces {63} for a finished look that can match the wall color.
  • Tilt Functionality Note: It's important to note that the tilt function of the MantelMount will only work when the mount is pulled away from the wall or in the down position. When returning the mount to the stowed position, the tilt should be brought back to a neutral upright position to avoid hitting the wall. The Recess Box also reduces the amount of side-to-side swivel when the mount is in the stowed position.

Maintenance Features:

  • The manual emphasizes careful installation to prevent damage or injury.
  • It advises against over-tightening Lag Bolts {17} to prevent property damage.
  • Users are warned not to cut or damage fireplace components during installation, as this can lead to dangerous gas leaks. Professional consultation is recommended if uncertain.
  • The document highlights that MantelMount is not responsible for damage or injury caused by incorrect installation or improper use, underscoring the importance of following instructions carefully.
  • For missing/damaged parts or questions during installation, customer support is available via phone and email, indicating a commitment to assisting users with proper setup.

Safety Warnings and Cautions:

  • Choking Hazard: The product contains small parts; keep children away from the work area and prevent them from playing with these parts.
  • Improper Use: Do not use the product in any way or for any purpose not specifically described in the instructions.
  • Child Safety: Do not let children operate, pull on, or hang from the MantelMount. Do not let children push the MantelMount upward to the top position, as this can cause it to slam against the wall. Only a person tall enough to control the mount all the way to the top should operate it.
  • Professional Installation Recommended: This product is intended to be installed by professional installation contractors or persons familiar with the required tools and methods. If unsure about installation ability, contact a professional.
  • Fireplace Components: Do not cut or damage fireplace components during installation, as this can lead to gas leaks and severe injury or death. Consult a gas or fireplace professional if uncertain.
  • Gas Springs: Do not damage or scratch the rods of the Gas Springs.
  • Over-tightening Lag Bolts: Do not over-tighten Lag Bolts {17}, as this can cause property damage or injury.

MantelMount MM340 Specifications

General IconGeneral
BrandMantelMount
ModelMM340
CategoryRacks & Stands
LanguageEnglish

Related product manuals