EasyManua.ls Logo

Marcum Technologies LX Series User Manual

Marcum Technologies LX Series
2 pages
To Next Page IconTo Next Page
Page #1 background imageLoading...
Page #1 background image
Warranty
MarCum warranties this product to be free from defects in materials and
workmanship for two years from the date of purchase. The warranty of the
battery may differ from the system warranty, see website for details. This
warranty applies to customers who properly complete the online product
registration form found on the MarCum Technologies Website:
www.MarCumTech.com
LX-Series
Digital Ice-Sonar
Quick Start Guide
Service
If your unit is malfunctioning, check the support section of our website.
You may find that the solution to your problem is something you can
resolve yourself. If you need to send it in, there is no need to contact our
office. Getting repairs made is as simple as going to our website,
MarCumtech.com clicking the support tab and then filling out the MarCum
Warranty claim.
Camera Functions
The camera of your LX-9L can be used to search for that perfect weed line
or locate the crib or rock pile where fish will generally school, entertain the
kids, or as the perfect tool to enhance your ice fishing experience. To use
the camera, make sure the camera cable is attached to the pigtail video
plug coming out of the back of your monitor. Press the MENU button and
highlight “View Mode”. Selecting “Camera”, “Heads Up”, or “Split Screen”
will allow video from your Manta camera to be displayed in various config-
urations.
The MENU Key, which also functions as the ENTER Key, opens up five
sub-menus. They are as follows:
VIEW MODE – here you select between sonar only, camera only, “heads--
up” [featuring sonar on top of video], and split screen.
DISPLAY OPTIONS – this is where you customize your display by select-
ing which sonar features, color palette, background and other features are
displayed on your dashboard
PLAY/RECORD – this is where you make and playback recordings,
adjust your camera settings, and turn the camera light on/off.
SONAR SETTINGS – this is where you may adjust sensitivity, target
adjust, zoom, and other sonar related features.
SYSTEMS SETTINGS – calibrations and other system settings are
adjusted here
Charging
To charge, simply couple the end of the charger with the end of the wiring
harness. It is also normal for the light on the charger to be green if it is just
plugged into the wall. When it is plugged into the wall and battery, you will
see a red LED light appear on the charger. If the light is red, the battery is
being charged. When your battery is fully charged, this red light should
change to green.
MarCum User Manuals are available for download from www.MarCumTech.com
Les manuels d'utilisation de MarCum sont disponibles en téléchargement sur www.MarCumTech.com
*Actual run times may vary depending on conditions.
22-1012-80029 2020-0501
www.MarCumTech.com

Other manuals for Marcum Technologies LX Series

Question and Answer IconNeed help?

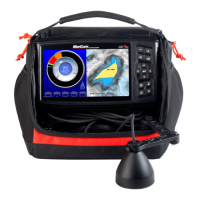
Do you have a question about the Marcum Technologies LX Series and is the answer not in the manual?

Marcum Technologies LX Series Specifications

General IconGeneral
DisplayVarious - LED, LCD, or Color LCD
Depth CapabilityVaries by model (e.g., 200 ft, 300 ft, 1000+ ft)
Power OutputVaries by model (e.g., 1500 Watts Peak-to-Peak)
Battery LifeVaries by model (up to 20 hours)
Target SeparationVaries by model (e.g., as low as 2.15 inches)
Transducer Frequency200 kHz
Display TypeColor
Interference RejectionYes
Beam Angle20 degrees

Summary

Camera Functions

View Mode

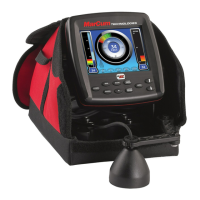
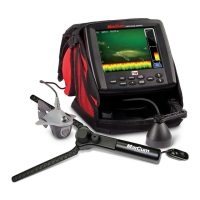
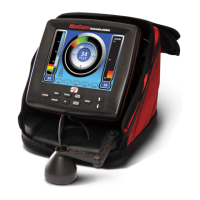
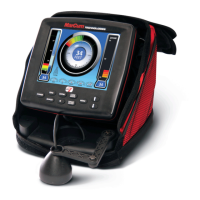
Select display configuration: sonar only, camera only, heads-up, or split screen.

Display Options

Customize display settings including sonar features, color palette, and background.

Play/Record

Make and playback recordings, adjust camera settings, and control camera light.

Sonar Settings

Adjust sonar sensitivity, target adjust, zoom, and other sonar related features.

Charging

Warranty

Service

System Setup and Operation

Connect Power

Connect the red wire to the red terminal and black wire to the black terminal on the battery.

Deploy the Transducer

Level transducer in ice hole using arm and stopper, then deploy into water.

Power Up System

Press Power Button; factory settings activate, allowing use or menu customization.

Adjust Range

Select from nine fixed ranges or create custom ranges using Dynamic Depth feature.

Adjust Gain

Press SENS button, use UP/DOWN to adjust sensitivity for clear bottom and lure display.

Sonar Feature Adjustments

Bottom Return

Understand display signals: RED for hard bottom, RED/GREEN for soft bottom, YELLOW for weeds.

Zoom Function

Select zoom window upper limit to focus display on specific depths in water column.

Target Adjust

Change signal size without increasing sensitivity for finer display tuning.

IR Button

Activate Interference Rejection (12 levels) to clear display clutter caused by other sonar units.

Adjust Cone Angle

Switch between 20-degree and 8-degree cone angles to change sonar footprint.

Power Options

LiFePO4 (L-Series)

Lightweight, long-lasting power source with reduced weight and faster recharge rates.

Lithium Shuttle (Li-Series)

Expand unit run time with a 12-volt Lithium ION battery, includes LED, USB ports, rod holders.

Related product manuals