EN
26
ashing. Automatic synchronising with the DCF
signal is carried out at 01.00, 02.00 and 03.00
to set the exact time. If the synchronisation
fails (the radio mast icon disappears from
the display) a new synchronisation attempt
will be made one hour later. This is repeated
automatically up to 5 times.
Manual search
1. Start a manual search for a DCF signal by
pressing the UP button for 2 seconds. If no
signal is received in 7 minutes the search
for a DCF signal will stop (the radio mast
icon goes o) and a new search will be
made automatically in half an hour.
2. Press the UP button to cancel the search
for a radio signal.
IMPORTANT:
• A ashing radio mast icon shows that
searching for a DCF signal is in progress.
• A constant radio mast icon shows that
the search for a DCF signal was
successful.
• The recommended minimum distance to
sources of interference such as television
or computer screens is 2.5 metres.
• Note that radio reception is worse in
basements and rooms with concrete
walls. Place the weather station near a
window if the reception is poor.
• Only the SNOOZE/LIGHT and UP buttons
are activated during the search for a DCF
signal. To use other functions, press the
"-" button to stop searching for a DCF
signal.
MANUAL SETTING OF CLOCK
1. Press the MODE button for 2 seconds.
The 12/24 hour indicator starts ashing.
Use the UP and DOWN buttons to select
12-hour or 24-hour displaying.
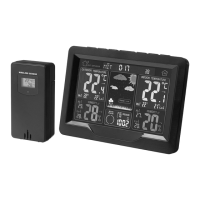
SENSOR BUTTONS AND FUNCTIONS
1. LCD – temperature
2. Status light for signal transfer
3. LCD – humidity
4. Button °C/°F
5. Button TX
6. Battery compartment
FIG. 3
HOW TO USE
BEFORE USING FOR THE FIRST TIME
1. Connect the mains adapter or open the
battery compartment on the weather
station and insert 2 alkaline AA batteries
with the correct polarity as shown by the
markings.
2. When the product receives current all the
icons on the display go on for 3 seconds
and there is an audio prompt. The indoor
temperature and humidity are registered.
3. The weather station starts to search for
the outdoor sensor. This takes about
3 minutes and a ashing icon for a radio
mast is shown on the outdoor part of the
receiver display.
4. Open the battery compartment on the
wireless outdoor sensor and the battery
compartment on the weather station and
insert 2 alkaline AA batteries with the
correct polarity as shown by the markings.
5. When the receiver has established a
connection to the outdoor sensor it
switches to receiving mode for radio
controlled setting of the clock.
RECEIVING RADIO SIGNALS
The clock automatically searches for a DCF
signal 7 minutes after restart, or after replacing
the batteries. The radio mast icon starts