model no. 054-7193-0 | contact us 1.800.689.9928
12
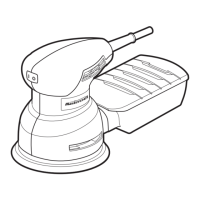
ATTACHING THE DUST BAG
(fig 3)
Toinstall:Press the dust bag port down on to the slot of
the dust chute until the chute’s detent fully engages with
the holes.
Toremove:Lift dust bag port up. Empty the dust bag
by removing the bag from the sander, and gently tap to
remove the dust.
OPERATING INSTRUCTIONS
TURNING THE TOOL ON AND OFF
Push the rocker switch to the left to turn the tool on “ON” and to the right to turn the tool “OFF”.
1. Make sure that the workpiece is free of nails and other foreign objects that could tear the sandpaper.
2. Always start the sander before applying it to the workpiece.
3. Move the sander evenly over the entire work surface. The weight of the sander alone is sufficient for
normal use. Any excess pressure will alter the sanding action, providing an uneven finish, and cause extra
wear to both the sander and sandpaper.
4. Never allow the sander to remain in one place on the work surface for too long or excessive material will
be removed.
5. The sander should never be turned off while resting on the workpiece. Lift the sander from the workpiece
and then turn it off.
6. Do not use the sander without sandpaper, or the pad will be damaged.
7. For optimum performance, make sure your hand does not cover the air ducts located on the sander, and
make sure oil or water does not come in contact with the motor.
WARNING!
• To reduce the risk of injury, turn the unit off and disconnect it from the power source. An
accidental start-up can cause injury.

 Loading...