OPERATING THE BENCH GRINDER
6. NOTE: The left hand arbor hex nut (E) is
left hand threaded and is loosened by rotating
it clockwise. The right hand arbor hex nut is
right hand threaded and is loosened by
rotating it counter-clockwise.
7. Remove the Outer Wheel Flange (H) and
then the abrasive wheel (I) from the arbor
shaft.
8. The new abrasive
wheel to be put onto the grinder must have
a higher R.P.M. rating than the grinder (3450
R.P.M.). The new abrasive wheel must have
the correct outer wheel diameter and bore
diameter as original wheels. The label on the
side of the abrasive wheel must stay on. DO
NOT remove this label.
9. Replace the abrasive wheel, outer wheel
ange and arbor hex nut. NOTE: The left
hand arbor hex nut is left hand threaded and
is tightened by rotating it counter-clockwise.
The right hand arbor hex nut is right hand
threaded and is tightened by rotating it
clockwise.
DO NOT OVER
TIGHTEN the arbor hex nut as this may
damage the abrasive wheel and cause
serious injury to the operator.
Turn the power switch “OFF” and unplug the
power cord from its power source prior to any
maintenance.
LUBRICATION
The Bench Grinder has sealed lubricated
bearings in the motor housing that do not
require any additional lubrication from the
operator.
CLEANING
With the Bench Grinder unplugged, rotate the
abrasive wheels slowly and inspect for any
damage or trapped shavings.
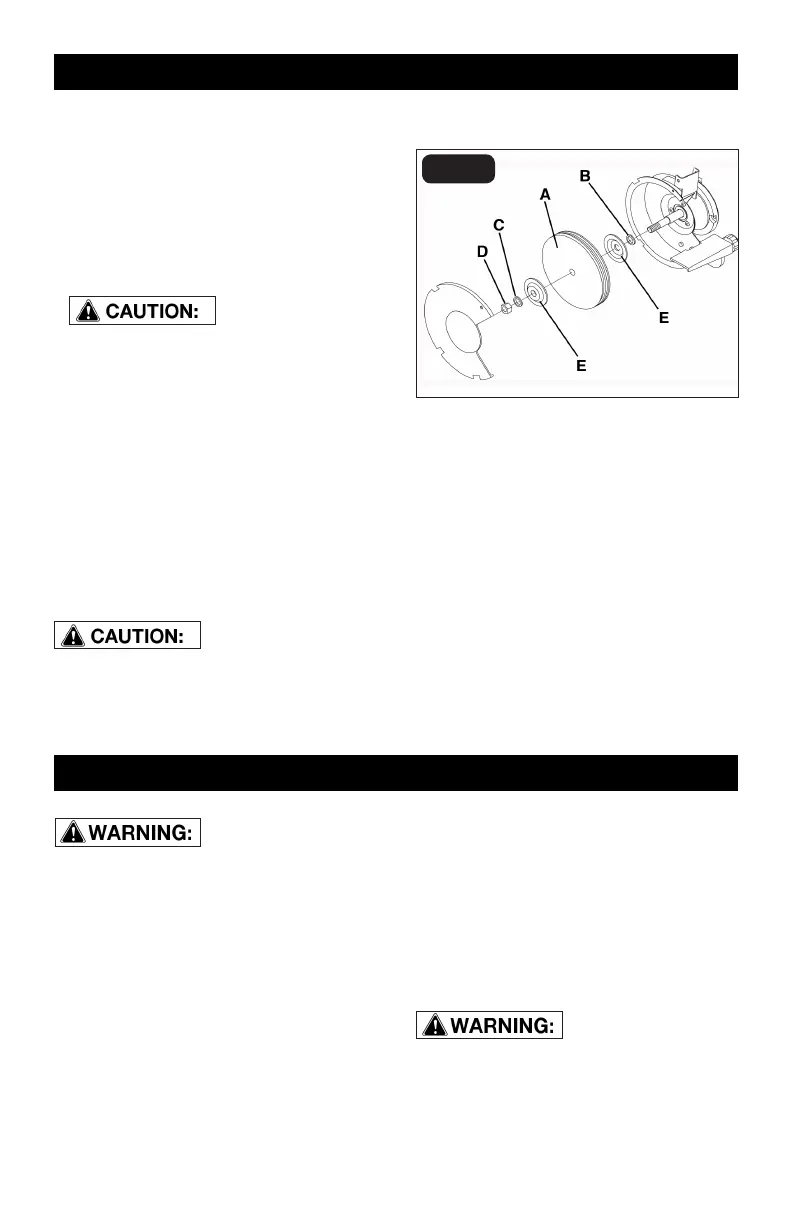
WIRE WHEEL or BUFFING WHEEL (Fig. L)
A wire wheel or bung wheel (A) can be used
with your grinder. Depending on the thickness
of the wheel, you will need to add one or more
spacers to allow the arbor hex nut to tighten
correctly. These spacers are identical to each
other. Figure L shows the correct placement
of the spacers (B) and (C).
Note: One spacer (B) should always go onto
the arbor shaft rst. The second spacer (C),
if needed, will go on next to the arbor hext
nut (D) as shown. Always use the wheel
anges (E) that came with the grinder for both
wire wheel and bung wheels. See section
CHANGING THE GRINDING WHEEL for
correct procedure of changing wheels.
CAUTION: REPLACE the abrasive wheels
if there is any damage at all. FAILURE to
replace a damaged wheel can cause serious
injury to the operator.
CAUTION: DO NOT USE FLAMMABLE
MATERIALS to clean the Bench Grinder. A
clean dry rag or brush is all that is needed to
remove dust and debris buildup.
Repairs to the Bench Grinder should be
performed by trained personnel only.
Unauthorized repairs or replacement with
non-factory parts could cause serious injury
to the operator and damage to the Bench
Grinder.
FIG. L
MAINTENANCE OF THE BENCH GRINDER
Page 15