position and let go. There should not be any steam releasing from the Unit.
HOW RAPID RELEASE WORKS AND WHEN TO USE IT
• To use rapid release, once the active cooking cycle is done, you can cancel the cooking cycle by
pressing the Cancel Button. Then, slide the Steam Release Switch to the Open position and let go,
wait for the steam to evacuate. Once the steam has been released, the Lid will freely slide open.
• The rapid release process requires an extra degree of attention because a burst of steam is
released through the Pressure Release Valve. Rapid release takes no more than a few minutes and
works best with foods like eggs, vegetables, or delicate ingredients that do not benefit from any extra
cooking time. This method is also helpful when you need to check the doneness of food or to add
additional ingredients to the One Touch Quick pot, such as when cooking a stew.
• Avoid using rapid release when cooking foods that foam, froth, or that may increase in volume,
such as legumes, or foods that are mostly liquid, such as soup, because the liquid can boil up and
vent through the Pressure Release Valve.
12. ANTI-TAMPER FLOAT VALVE GUARD: A screen on the Lid covers the Float Valve, so it cannot
be tampered with.
B. SPECIAL FEATURES
1. LCD DISPLAY: The LCD Display on your One Touch Quick pot offers a wide range of 44
preprogrammed choices. Cooking time may be adjusted to suit any recipe or personal preference.
The display changes color based on its operation.
2. KEEP WARM MODE: At completion of cooking cycle, the Unit will automatically shift to Keep
Warm mode. Keep Warm mode keeps cooked food warm for up to 24 hrs.
NOTE: Foods kept at Keep Warm mode for longer than 6–8 hrs. may lose their flavor and texture
that can be a food concern when left on the Keep Warm function too long.
3. STEAM RELEASE SWITCH: Quickly lowers pressure. Move the Release Switch on the top of the
Lid from the Closed to the Open position to open the Pressure Release Valve.
WARNING: Hot steam is released from the Pressure Release Valve. DO NOT USE BARE HANDS
to open Pressure Release Valve.
4. ONE-TOUCH TECHNOLOGY: With 44 preprogrammed default settings, favorite dishes could be
ready quickly and easily cooked to perfection in a single pot with a single touch of a button and a turn
of a dial.
5. COOL-TO-THE-TOUCH LID HANDLE: The Handle stays cool to the touch, so you can open the
Lid even when there is hot food inside. It is always recommended to use oven mitts when opening
the Lid after the cooking cycle is complete.
6. STAINLESS STEEL INNER POT: The Inner Pot is made of stainless steel, which means it is
completely PTFA and PFOA free.
RELEASING PRESSURE
NATURAL RELEASE AND RAPID RELEASE
• Natural release and rapid release are two methods that commonly used to depressurize a pressure
cooker once active cooking is done. Pressure cookers use steam pressure that builds up inside the
closed pot to cook food. As the pot heats up, the liquid inside forms steam, which raises the pressure
in the pot, cooking food at up to triple the normal rate.
• After active cooking is done, the pressure built up inside the pressure cooker needs to be released.
• The One Touch Quick pot has a safety mecha- nism that prevents the Lid from opening until the
pressure has been lowered. There are two ways to release the pressure within the Unit: natural rap-
id release. While both methods depressurize the Unit, the process for each method differs, and each
process has a different impact on the food inside the Unit.
HOW NATURAL RELEASE WORKS AND WHEN TO USE IT
• Natural release lets pressure reduce slowly on its own. Once the active cooking cycle is done, you
can press the Cancel Button on the Control Panel and the pressure will automatically drop inside the
pressure cooker slowly. Because of this slow drop in pressure and heat when using natural release,
food continues cooking even though active cooking is done.
• Use this method to reduce pressure when cooking meats, foods that increase in volume or that
foam, soups, or any other foods that are primarily liquid.
• Timing for natural release varies and will differ based on the type and amount of food being cooked.
Generally, natural release takes between 20 and 60 mins.
• NOTE: To check all pressure has been released by sliding the Steam Release Switch to the Open
SAVE THESE INSTRUCTIONS – FOR HOUSEHOLD USE ONLY
Collegare: Attaching the Power Cord
• Always attach electrical cord to the One Touch Quick pot before plugging the Unit into an outlet.
Plug into a 3-prong wall outlet with no other appliances on the same outlet. Plugging other applianc-
es into the outlet will cause the circuit to overload.
• DO NOT USE AN EXTENSION CORD WITH THIS PRODUCT.
• Models PN140 Quick Pot (6 Litter) has been designed for use with a 3-prong, grounded, 120V
dedicated electrical outlet only.
DO NOT USE WITH ANY OTHER ELECTRICAL OUTLET or modify the plug.
• A short power-supply cord, equipped with grounding conductor and plug, is provided to reduce the
risk of becoming entangled or tripping over a longer cord.
• To disconnect, turn any control to “off,” then remove plug from wall outlet.
FEATURES & BENEFITS
A. BUILT-IN SAFETY DEVICES
1. SAFETY LID LOCK: The Lid tabs and the Base tabs are closely connected in order to lock the Lid
to the Base when fully closed.
2. POSITIVE PRESSURE MECHANISM (FLOAT VALVE): When the pressure reaches a required
point, it lifts the Float Valve up and reaches the Locking Pin.
3. LID POSITIONING SENSOR: A magnetic sensor indicates whether the Lid is fully closed. The Unit
will beep and display “LID” when the Lid is not locked or is not required for a preprogrammed setting.
NOTE: The Sous Vide, Steam, Sauté, Slow Cook, and Yogurt presets will not start if the Lid is
locked. It is recommended to use the Glass Lid to prevent splatter and keep a consistent temperture
during the Sous Vide, Steam,Slow Cook, and Yogurt cooking cycles. It is also recommended to have
the Glass Lid on while slow cooking to prevent splatter.
4. LID INNER TRAY (GUARD): The Inner Lid can prevent food from entering the Upper Lid and the
Float Valve and Pressure Release Chambers.
5. ANTI-BLOCKAGE GUARD: Guards the underside of the Pressure Release Valve.
6. TWO-STEP SECURITY RESET FOR QUICK RELEASE: The Steam Release Switch needs to be
slid once to release the steam and then let go to open the Lid. If there is steam/pressure coming out
of the Pressure Release Valve or your hand is still holding the Steam Release Switch in the Open
position, the Lid will not slide to open.
7. EXCESS PRESSURE RELEASE SYSTEM: The Pressure Release Valve is weighted, which
maintains a pressure level and only allows to build pressure at a certain level. When the pressure is
higher than the weight that can handle, the steam is released until the pressure is less than the
weight.
8. AUTOMATIC TEMPERATURE CONTROL: The temperature is regulated by the programming to
maintain a consistent temperature automatically.
9. PRESSURE CONTROLLER: The Inner Pot sits on a pressure plate. When there is too much
pressure in pot, the plate turns off the heater, which stops the pressure from increasing.
10. ELECTRICAL (CURRENT-TEMP) PROTECTION: Temperature sensor could help when the
temperature rises above the preprogrammed setting, the heater shuts down and then fluctuates to
maintain the correct temperature.
11. CYCLE INDICATOR (LCD DISPLAY): The LCD display changes colors and a program
countdown is shown.
• Lid should rotate freely and any resistance indicates that the Lid is improperly placed or under
pressure.
• Always attach plug to appliance first, then plug cord into the wall outlet. To disconnect, turn any
control to “off,” then remove plug from wall outlet.
• This appliance cooks under pressure. Improper use may result in scalding injury. Make certain Unit
is properly closed before operating and the Pressure Release Valve is free from debris.
• Extreme caution must be used when moving an appliance containing hot oil or other hot liquids.
RECOMMENDED: DO NOT LIFT OR MOVE THE UNIT when under pressure or when contents are
hot. Hot spilled foods can cause serious burns! To remove contents in cooker, use ladle provided.
• Always check the pressure release devices for clogging before use.
• CAUTION HOT SURFACES: This appliance generates extreme heat and steam during use. Do not
touch hot surface. Use handles or knobs.To avoid injury, do not touch the hot surfaces or the
Pressure Release Valve on the Lid during operation. Proper precautions must be taken to prevent
the risk of personal injury, fires, and damage to property.
• Do not use this appliance for anything other than its intended use.
• Never use the Lid Handle to lift or move cooker. Use only the black handles located on the side of
the Unit’s base when lifting or moving the Unit (see OPEN LID in PREPARING FOR USE).
• Never fill above the Inner Pot’s max fill line (FULL CUP). Overfilling can clog the Pressure Release
Valve, which can cause excess pressure to develop.
• WARNING: to reduce risk of electric shock, cook only in the removable container (Inner Pot)
provided.
• Some foods, such as rice, beans, applesauce, cranberries, pearl barley, oatmeal or other cereals,
split peas, noodles, macaroni, rhubarb, and spaghetti, expand and create foam when cooking and
need special cooking instructions.Pay particular attention to liquid quantities. Do not fill the Inside Pot
more than HALFWAY when cooking with these foods.
• DO NOT fill the Unit over maximum fill line at 2/3 full. When cooking foods that expand during
cooking, such as rice or dried vegetables, do not fill the Unit beyond the recommended level at 1/2
full. Overfilling may cause a risk of clogging the Pressure Release Valve and developing excess
pressure.
• Never deep fry or fill with oil. Do not use this pressure cooker for pressure frying with oil.
• The use of accessory attachments not recommended by the appliance manufacturer may cause
injuries.
• Never use outlet below counter.
• Never use with an extension cord.
• Do not use Unit outdoors.
• Do not operate if the cord or plug are damaged.
If appliance begins to malfunction during use, immediately unplug cord from power source. DO NOT
USE OR ATTEMPT TO REPAIR A MALFUNCTIONING APPLIANCE. Contact Customer Service for
assistance.
• To prevent risk of explosion and injury, replace only the Rubber Gaskets (dynamic seal ring) as
recommended by the manufacturer.
• Unplug the Unit from the outlet when not in use and before cleaning. Allow the Unit to cool before
attaching or removing parts.
• NEVER IMMERSE HOUSING IN WATER.
IF UNIT FALLS OR ACCIDENTALLY BECOMES IM- MERSED IN WATER, UNPLUG FROM WALL
OUTLET IMMEDIATELY. DO NOT REACH INTO LIQUID IF UNIT IS PLUGGED IN AND
IMMERSED. DO NOT IMMERSE OR RINSE CORDS OR PLUGS IN WATER OR OTHER LIQUIDS.
POWER QUICK POT (STANDARD PANEL)
GOOD TO KNOW
The One Touch Quick pot will provide you an ultimate delicious dishes around the dinner table with
your families. Before you start, it’s very important that you read through this manual, ensuring that
you are totally fully understand this appliance’s operation and precautions.
WELCOME
• Pressure cooking method could help food lovers to prepare the meals that more tasty and faster
than using conventional stove top methods. It’s that simple.
• We created some of the most useful and popu- lar kitchen appliances for worldwide use for this
decade. The One Touch Quick pot is the latest in our distinguished line.
• With features to enhance your cooking experi- ence, Sauté, Steam, Slow Cook, Bake, Sous Vide,
Yogurt, Canning, and under Pressure, the One Touch Quick pot is more than a pressure cooker.
• Our product has been evaluated and tested that will guarantee rave reviews at mealtimes for the
entire family. Once familiar with the unique One- Touch, Pre-Set System, you’ll find that many of your
favorite family recipes can be cooked to per- fection in a fraction of the time.
• The sealed cooking chamber builds up heat and pressure, this leads to more flavor stays locked
within the food and more energy is saved in a shorter cooking time. The “sealed” cooking process
eliminates messy stove top spills resulting in cooler kitchens and easier cleanups.
IMORTANT SAFEGURADS
WARNING
PREVENT INJURIES! – CAREFULLY READ ALL INSTRUCTIONS BEFORE USE!
When using electrical appliances, always follow these basic safety precautions.
• Read all instructions carefully to prevent inju- ries.
• This appliance is not intended for use by persons with reduced physical, sensory, or mental
capabilities or a lack of experience and knowledge unless they are under the supervision of a
responsible person or have been given proper instruction in using the appliance. Do not leave
unattended with children or pets. Keep appliance and cord away from children. Anyone who has not
fully read and understood all operating and safety instructions contained in this manual is not
qualified to operate or clean this appliance.
• Always place Unit on a flat, heat resistant sur- face. Intended for countertop use only. DO NOT
operate on unstable surface. Do not place on or near a hot gas or electric burner or in a heated oven.
Do not operate the Unit in an enclosed space or under hanging cabinets. Proper space and
ventilation is needed to prevent property damage that may be caused by steam released during
operation. Never operate the Unit near an flambale materials, such as dish towels, paper towels,
curtains, or paper plates. Do not let the cord hang over the edge of the table or counter or touch hot
surfaces.
• NEVER FORCE THE LID OPEN. Never attempt to open Lid during operation as a pressure cooker.
Any pressure in the cooker can be hazardous. Do not open the pressure cooker until Unit has cooled
and ed. all internal pressure has been released. If the lid is difficult to open, this indicates that the
Unit is still under pressure do not force it open. Once pressure is released, follow instructions to open
Lid. Always open Lid away from face and body to avoid steam burns (see OPERATING INSTRUC-
TIONS).
GUÍA DE INICIO
¿POR QUÉ 2 TAPAS?
El Taste Difference Food Genie posee un diseño de dos tapas. Use la tapa de la olla a presión para
cocinar sus alimentos a presión y conservar los jugos y el sabor. Cambie a la tapa de la freidora de
aire. Esta crea un remolino de aire súper caliente y los alimentos quedan crujientes.
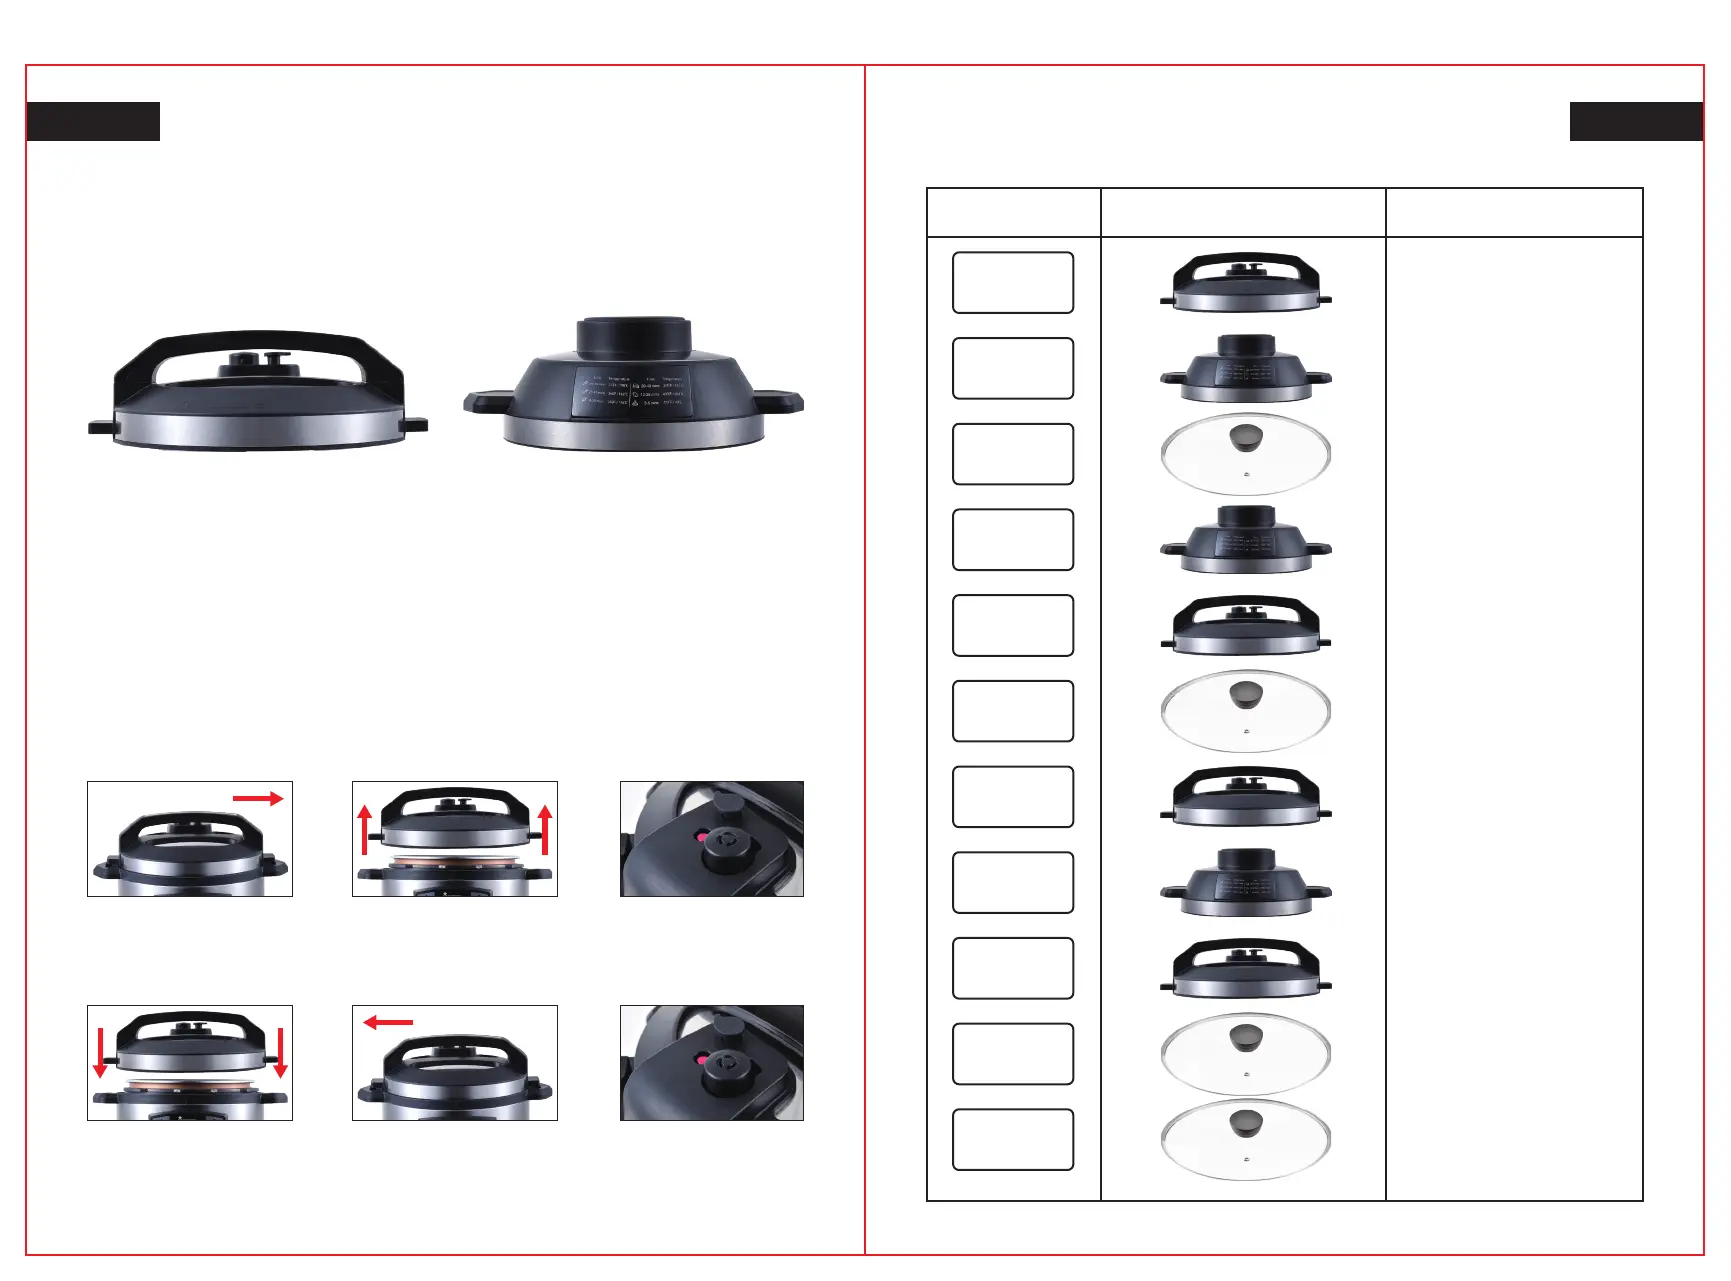
OPCIONES DE COCCIÓN PREDETERMINADAS
TAPA PARA CALOR
CALOR, PRESIÓN,
FREÍDO POR AIRE
PRESIÓN
FREÍDO POR AIRE
CALOR
FREÍDO POR AIRE
PRESIÓN
CALOR
PRESIÓN
FREÍDO POR AIRE
PRESIÓN
CALOR
CALOR
PRUEBA DE LA OLLA A PRESIÓN REALIZADA SOLO CON AGUA
ESES
TAPA DE LA OLLA A PRESIÓN
La tapa de la olla a presión retiene en el interior
un vapor súper caliente. La alta presión hace
penetrar los líquidos y humedad en los
alimentos y estos retienen sus nutrientes y un
sabor intenso. Cocina un 70% más rápido que
los hornos convencionales.
Use solo para cocinar a presión o hacer
conservas.
TAPA DE LA FREIDORA DE AIRE
La tapa de la freidora de aire posee un
dispositivo de calentamiento y un ventilador
turbo que crean un remolino de aire súper
caliente.
Úsela para caramelizar, dorar y hacer
alimentos crujientes.
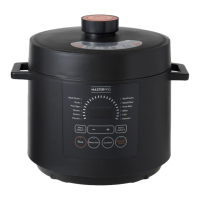
Paso 1: Gire la tapa de la olla a
presión en sentido antihorario
después de colocar la tapa para
desbloquearla del aparato.
Paso 2: Retire la tapa y llene la
olla con 2 tazas de agua.
Paso 3: Compruebe que la
válvula de liberación del vapor
se eleva.
Paso 4: Coloque la tapa sobre el
aparato.
Paso 5: Gire la tapa en sentido
horario después de colocarla para
bloquearla.
Paso 6: Presione la válvula de
liberación de vapor para que
salga el vapor.
Cocción a
presión
Freído por
aire
Vapor
Asado
Yogur
Horneado
Conservas
Estofados
Salteado
Vacío
Deshidratación
01 02

 Loading...