2
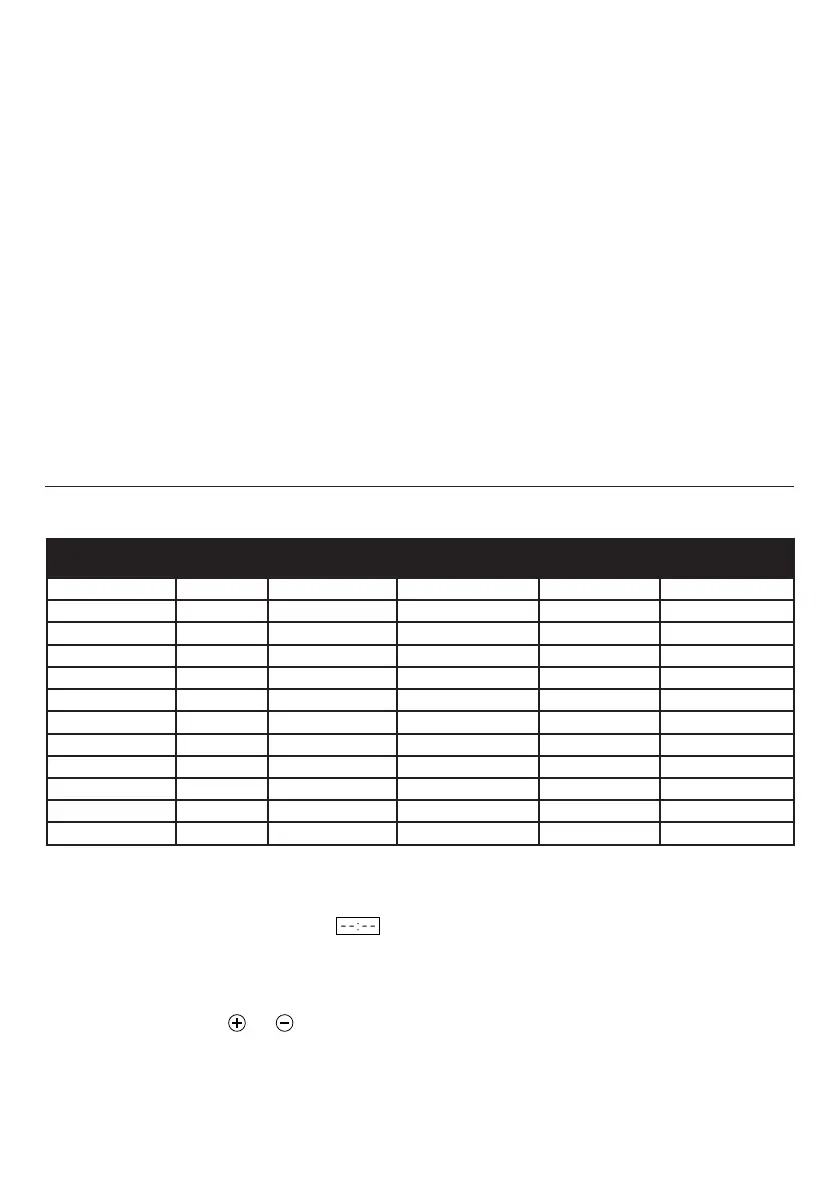
Function Default Time Time Adjustment
Increments
Time Range Default
Temperature
Option to Adjust
Temperature
Slow Cook 6 hours 30 mins 2 – 12 hours 70-93°C
Sauté 20 mins 1 min 1 – 30 mins 180°C Yes (120°-200°)
Yoghurt 8 hours 30 mins 6 – 12 hours 40°C
Sous Vide 90 mins 30 mins 1 – 12 hours 60°C Yes (50°-80°)
Steam 10 mins 1 min 1 – 1.5 hours 109°C
Pasta 10 mins 1 min 5 min – 2 hours 100°C
Rice 10 mins 1 min 1 – 30 mins 109°C
Bean/Chilli 15 mins 1 min 5 – 30 mins 109°C
Canning 45 mins 5 mins 10 mins – 2 hours 116°C
Meat/Poultry 15 mins 1 min 1 min – 2 hours 109°C
Soup/Porridge 30 mins 1 min 10 mins – 2 hours 109°C
Potato 15 mins 1 min 5 mins – 2 hours 109°C
OPERATING INSTRUCTIONS
• Before first use hand wash lid, inner pot, steam rack and
rubber gasket with warm soapy water. Rinse and dry
thoroughly.
• Before each use check anti-block shield, floating air valve
and exhaust valve are free from obstruction. Ensure steam
release handle is in sealing position when using all pressure
functions. Ensure inner chamber of appliance is free of food
or any other substances before placing pot inside.
• To open lid, make sure the cooking program is complete
or press the Warm/Cancel key to terminate. Use handle to
turn clockwise and then lift. The inner pot may rise with lid
for a moment.
• To close the lid, use the handle to turn counter-clockwise
until lid locks into place.
• Attach condensation collector by locking it into place.
• After use, remove any foreign objects from the sealing ring
and anti-block shield.
• Pressing the Warm/Cancel key while a program is running
will end the program and revert appliance to standby mode.
Pressing this key while in standby mode will activate the
Keep Warm function for up to 8 hours. This keeps the
cooker at a serving temperature and is indicated by an
orange light next to the key. Use Keep Warm function only
with fully cooked food as it is intended to keep cooked food
at serving temperature.
• To safely open lid after cooking there are two methods:
1. Quick Release
Ensure the cooking function has completed and appliance is
in Keep Warm mode. Turn steam release handle to venting
position. This will release steam until floating air valve drops
down. The lid can be opened once floating air valve drops.
Take extreme care when using this method. Hot steam will
be released very quickly. Keep your face and hands away
from vent. It is recommended to use tongs to turn release
handle. This option is not suitable when cooking liquid foods
such as soup, or starchy foods such as porridge, as food
content may be released with steam potentially blocking
values. Do not force lid open – lid will remain locked until
the floating air valve drops.
2. Manual Release
Ensure the cooking function has completed and the
appliance is in Keep Warm mode. Allow appliance to cool
down naturally, until floating air valve drops. This may take
15 minutes. Placing a damp towel over appliance can speed
up process. Once the floating air valve has dropped, turn
steam release handle to venting position before opening.
Do not force lid open – lid will remain locked until the
floating air valve drops.
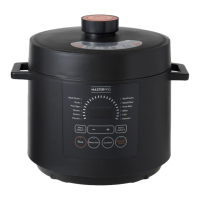
PRESSURE COOKING
• Pressure cooking functions include Rice, Meat/Poultry,
Bean/Chilli, Soup/Porridge, Canning and Potatoes.
• Connect power cord. The LED display will show
representing the cooker is in standby mode.
• Select the pressure cooking function you wish to use. Once
selected the preset time will appear, giving you the chance
to customise the cooking time within the time range above
(see table) by selecting the Time/Temp key (see control
panel diagram) and then the and keys. Select the
Time/Temp key again to set the time.
• Once time is set the display will show movement while
cooker starts to heat. Time will begin to count down once
set temperature has been reached.
1. RICE
• Rice variations are divided into brown and white when using
the rice function, see table on page 3. For fluffier rice add a
little extra water, reduce water for firm rice.
• We do not recommend cooking wild rice alone in the multi
cooker as it requires a significant amount of water.
• Ensure that the rice is evenly spread across the bottom
of the bowl and not heaped to one side. Always wash both
white and brown rice before cooking, this removes starch
preventing clumping and resulting in a fresh taste.
• The below table shows how many cups (using cup supplied)
of dry rice and water produce a certain quantity of cooked
rice, and required cooking time to do this. For rice recipes
see pages 5-6.
PROGRAM SETTINGS

 Loading...