Jewelry Studio
Please remove everything from the package and compare
to the contents list. If items are missing, please contact
Customer Service: 1-800-CRAYONS (US & Canada).
Keep these instructions for future reference as they
contain important information.
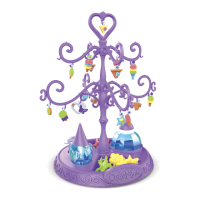
1 Jewelry Tree
1 Mini Brush
6 Nylon Cords
1 Glaze Pot
2 Safety Clasps
52 Charm Pieces
15 Jump Rings
ASSEMBLING THE CHARMINIS™ JEWLERY TREE
BEFORE YOU BEGIN
Protect play surfaces before use
Make sure hands are dry before use
Wash hands with soap and water after play
Keep charm pieces from being exposed to high humidity or water while storing
Drain, rinse, clean and dry all items thoroughly before storing
STEP 1: Insert the Center Piece into
the Base.
STEP 2: Add Arms to Center Piece.
Ensure the hooks are facing down.
STEP 3: Align bottom of Heart
Topper with opening on top of
Center Piece. Snap together to
secure into place.
STEP 4: Open and remove charm pieces from bags and place in Base. Keep the bags to store un-used
pieces for future use. Place Glaze Pot in small circular space on Base. See fully assembled Jewelry Tree
Stand above.
Arms
Center Piece
Heart
Topper
Base
Mini Brush
Storage
Tray
Glaze Pot