EasyManua.ls Logo

MAXA Tredis Series - User Manual

MAXA Tredis Series
80 pages
Go to English
Print Icon
To Next Page IconTo Next Page
Loading...
SPLIT TYPE ROOM AIR CONDITIONER
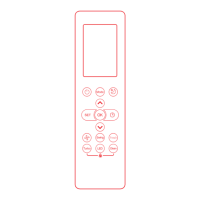
Fernbedienung
Fresh
Questo manuale è stato creato per scopo informativo. La ditta declina ogni
responsabilità per i risultati di una progettazione o di una installazione basata sulle
spiegazioni e le speciche tecniche riportate in questo manuale. E’ inoltre vietata la
riproduzione anche parziale sotto qualsiasi forma dei testi e delle gure contenute
in questo manuale.
This manual has been created for informative purpose. The company declines
every responsibility for the results of projecting or installation based on the
explanations and the technical specications given in this manual. Is besides
forbidden the reproduction under any form of the texts and of the gures
contained in this manual.
Ce manuel a été créé pour le but informatif. Lentreprise décline toute
responsabilité pour les résultats d’un projet ou d’une installation basée sur
les explications et les détails techniques rapportés dans ce manuel. C’est
en outre défendue la reproduction même partielle sous n’importe quelle
forme des textes et des gures contenues dans ce manuel.
Dieses Handbuch wurde zu Informationszwecken erstellt. Das
Unternehmen haftet nicht für die Ergebnisse eines Entwurfs oder einer
Installation, die auf den Erklärungen und den technischen Angaben in
diesem Handbuch gründen. Der Nachdruck der in diesem Handbuch
enthaltenen Texte und Abbildungen in jeglicher Form ist untersagt.
Este manual fue creado con nes informativos. La empresa
no acepta responsabilidades por los resultados de diseños o
instalaciones basados sobre las explicaciones y las especicas
tecnicas contenidas en este manual. Es también prohibida la
reproducción, aun parcial, bajo cualquier forma de los textos y
guras contenidos en este manual.
Question and Answer IconNeed help?

Do you have a question about the MAXA Tredis Series and is the answer not in the manual?

Overview

This document is a user manual for the MAXA Tredis series split-type room air conditioner remote controller. It provides detailed instructions on how to use the remote control, its functions, and important technical specifications.

Remote Controller Specifications

The remote controller is compatible with several MAXA air conditioner models, including RG10B(E)/BGEF, RG10B(E1)/BGEFU1, RG10B1(E)/BGEF, RG10B2(E)/BGCEF, RG10B10(E)/BGEF, RG10A4(E)/BGEF, RG10A4(E1)/BGEFU1, RG10A5(E)/BGEF, RG10A5(E1)/BGEFU1, RG10A5(E1)/BGCEFU1, RG10A5(E)/BGCEF, and RG10A11(E)/BGEF.

It operates on a rated voltage of 3.0V, powered by two R03/LR03 dry cell batteries. The signal receiving range is up to 8 meters, and it can operate in ambient conditions ranging from -5°C to 60°C (23°F to 140°F).

Handling the Remote Controller

Inserting and Replacing Batteries: To use the remote control, insert two R03/LR03 dry cell batteries.

  1. Slide the back cover downwards to expose the battery compartment.
  2. Insert the batteries, ensuring the (+) and (-) ends match the symbols inside the compartment.
  3. Slide the battery cover back into place.

Battery Notes:

  • Do not mix old and new batteries or batteries of different types.
  • Remove batteries if the remote control will not be used for more than 2 months to prevent leakage.
  • Dispose of batteries according to local laws, not as unsorted municipal waste.

Tips for Using the Remote Control:

  • The remote control should be used within 8 meters of the indoor unit.
  • The indoor unit will emit a beep when it receives a signal from the remote.
  • Curtains, other materials, and direct sunlight can interfere with the infrared signal receiver.
  • If the remote is not used for more than 2 months, remove the batteries.

FCC Compliance (for USA): This device complies with Part 15 of the FCC Rules. Operation is subject to two conditions: (1) it may not cause harmful interference, and (2) it must accept any interference received, including interference that may cause undesired operation. Any changes or modifications not expressly approved by the party responsible for compliance could void the user's authority to operate the equipment.

Buttons and Functions

The remote controller features several buttons for various operations:

  • ON/OFF: Turns the unit on or off.
  • TEMP ▲/▼: Increases or decreases the set temperature in 1°C (1°F) increments. The maximum temperature is 30°C (86°F), and the minimum is 17°C (62°F). For model RG10B(E1)/BGEFU1, pressing both buttons simultaneously for 3 seconds alternates the temperature display between °C and °F.
  • MODE: Scrolls through operation modes: AUTO → COOL → DRY → HEAT → FAN. Note that HEAT mode is not supported by cooling-only appliances.
  • SET: Scrolls through advanced functions like Fresh, Follow Me, and AP mode. The selected symbol flashes on the display, and pressing OK confirms the selection.
  • OK: Confirms selected functions.
  • TIMER: Sets the timer to turn the unit on or off.
  • SHORTCUT: Restores current or previous settings.
  • SWING: Starts and stops horizontal louver movement. Holding it for 2 seconds activates vertical louver auto swing.
  • FAN SPEED: Selects fan speeds: AUTO → LOW → MED → HIGH. Holding it for 2 seconds activates the Silence feature.
  • TURBO: Enables the unit to reach the preset temperature in the shortest possible time.
  • LED: Turns the indoor unit's LED display and buzzer on or off, creating a quiet environment.
  • CLEAN: Starts or stops the Self Clean function.
  • ECO (for some models): Enters energy-efficient mode (available only in COOL mode).

Remote Screen Indicators

The remote control's LCD displays various indicators:

  • Transmission Indicator: Lights up when a signal is sent to the indoor unit.
  • Fresh Feature Display (some units): Appears when Fresh feature is activated.
  • Sleep Mode Display: Indicates Sleep mode is active.
  • Follow Me Feature Display: Indicates Follow Me feature is active.
  • Wireless Control Feature Display: Indicates wireless control is active.
  • Low Battery Detection Display: Flashes when batteries are low.
  • MODE Display: Shows the current operating mode (AUTO, COOL, DRY, HEAT, FAN).
  • ECO Display (some units): Appears when ECO feature is activated.
  • LOCK Display: Appears when the Lock feature is activated.
  • TIMER ON/OFF Display: Shows when the timer is set to turn the unit on or off.
  • Silence Feature Display: Appears when Silence feature is active.
  • FAN SPEED Display: Shows the selected fan speed (LOW, MED, HIGH, AUTO). Fan speed cannot be adjusted in AUTO or DRY mode.
  • Temperature/Timer/Fan Speed Display: Shows the set temperature (17-30°C / 62-86°F or 20-28°C depending on model), timer setting (0-24 hours), or fan speed. This display is blank in FAN mode.

How to Use Basic Functions

AUTO Mode:

  1. Press MODE to select AUTO.
  2. Set desired temperature using TEMP ▲/▼.
  3. Press ON/OFF to start the unit. Note: Fan speed cannot be set in AUTO mode.

COOL Mode:

  1. Press MODE to select COOL.
  2. Set desired temperature using TEMP ▲/▼.
  3. Press FAN to select fan speed (AUTO, LOW, MED, HIGH).
  4. Press ON/OFF to start the unit.

DRY Mode (Dehumidifying):

  1. Press MODE to select DRY.
  2. Set desired temperature using TEMP ▲/▼.
  3. Press ON/OFF to start the unit. Note: Fan speed cannot be changed in DRY mode.

FAN Mode:

  1. Press MODE to select FAN.
  2. Press FAN to select fan speed (AUTO, LOW, MED, HIGH).
  3. Press ON/OFF to start the unit. Note: Temperature cannot be set in FAN mode, so the display will be blank.

HEAT Mode:

  1. Press MODE to select HEAT.
  2. Set desired temperature using TEMP ▲/▼.
  3. Press FAN to select fan speed (AUTO, LOW, MED, HIGH).
  4. Press ON/OFF to start the unit. Note: Heating performance may be affected by low outdoor temperatures.

Setting the TIMER (ON/OFF): Sets the time after which the unit will automatically turn on or off.

  • TIMER ON: Press TIMER, then use TEMP ▲/▼ to set the desired ON time. Point the remote at the unit and wait 1 second to activate.
  • TIMER OFF: Press TIMER, then use TEMP ▲/▼ to set the desired OFF time. Point the remote at the unit and wait 1 second to activate.
  • The timer increases by 30-minute increments up to 10 hours, then by 1-hour increments up to 24 hours.
  • To cancel, set the timer to 0.0h.

How to Use Advanced Functions

Swing Function:

  • Press SWING to start/stop horizontal louver movement.
  • Hold SWING for 2 seconds to activate vertical louver auto swing (model dependent).

LED Display:

  • Press LED to turn the indoor unit's display on or off.
  • Hold LED for 5 seconds (some units) to display the actual room temperature. Hold again for 5 seconds to revert to the set temperature display.

Silence Function (some units):

  • Hold FAN button for 2 seconds to activate/deactivate Silence function.
  • This mode may reduce cooling/heating capacity due to low compressor frequency.
  • Press ON/OFF, MODE, SLEEP, TURBO, or CLEAN to cancel Silence function.

ECO Function (some units):

  • Press ECO to enter energy-efficient mode (COOL mode only).
  • In COOL mode, if the set temperature is below 24°C/75°F, the remote automatically adjusts to 24°C/75°F and AUTO fan speed. If the set temperature is 24°C/75°F or above, fan speed changes to AUTO, but temperature remains unchanged.
  • ECO operation stops if ECO is pressed again, mode is changed, or temperature is set below 24°C/75°F.

FP Function (Heat Pump Air Conditioners Only):

  • Press the button twice within one second in HEAT mode to activate FP function.
  • The unit operates at high fan speed with temperature automatically set to 8°C/46°F.
  • To deactivate, press ON/OFF, SLEEP, MODE, FAN, or TEMP during operation.

LOCK Function:

  • Hold CLEAN and TURBO buttons simultaneously for more than 5 seconds to activate Lock function.
  • All buttons will be unresponsive except for pressing these two buttons again for 2 seconds to disable locking.

SHORTCUT Function (some units):

  • When the remote is on, pressing SHORTCUT restores previous settings (mode, temperature, fan speed, sleep feature).
  • Holding SHORTCUT for more than 2 seconds restores current operating settings.

Clean Function:

  • Press CLEAN to start the Self Clean function. The unit will clean itself and then turn off automatically.
  • Pressing CLEAN mid-cycle cancels the operation and turns off the unit.
  • This function is only available in COOL or DRY mode.

TURBO Function:

  • In COOL mode, TURBO blows powerful cool air for rapid cooling.
  • In HEAT mode (for units with electric heating elements), TURBO activates the electric heater for rapid heating.

SET Function:

  • Press SET to enter function settings, then use SET or TEMP ▲/▼ to select the desired function. Confirm with OK.
  • To cancel, repeat the same procedure.
  • Functions available via SET include Fresh, Sleep, Follow Me, and AP mode. Note: If the remote has dedicated Fresh and Sleep buttons, SET cannot be used for these functions.

Fresh Function (some units):

  • Activates the ion generator to purify the air.

Sleep Function:

  • Decreases energy consumption during sleep. Activated via remote control only. Not available in FAN or DRY mode.

Follow Me Function:

  • The remote measures the temperature at its current location and sends this signal to the air conditioner every 3 minutes.
  • In AUTO, COOL, or HEAT modes, this optimizes temperature around the user for maximum comfort.
  • Hold TURBO for 7 seconds to start/stop memory for Follow Me. "On" or "OF" (Off) displays for 3 seconds.
  • While memory is active, pressing ON/OFF, changing mode, or power failure will not cancel Follow Me.

AP Function (some units):

  • Used for wireless network configuration. For some units, it's not activated by the SET button.
  • To enter AP mode, continuously press the LED button seven times within 10 seconds.

The design and specifications are subject to change without prior notice for product improvement. For details, consult the sales agency or manufacturer.

MAXA Tredis Series Specifications

General IconGeneral
BrandMAXA
ModelTredis Series
CategoryRemote Control
LanguageEnglish