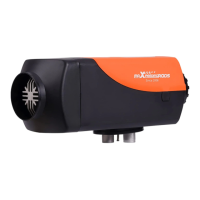
Fig.18
6.2.7 Setting Time
At the same time, press the "
" and " " keys for two
seconds to enter the time setting interface, as shown
in Fig.18. The instrument indicator light " " flashes
and the display shows the planned start time 10.1 hours
later. If it displays OFF, it means the shutdown time has
been set.
OK
6.2.8 Remote Control Operation
In the shut-down state, simultaneously press and hold
the " " and " " keys for 2 seconds to enter remote
control pairing mode as shown in Fig.19.
6.2.6 Plateau Mode Operation
At the same time, press "
" + " " keys for two
seconds to enter the plateau mode. The symbol " "
indicates that the high-altitude mode is activated. In
the plateau mode, the fuel-air ratio is reduced to adapt
to the high-altitude hypoxia, and then press the " " +
" " keys at the same time for 2 seconds to exit the
plateau mode. Please use with caution!
OK
OK
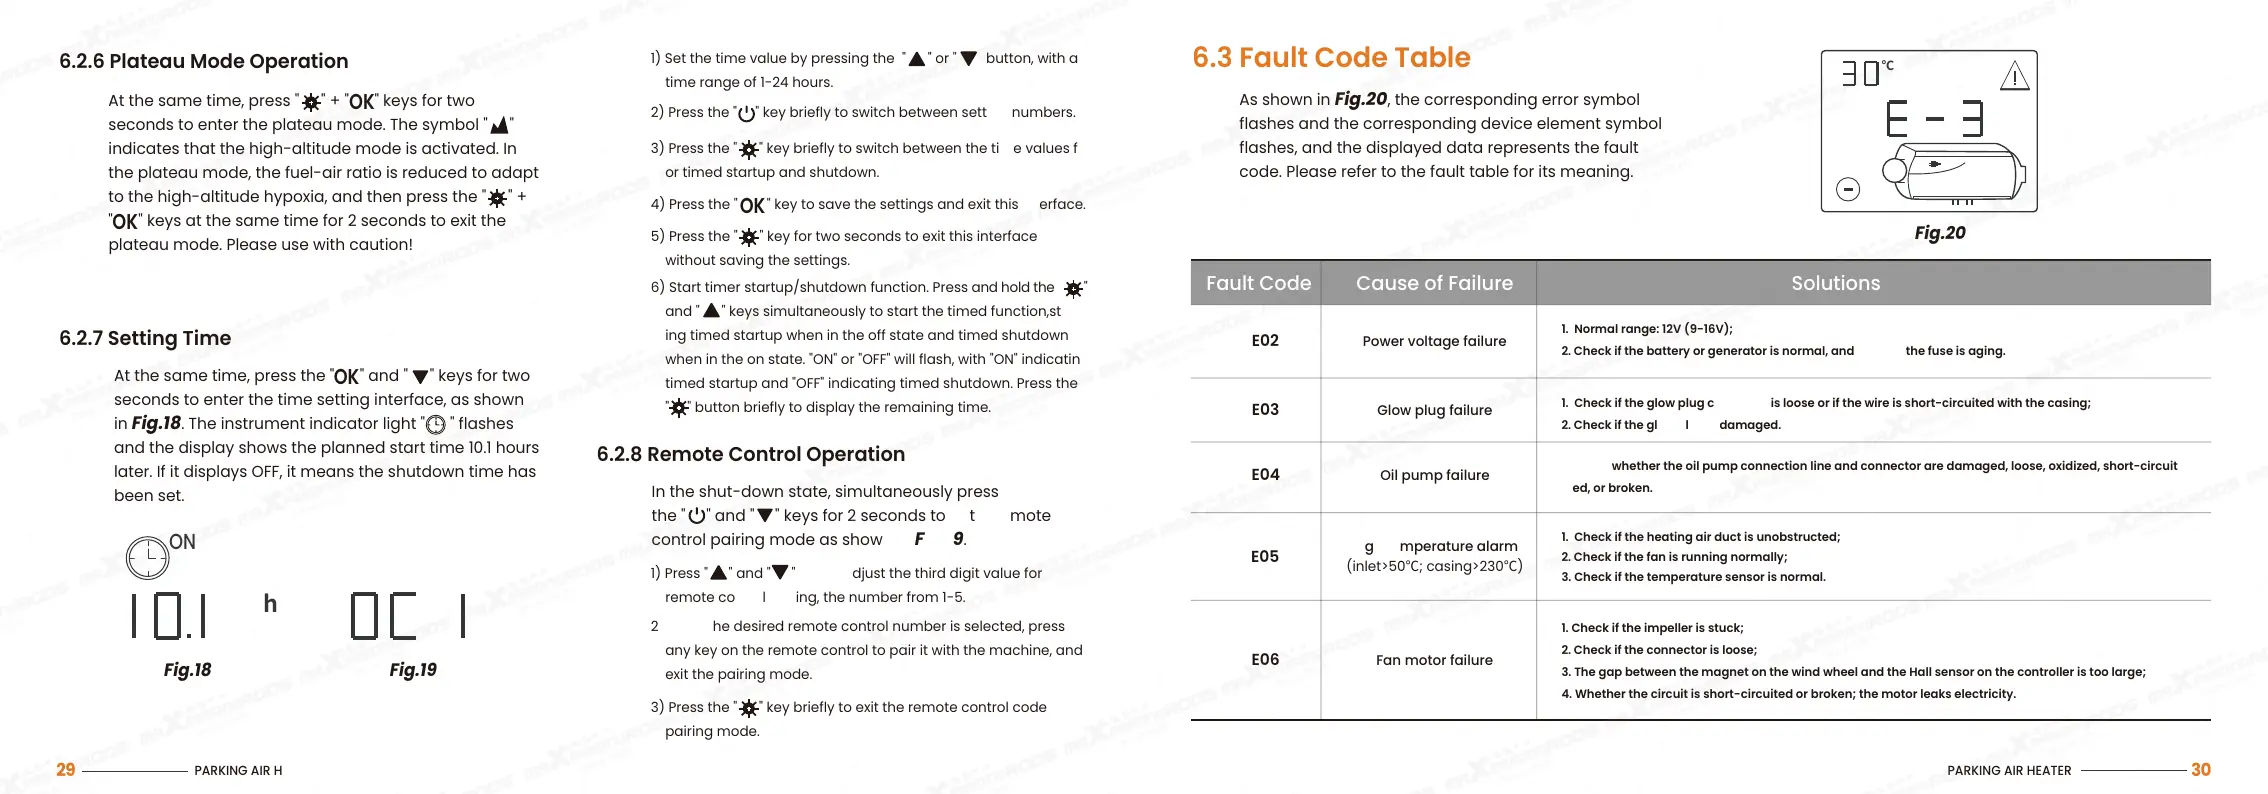
6.3 Fault Code Table
As shown in Fig.20, the corresponding error symbol
flashes and the corresponding device element symbol
flashes, and the displayed data represents the fault
code. Please refer to the fault table for its meaning.
Power voltage failureE02
Glow plug failure
E03
Fault Code Cause of Failure Solutions
1. Normal range: 12V (9-16V);
2. Check if the battery or generator is normal, and check if the fuse is aging.
1. Check if the glow plug connector is loose or if the wire is short-circuited with the casing;
2. Check if the glow plug is damaged.
1. Check if the heating air duct is unobstructed;
2. Check if the fan is running normally;
3. Check if the temperature sensor is normal.
Oil pump failure
E04
E05
1. Check whether the oil pump connection line and connector are damaged, loose, oxidized, short-circuit
ed, or broken.
Fan motor failure
E06
1. Check if the impeller is stuck;
2. Check if the connector is loose;
3. The gap between the magnet on the wind wheel and the Hall sensor on the controller is too large;
4. Whether the circuit is short-circuited or broken; the motor leaks electricity.
High temperature alarm
(inlet>50℃; casing>230℃)
ON
h
Fig.19
℃
1) Set the time value by pressing the " " or " " button, with a
time range of 1-24 hours.
2) Press the " " key briefly to switch between setting numbers.
3) Press the " " key briefly to switch between the time values f
or timed startup and shutdown.
5) Press the " " key for two seconds to exit this interface
without saving the settings.
4) Press the " " key to save the settings and exit this interface.
OK
6) Start timer startup/shutdown function. Press and hold the " "
and " " keys simultaneously to start the timed function,start
ing timed startup when in the off state and timed shutdown
when in the on state. "ON" or "OFF" will flash, with "ON" indicating
timed startup and "OFF" indicating timed shutdown. Press the
" " button briefly to display the remaining time.
1) Press " " and " " key to adjust the third digit value for
remote control coding, the number from 1-5.
2) Once the desired remote control number is selected, press
any key on the remote control to pair it with the machine, and
exit the pairing mode.
3) Press the " " key briefly to exit the remote control code
pairing mode.
PARKING AIR HEATER
29
PARKING AIR HEATER
30
Fig.20
 Loading...