4-- 14© 2012 Mobile Climate Control T-299 Rev. 08/2012
Notice that new belt tension is higher than in-service
or re-tension amount. All new belts require a run-in
period. During this period, a new belt will stretch
more in a 10 hour run time than the entire life of the
belt. So it is important to recheck belt tension after
run-in or re-tension new belts if less than re-tension
amount prescribed above. You should check belt
tension with the belt ”hot.” However, the belt must
be allowed to cool before re-tensioning. Drives
which incorporate automatic tensioners do not
require a run-in period or re-tensioning.
4.12.5 Measuring Methods for Belt Tension
There are several methods and tools available for
determining belt t en sion. The industry's acceptable
method would be to use a belt tension gauge as
manufactured by Burroughs or approved equal.
There are also several models available than can be
used. Please follow manufacturer guidelines
regarding gauge selection operation and calibration
requirements. You must get the correct tension
gauge for your specific b elt type(s).
4.13 RETURN AIR FILTER
NOTE
Never operate the evaporator without the
return-air filter properly installed.
The evaporator return air filter(s) should be checked
for cleanliness periodically(refer to table 4.1) and
always with regard to operating conditions. A system
operating on unpaved dusty roads will need a stricter
maintenance schedule than a bus operating
consistently on paved roads. A dirty air filter will
restrict the air flow over the evaporator coil. This
could cause insufficient co o ling or heating and
possible frost build-up on the coil. The GEN 4 series
return air filters are secured to the rear of the
evaporator coil assembly, while the GEN 5 series
return air filters are located under the evaporator
cover assembly.
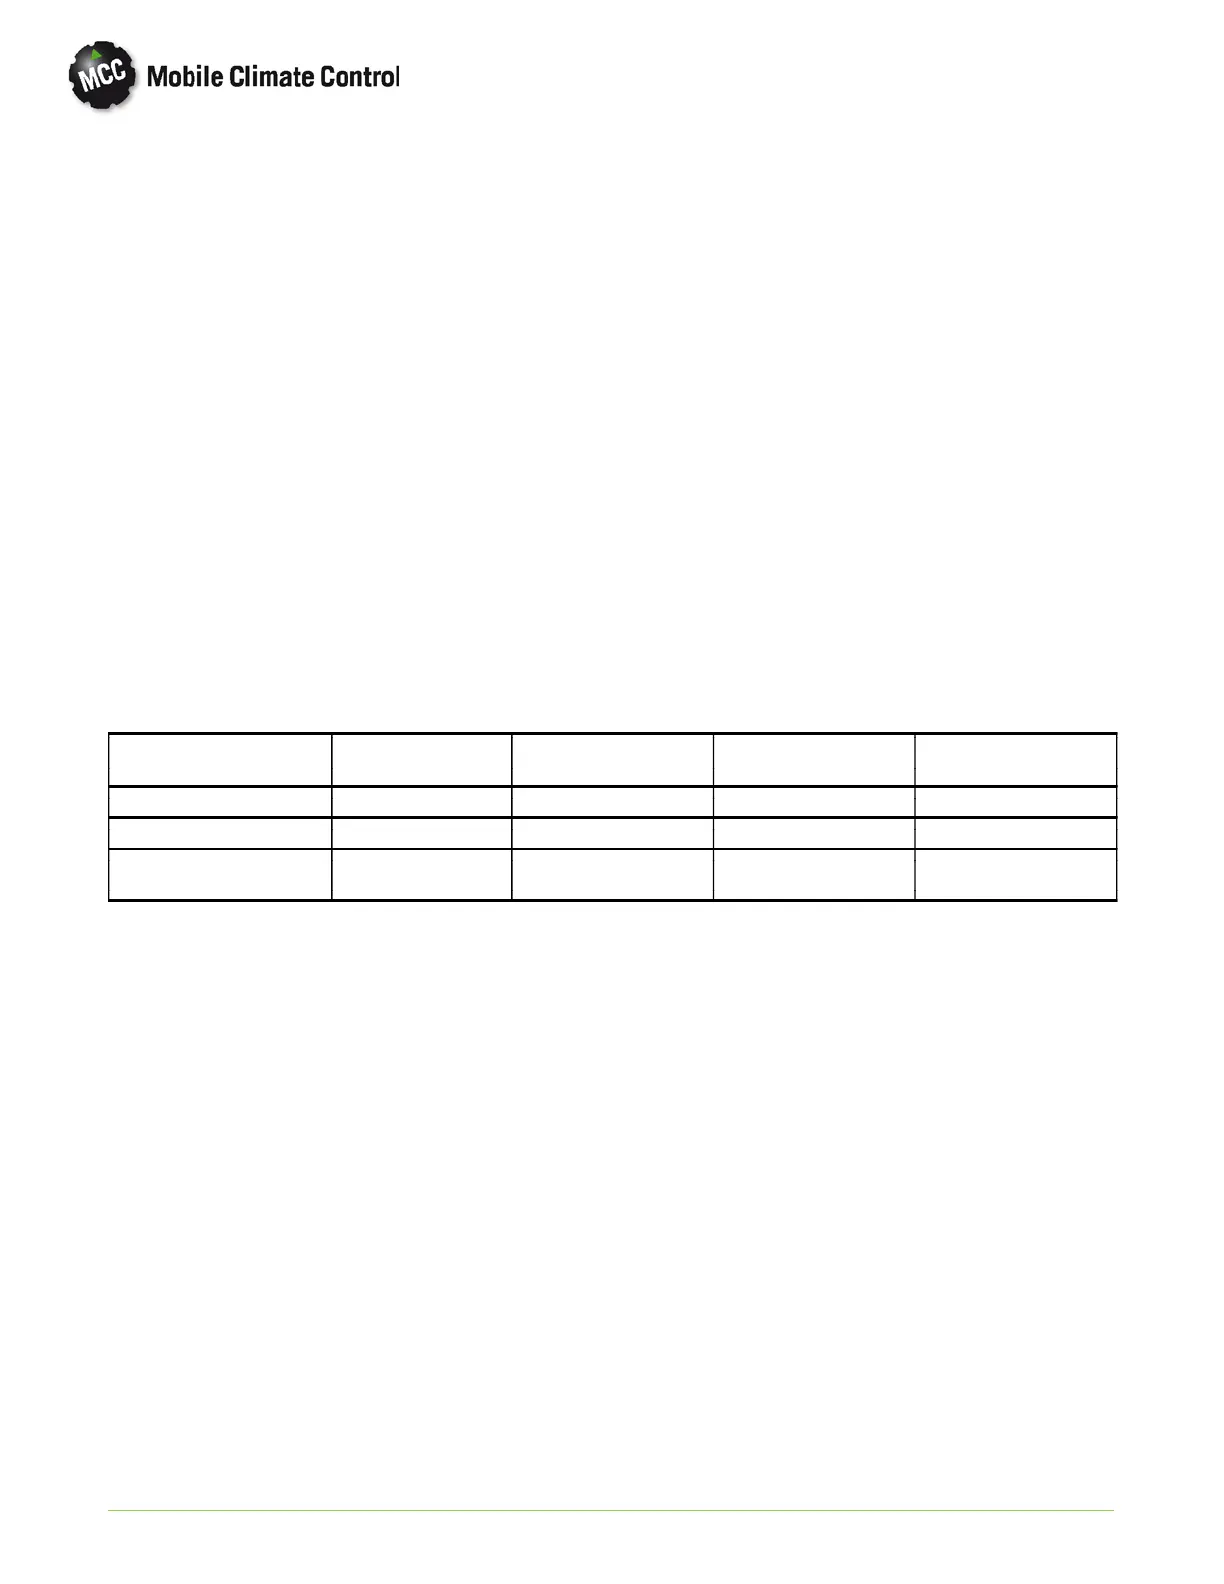
Table 4-9 Belt Tension Guide
Drive Belt Top Width
New Belt
Lbs. Tension
Re-Tension
Lbs. Tension
Re-Tension
Threshold
Alternator All 110 90 70
Compressor All 130 105 80
Poly-Rib Belt
& Serpentine Drive
6orMoreRibs 145 105 90
4.13.1 GEN 4 (EXCEL) Series
Replace the GEN 4 series return air filter(s) as
follows:
a. Remove the evaporator return air grill.
b. Remove the return air filter from behind the coil
assembly.
c. With the return air filter(s) and return air grill
removed, it is advisable to check the evaporator coil.
If the coil is dirty pro ceed with cleaning the coil.
d. Clean or replace the return air filter(s).
e. Replace evaporator return air grill.
4.13.2 GEN 5 Series
Replace the GEN 5 series return air filter(s) as
follows:
a. Insert a 3mm Allen wrench into the 1/4 turn
receptacle stud.
b. Turn counterclockwise opening the filter channel.
c. Slide filter out of the evaporator grill. (In some
applications, needle-nosed pliers may be needed in
order to grip the filter assembly).
d. Clean or replace the return air filter(s) as requ ired.
e. Close the filter channel and lock the 1/4 turn stud
into place by turning clockwise with 3mm Allen
wrench.
 Loading...