The McQuay Wireless Temperature Control (Model OM 897, Part Number: 668111001, dated January 2008) is a two-part wireless thermostat system designed for precise temperature control in "Applied" Package Terminal Air Conditioners and Heat Pumps without the need for wiring. This system consists of a thermostat and one or more Remote Control Nodes (RCNs).
Function Description:
The T9000 Wireless Temperature Control system provides precision temperature control for HVAC equipment. The thermostat communicates with its RCN(s) using unlicensed 900 MHz radio frequency energy. Once linked, the thermostat and RCN form a control system that will not interfere with or be affected by other thermostats or RCNs in adjacent rooms, apartments, or neighboring homes. The system supports up to eight RCNs linked to a single thermostat, allowing for control of multiple heating or cooling loads, such as electric baseboard heating and window air conditioners. The thermostat can be programmed with separate heating and cooling schedules for different periods of the day (Morning, Day, Evening, Night) and days of the week (weekday/weekend). It also features a manual operating mode where the temperature can be held at a desired set point.
Important Technical Specifications:
- Power Source: Operates on two or four AA alkaline batteries.
- Battery Life: Approximately 18 months with two batteries; doubles with four batteries (average 1 to 1.5 years).
- Wireless Communication: Unlicensed 900 MHz radio frequency.
- Node Capacity: Up to eight Remote Control Nodes (RCNs) can be linked to a single thermostat.
- Temperature Display: Fahrenheit or Celsius.
- Program Periods: Morning, Day, Evening, Night.
- Default Program Parameters: Conforms to Energy Star guidelines.
- Anti Short-Cycle Delay: Imposes a 3-minute delay before restarting the air conditioning compressor.
- Memory: Linking information and programmed data are stored in non-volatile memory.
Usage Features:
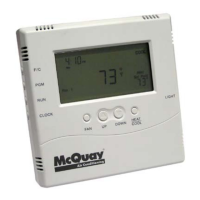
- Large LCD Display: Provides current room temperature, set point temperature, time, program interval, and system status information. In hotel applications, programming, clock setup buttons, and associated display information are typically not displayed.
- Buttons:
- F/C: Toggles between Fahrenheit and Celsius display.
- Program: Enters programming mode to set time and temperature schedules.
- Run: Toggles between manual operating mode and program operating mode. In manual mode, the thermostat holds a set temperature; in program mode, it follows the programmed schedule.
- Clock: Used to set the current time and day of the week.
- Fan: Adjusts fan operation.
- Up/Down: Changes set point temperature, adjusts time/day in setup modes, and navigates programming options.
- Heat/Cool: Changes the operating mode (Heat, Cool, Off), confirms selections in setup modes, and moves to the next item in programming.
- Backlight: Illuminates the display briefly. Frequent use reduces battery life.
- Programming:
- The thermostat offers four program periods: Morning, Day, Evening, and Night.
- Users can set specific start times and temperatures for each period for both heating and cooling.
- Default program parameters are pre-loaded and conform to Energy Star guidelines.
- Programming involves selecting the day(s), period, hour, minute (in five-minute increments), and desired set point temperature using the UP/DOWN and HEAT/COOL buttons.
- Manual Operation: In manual mode, the thermostat maintains a user-defined temperature until changed again. The "Hold" icon is displayed to indicate this mode.
- Temperature Override: While a program is running, the temperature can be temporarily adjusted. The thermostat will hold this new temperature until the next program period takes effect.
- Antenna Symbol: Indicates active communication with the RCN(s). If communication is lost, the symbol disappears.
- Installation Session: The thermostat includes internal buttons (SW4-INSTALL, SW9-LINK, PB1-NETWORK) for linking and unlinking RCNs.
- SW4-INSTALL: Initiates an installation session.
- SW9-LINK: Used to link the thermostat to control nodes.
- PB1-NETWORK: Used to uninstall the thermostat from linked nodes.
- Node Installation:
- Press SW4-INSTALL.
- Use the UP button to select "Install a Node" or "Uninstall ALL Nodes."
- Use the UP button to set the node number (0-7).
- Select the control type (Heat only, Cool only, or Heat/Cool) using the UP button and confirm with HEAT/COOL.
- Press SW9-LINK and activate the link service request on the control node within 5 seconds.
- A "Good" message confirms successful linking.
- Multiple Node Installation: Nodes can be linked as different numbers (0-7) or all as the same number (e.g., 00). Linking all nodes as the same number ensures communication is considered "good" as long as at least one node is heard from, which is useful if some nodes might be temporarily powered off or removed.
- Thermostat Installation Reset: Press SW4-INSTALL, then press and hold PB1-NETWORK for approximately two seconds to wipe all previous installation records from memory. This is useful for troubleshooting installation difficulties.
- Vacation Mode: To minimize system operation during extended absences, users can either set the thermostat to "OFF" (not recommended during heating season) or switch to manual mode, set a "Hold" temperature (e.g., 85°F for cooling, 65°F for heating), and consider humidity levels to prevent mold growth.
Maintenance Features:
- Battery Replacement Indicator: A low battery icon (+) lights up on the display approximately one week before batteries are exhausted.
- Battery Type: Uses standard AA size, 1.5-volt alkaline batteries.
- Battery Replacement Procedure:
- Open the thermostat by pressing the two push-tabs on the bottom and pulling the front cover away from the base.
- Replace all batteries with new ones simultaneously. Do not mix old and new batteries.
- Batteries are paired, with one set on top of the other. The thermostat can operate on either Set A, Set B, or both.
- To avoid losing programmed data, batteries can be replaced one set at a time before they are completely depleted. If both sets are removed or depleted, programmed data and clock settings will be lost.
- Automatic System Shutdown: If batteries become completely depleted, the heating/cooling system will go to the "Off" state.
- Non-Volatile Memory: Linking information is stored in non-volatile memory, so re-linking is not necessary after battery removal or power outages. Programmed data for heating, cooling, and time of day will be lost if batteries are completely removed or depleted.
- Troubleshooting:
- Antenna symbol not displayed: Check RCN power, ensure thermostat and RCN are linked, and try pushing the FAN button to force communication. Temporary RF interference can cause this.
- "Bad" message during installation: Repeat the "Installing Nodes" process. If the problem persists, perform a "Thermostat Installation Reset."
- Blank display: Indicates depleted batteries. Replace with four new, high-quality AA alkaline batteries.
- Location Recommendations: For optimal performance, mount the thermostat on an interior wall, centrally located within the conditioned space, approximately 5 feet above the floor. Avoid drafts, direct sunlight, and heat sources like warm air vents, lighting fixtures, appliances, or fireplaces.
- Mounting Options:
- Wall Mount: The back mounting plate provides six holes for secure wall mounting, compatible with standard electrical switchboxes or drywall mounting rings.
- Back Stand: A built-in, hinged stand support allows the thermostat to be placed on a flat surface, such as a table or shelf, if permanent wall mounting is not desired.