Quick Start Guide - 782-AV 4K UHD IPTV and Media Player
Installation
1. When locating the 782 unit, ensure that a clearance
distance of 25mm (1”) is maintained around the unit
to provide sufficient ventilation airflow. Items that could
accidentally block the ventilation grills or impede the cooling
airflow must not be located near the unit.
2. The 782 must not be installed where there is a possibility
of exposure to condensation, dripping or splashing liquids.
Containers filled with fluid should not be located in the vicinity
of this unit. Do not fix the 782 to any surface which is a heat
source that may cause the unit to over-heat.
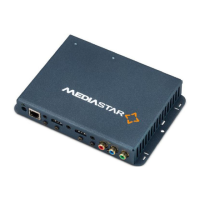
3. Connect the 782 unit to the display using the HDMI or other AV
cable. Ensure the HDMI cable is inserted into the 782’s HDMI
OUTPUT port. All connectors are clearly labelled on the rear
face of the unit. If the analogue audio output is being used,
connect the 3.5mm audio output jack to the display with an
appropriate (adapter) cable.
4. If the 782 is to be operated by a user using a MediaStar
Infra-Red (IR) remote control (part number 791-3W, ordered
separately), either:
a) Ensure the built-in IR receiver on the side of the 782 is
visible, or
b) Fit a remote IR receiver module (part number 911-4154,
ordered separately). The IR receiver should be mounted in
a visible position, facing away from the screen and
be plugged into the IR RX 3.5mm jack socket in the 782.
If necessary the 911-4154 cable can be extended up to
10m using a standard 3.5mm 4 pole male to female
extender cable.
5. Power-on the 782 using the external mains-DC Power
supply or via the CAT5 network cable if using Power-over-
Ethernet (PoE).
When powering with the mains/DC power supply:
The external mains/DC power supply input rating must meet
the specifications of the mains supply at the installation location.
Only the LPS (Limited Power Source) power supply provided with
this equipment should be used.
This device must be installed using a mains (AC supply) plug
and socket that is located near the equipment, that remains
operable and be easily accessible to disconnect the unit in the
case of an emergency. Insert the DC jack plug of the mains/DC
power supply unit into the jack socket on the 782. Plug in the
mains/DC power supply unit, switch on and check that the
status indicator LED by the DC jack socket is lit.
Connect the 780 to a local network port with the CAT5
SFTP patch cable supplied (or another equivalent cable of
appropriate length).
When powering using PoE:
Connect the 782 to the network using the CAT5 SFTP cable
supplied or another equivalent cable of appropriate length.
The 782 will then negotiate a class 0/4 power supply connection
with the PoE power supply equipment.
Check the status LED by the DC jack socket is lit. If a mains/DC
power supply and PoE are used simultaneously, most power
will be taken from the PoE supply.
6. The status LED (by the DC jack connector) will initially be
orange, then orange flashing as the unit boots up. When the
LED goes green, the 782 is ready for use and the video outputs
will be showing a picture. Ensure that the correct video input
source has been selected on the display to see
the 782’s picture.
When using HDMI, the 782 will automatically select the
highest possible picture resolution that the display and 782
both support. When using the phono (analogue) outputs,
the picture format defaults to YPbPr at 720p60. If your
display is not capable of supporting this resolution, you can
configure a different resolution via the on-board browser
configuration menus.
The LEDs on the network connector will illuminate to indicate
there is a valid network connection. The orange RJ45 LED
indicates a network link has been established, and the
(flashing) green LED shows network activity.
The 782 is supplied with DHCP enabled, so by default, it will
negotiate a valid IP address setting with a DHCP server. If no
DHCP server is present, the unit should be configured with a
static IP address. If required, the 782’s MAC address is printed
on the part number label on the rear face of the unit.
To set a static IP address on the 782, use an IR or Bluetooth
remote control to show the on-screen setup menus. Press
the menu (or home) button to show the Media list and
then use the arrow up cursor key to show the setup menus.
Navigate to the Advanced/Configuration-Configure Network-
IP address setting menus to set the IP address details. Ensure
that all static IP address details (netmask, gateway etc.),
are in accordance with the settings provided by the network
system administrator.
 Loading...