The Medicus Dual Hinge Driver is a golf training aid designed to help golfers improve their swing mechanics and "Drive Like a Pro." This instructional manual outlines the proper grip, posture, stance, alignment, and nine key breakpoints of the golf swing, emphasizing how the unique dual-hinge design of the driver helps detect and correct flaws.
Function Description:
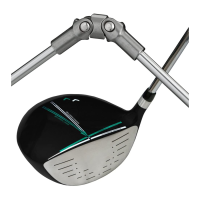
The primary function of the Medicus Dual Hinge Driver is to provide immediate feedback on swing flaws. Unlike a standard driver, this training aid features two hinges in the shaft. If a golfer's swing is not executed correctly, particularly at critical points like the initial move down, the hinges will "break" or collapse, indicating an error in timing, tempo, or swing path. This instant feedback allows golfers to identify and correct mistakes in real-time, promoting muscle memory for a more consistent and powerful swing. The manual highlights that the driver's sensitive angle design makes even the slightest flaw detectable, reinforcing proper positioning throughout the swing.
Important Technical Specifications:
While specific material or weight specifications are not detailed in the provided pages, the core technical feature is the dual-hinge mechanism. This mechanism is adjustable, allowing users to customize the tension.
- Hinge Tension Adjustment: The manual explains how to set and adjust the hinge tension. To check the standard tension, the club should be held parallel to the ground with one hand. The hinge mechanism should be aligned to allow the head to fall freely, but the hinge at either position should remain rigid. It should react (break) with a short, quick upward wrist movement.
- Adjustment Mechanism: A setscrew is used for adjustment. Turning the setscrew counter-clockwise makes the hinge more responsive or fluid, while turning it clockwise increases the tension, making it less responsive. This adjustability allows golfers to tailor the feedback sensitivity to their skill level and specific training needs.
Usage Features:
The manual provides a comprehensive guide to using the Medicus Dual Hinge Driver effectively, breaking down the golf swing into nine key "breakpoints":
- The Proper Grip: Emphasizes placing the club in the fingers of both hands, with specific attention to thumb placement, gap formation between fingers, and the "V"s formed by the thumb and index fingers pointing between the right shoulder and spine. Three types of grips (overlap, interlock, ten finger) are mentioned, with the Vardon overlap grip being the most common. Grip pressure should primarily come from the last three fingers of the left hand and the middle two fingers of the right hand.
- Posture, Stance & Alignment: Details the correct setup, including heel-to-shoulder width, knee flex (approximately 20 degrees), foot turn (right foot out 5 degrees, left foot left 10-15 degrees), weight distribution, hip level, and arm hang. The ball position is specified as 2 inches inside the left heel or aligned with the left armpit, with feet, knees, hips, forearms, and shoulders parallel to the target line. Common faults like incorrect weight distribution, hand position, knee bend, and hip bend are illustrated.
- Breakpoint 1: Takeaway: Describes the initial movement as a slow, rotational upper body movement, allowing hands, arms, and shoulders to move together. The hands begin to hinge vertically as the one-piece takeaway continues. Common faults include taking the club away too fast with wrist hinging/cocking, using only arms, or opening the clubface.
- Breakpoint 2: Toe-up Position: Focuses on the continued upper body rotation with the right elbow close to the right hip. As hands cock/set, the club becomes parallel to the target line and ground, with the toe pointing skyward. Common faults include reverse pivot, over-rotation of hands, and pushing the right elbow away from the hip.
- Breakpoint 3: Setting of Hands: Explains the continued shoulder rotation with the right knee flexed and weight transferring to the inside of the right heel. Hands become fully hinged/cocked, positioning the club perpendicular to the ground with the left arm extended and parallel. The club shaft should point to the target line, and the right arm should not be visible from the rear view. Common faults include over-extension of arms, reverse pivot, and incorrect shaft angle (too upright or too flat).
- Breakpoint 4: At the Top: Describes the peak of the backswing with shoulders rotated 90 degrees to the target line and hips at 45 degrees. The right knee remains flexed, and the left knee points towards the golf ball. The club should be parallel to the target line, with both hands under the shaft, clubface semi-skyward, and right forearm perpendicular to the ground. Common faults include swaying, weight on the left side, and incorrect wrist/clubface alignment.
- Breakpoint 5: Initial Move Down: This is identified as a critical point for distance. The Medicus Dual Hinge Driver's sensitive design detects flaws here. The downswing involves arms and hands accelerating faster than the body, with the right knee momentarily holding its position. The left arm returns to parallel, the right elbow stays close to the body, and the club shaft points to the target line with wrists fully cocked. Common faults include "casting" (early unhinging) and dropping the club too flat.
- Breakpoint 6: Pre-Impact: Details the position just before impact: hands in front of the body, club shaft parallel to the target line with the toe skyward, and wrists remaining cocked at a 90-degree angle with the shaft and left forearm. Common faults include swaying towards the target and premature unhinging of wrists.
- Breakpoint 7: Impact: Describes the moment of impact: hands, shoulders, hips, and body moving together, club released with hands ahead of the ball and clubface square. Hips are 30-45 degrees open, shoulders about 5 degrees open, left leg slightly flexed but straightening, right heel slightly off the ground, head behind the ball, and right arm extending while wrists uncock. Common faults include falling away from the target (reverse pivot) and head moving in front of the ball.
- Breakpoint 8: Post-Impact: Explains the position immediately after impact: weight shifted to the left, hips rotated 80-90 degrees open to the target line, club shaft parallel to the target line and ground with toe skyward, head down and behind the ball, and both arms fully extended. Common faults include right arm too far from the body, over-rotation of hands, and no rotation of hands.
- Breakpoint 9: The Finish: Describes the final position: 90 percent weight on the left side with the left leg straight, hips rotated to the left (belt buckle pointing slightly left of target), right knee aiming at the target and even with the left, no gap between legs from knees up, arms relaxed with club shaft behind the head, and both wrists recocked. Upper body maintains its original bend/tilt. Common faults include weight on the right side, dipped right shoulder, and right knee not even with the left.
Maintenance Features:
The manual implicitly suggests that the hinge mechanism may require occasional adjustment to maintain optimal performance. The ability to turn the setscrew clockwise or counter-clockwise to increase or decrease tension serves as a maintenance feature, allowing users to fine-tune the device's responsiveness over time or as their swing improves. No other specific cleaning or storage instructions are provided in the excerpt.