EasyManua.ls Logo

MEDISTIM MiraQ System User Manual

Default Icon
2 pages
To Next Page IconTo Next Page
Page #1 background imageLoading...
Page #1 background image
Quick Guide - MiraQ™ System
1. Make sure the locking lever is in the unlocked position
(the upper position).
2. With the probe cable to the right, insert the connector
into the system in one smooth horizontal motion.
3. When the probe is completely inserted, move the lever
into the locked position (lower position).
4. When removing the probe, hold the connector while
moving the locking lever into the unlocked position, and
gently pull it out.
2.1 Connecting the Medistim L15 imaging probe
1. PERFORMING TTFM MEASUREMENTS
Connecting the imaging probe
Before measurement:
1. Select correct application.
2. Fill in patient data.
3. Connect the ECG cable (if applicable).
4. Connect the probe.
5. Choose applicable anatomical location.
6. Check the ACI. This can be done by placing the probe in
water. ACI should be green with 90% or above.
During Measurement
1. Place the probe on the graft.
2. Check that ACI is green or yellow. If the ACI shows red or
orange, try using more gel or use a different probe size.
3. The values can be read when the red baseline is flat and
stable.
4. Save the measurement. The system will save 1 minute
retrospectively each time the save button is pressed.
2. PERFORMING IMAGING MEASUREMENTS
Note
To obtain DF% readings, and red/blue color for the systolic/diastolic phases, ECG signals must be provided via an ECG cable.
Remember to save the best measurements. Scroll the stored data, and save where the PI, Flow and DF% are representative for
the measurement with good ACI.
# Screen element
1 Live session screen
2 Archive reporting
3 Mean flow
4 Pulsatility Index
5 Minimize window
6 Save
7 DF% - Diastolic filling
8 Anatomical location
9 ACI - Acoustic Coupling
Index
10 Retrieve window
3
4
9 8
7
6
5
10
TTFM measurement screen
21
Question and Answer IconNeed help?

Do you have a question about the MEDISTIM MiraQ System and is the answer not in the manual?
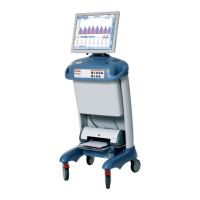
MEDISTIM MiraQ System Specifications

General IconGeneral
CategoryMedical Equipment
ManufacturerMedistim
TechnologyTransit-time ultrasound
ApplicationIntraoperative blood flow measurement
Probe OptionsVarious sizes and configurations for different vessel diameters
Measurement ParametersVessel Diameter
Power SupplyRechargeable battery or AC adapter
ConnectivityUSB, Ethernet
Operating Temperature10°C to 40°C (50°F to 104°F)
Storage Temperature-20-60°C
Relative Humidity30% to 75% non-condensing
Regulatory ComplianceCE marked, FDA cleared

Summary

Performing TTFM Measurements

Before Measurement Steps

Steps required before starting a TTFM measurement, including application selection and probe connection.

During Measurement Guidelines

Guidelines for probe placement, ACI check, baseline stability, and saving measurements during TTFM.

Performing Imaging Measurements

Connecting the Imaging Probe

Procedure for connecting the Medistim L15 imaging probe to the system.

Overview of the Imaging Screen

Imaging Screen Elements

Identification and function of key elements on the MiraQ™ imaging screen, such as TGC sliders, mode tabs, and probe orientation.

Adjusting Imaging Parameters

How to change depth, activate Doppler modes, adjust ROI, and modify the velocity scale for imaging.

Saving Imaging Video

Procedure for saving a 5-second video sequence from the imaging screen by pressing the Save button.

Connecting to an External Screen

External Display Configuration

Steps to connect an external monitor, including physical connection and adjusting display settings in System Settings.

Related product manuals