EasyManua.ls Logo

Medline MDS89745RA - User Manual

Medline MDS89745RA
8 pages
Print Icon
To Next Page IconTo Next Page
Loading...
MDS89745RA/H (2304) Troubleshooting Guide
Revision 1 - 12/03/2019 Released by William Laubach
Product Description
Knockdown Bath Bench with Arms and Back
MDS89745RA, MDS89745RAH
Features aluminum frame with weight capacity of 350lbs.
Troubleshooting Topics
Top Issue # 1 Missing parts
Yes No
Are all components listed in Appendix A present?
If no, continue to Complaint Form on Page 2 and note the part/s
that is/are missing per Appenfix A.
Top Issue # 2 Arms do not fit
Yes No
Is the complaint for the arms not fitting like in Figure 2
(holster are on the front and back sides of the frame)?
If yes, continue to the next question.
If no, continue to Complaint Form on Page 2 and elaborate
on what they are experiencing.
Are there any dents, fractures or other damage to the
product?
If no, continue to next question.
If yes, continue to Complaint Form on Page 2 and note
what specific part, per Appendix A, is damaged.
Are the arm holsters located on the outside as shown in
Figure 2?
If yes, reference Appendix B on how to assemble the
bench.
If no, continue to Complaint Form on Page 2 and elaborate
on what they are experiencing in regards to the arms not
fitting.
Figure 1 Product Photo
Figure 2 - Top Issue #2, Side view
Question and Answer IconNeed help?

Do you have a question about the Medline MDS89745RA and is the answer not in the manual?

Overview

This document provides a troubleshooting guide for the Medline MDS89745RA/H (2304) Knockdown Bath Bench with Arms and Back. This bath bench is designed to provide support and assistance for individuals during bathing.

Product Description

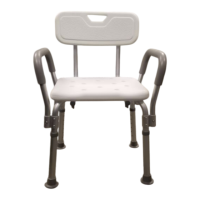
The MDS89745RA/H (2304) is a knockdown bath bench with arms and a back. It features an aluminum frame and has a weight capacity of 350 lbs. The product comes in two models: MDS89745RA and MDS89745RAH.

Troubleshooting Topics

Top Issue #1 – Missing parts

If parts are missing, it is important to first check if all components are listed in Appendix A. If they are, but still missing, then it is necessary to continue to Complaint Form on Page 2 and note the part(s) that is/are missing per Appendix A.

Top Issue #2 – Arms do not fit

If the arms do not fit, the following steps should be taken:

  • Is the complaint for the arms not fitting like in Figure 2 (holster arm on the front and back sides of the frame)? If yes, continue to the next question.
  • If no, continue to Complaint Form on Page 2 and elaborate on what they are experiencing.
  • Are there any dents, fractures or other damage to the product?
    • If no, continue to the next question.
    • If yes, continue to Complaint Form on Page 2 and note what specific part, per Appendix A, is damaged.
  • Are the arm holsters located on the outside as shown in Figure 2?
    • If yes, reference Appendix B on how to assemble the bench.
    • If no, continue to Complaint Form on Page 2 and elaborate on what they are experiencing in regards to the arms not fitting.

Complaint Form

If troubleshooting was attempted and could not resolve the issue, a complaint form must be filled out. This form requires the following information:

  • Convey Representative Name
  • Customer Name
  • Customer Phone Number
  • Customer Address
  • Customer Email Address
  • Item Number
  • Optum Item Number
  • Age of Product (estimated)
  • Product Serial or Lot Number
  • Photo Available? (Checkbox)

Defect Code

Check as many error codes as applicable to the customer issue:

  • Missing Parts (Checkbox)
  • Assembled improperly (customer) (Checkbox)
  • Bend/dented/fractured (Checkbox)

Additional Information

  • Lot Number/Serial Placement:
    • Lot number is located on a sticker placed on the cross frame.
    • There are some differences in the components and they vary by version. The lot number is crucial to identify which version the customer purchased.

Appendix A – Components

This section provides a detailed list of components for the bath bench, noting differences based on lot numbers.

Items with lot numbers that begin with 885 Hardware:

  • Contains 1 washer, 5 short (same size) hand screws, and 4 long (same size) hand screws.
  • Note: Short hand screws are the same size. 4 screws are used to attach the backrest pad to the backrest pad frames. 1 screw is inserted through the center of the seat to secure the frames (see picture on top right).

Items with lot numbers that begin with 956 Hardware:

  • Contains 1 washer, 4 short (1 may be longer than the other 3 short) hand screws, and 4 long (same size) hand screws.
  • Note: 4 short hand screws will be the same size and are used to attach the backrest pad to the backrest pad frames. 1 hand screw will be longer and will be inserted through the center of seat to secure the frames (see picture on bottom right).

Backrest pad

Items with lot numbers that begin with 885 Seat:

  • Pre-stamped with '1' and '2' to aid in assembly. Please note that the seat may appear different than in the picture.

Items with lot numbers that begin with 956 Seat:

  • Pre-stamped with 'A' and 'B' to aid in assembly. Please note that the seat may appear different than in the picture.

Padded arms:

  • 2 arms are included.

Backrest 'L' frames:

  • 2 backrest frames are included (same size).

Main frames with holsters and extension legs:

  • Each bath bench contains 2 main frames stamped 1 and 2.
  • 4 extension legs are attached.

Appendix B – Assembly Instructions

  1. Place the seat upside down on top of a raised flat surface. You should be able to see the indentations where the frame should be placed.
  2. Note the seat will be imprinted with '1' and '2' for the version with lot numbers beginning with '885'. This will be the back end of the seat.
    • Note the seat will be imprinted with 'A' and 'B' for the version with lot numbers beginning with '956'. This will be the front of the seat.
  3. Locate the main frames, these are imprinted with '1' and '2'. Match the frame imprinted with '1' to the indentation on the seat imprinted '1' or 'A' (depending on the version). Do the same for the frame and seat imprinted with '2' or 'B'.
    • Note: The '1'/'A' frame is on the bottom, while the '2'/'B' rests on top of '1'/'A' as shown in the diagram.
  4. Use the washer and one (1) of the five (5) short hand screws provided to secure the center cross section.
    • Note: Items with lot numbers beginning with '885' will all have the same size short hand screws. Items with lot numbers beginning with '956' will have one that is longest of the short screws and this one will be used to secure the cross section.
  5. Lay the bench on its side.
  6. To attach the backrest tubes to the bottom of the bench, use the four (4) long hand screws. Each hand screw should be inserted through the back rest tube and leg tube. Ensure that the back rest tubes to attach the backrest pad are towards the back end of the seat.
    • Reminder: The back end of the seat is where the imprinted '1' and '2' are located for items with lot numbers beginning with '885'. Items with lot numbers beginning with '956' will have 'A' and 'B' imprinted on the front side of the seat.
  7. Ensure the leg extensions are adjusted to the same height. The leg extensions have six (6) different notches.
  8. Stand the chair upright and use the remaining four (4) short hand screws to attach the backrest pad.
  9. Please note that the armrest holsters are on the side of the frame as shown in the diagram.
  10. Insert one arm rest into the armrest holders as shown in the diagram. Please note that the arm rests should flare outward.

Medline MDS89745RA Specifications

General IconGeneral
BrandMedline
ModelMDS89745RA
CategoryMobility Aid
LanguageEnglish

Related product manuals