EN
28
the charger. This connects the positive (+)
and negative (-) terminals correctly.
2. Connect the battery charger to the power
point. The red LED on the charger goes
on.
3. When the battery is put in the charger the
green LED goes on and starts ashing.
This indicates that the battery is charging.
At the same time the red LED on the
charger starts ashing briey before
remaining constantly red.
4. The battery is fully charged when the
green LED stops ashing and remains
constantly green. The red LED will then go
o. It takes about one hour to charge a
fully discharged battery. It will go quicker if
the battery is only partially discharged.
5. The status of the battery can be checked
during the charging by pressing the
button on the short side of the battery.
One, two, three or four LEDs will light up
beside the button to indicate the charging
level. Four LEDs mean that the battery is
fully charged.
FIG. 2
6. When the red LED on the charger goes
on the battery is discharged, with a red
and yellow light it is partially charged,
and with red, yellow and green it is fully
charged.
7. Unplug the charger from the power point.
Release the battery from the charger by
pressing in the red lock button on the
battery and pushing it along the guide
slots until the battery comes loose from
the charger. Set the rotation selector on
the drill driver to the OFF position and
connect the battery by pushing it into the
drill driver’s guide slots until it hooks on.
The drill driver is now ready to use.
POWER SWITCH
The power switch has variable speed control,
WARNING!
The actual vibration and noise level when
using tools may dier from the specied
maximum value, depending on how the
tool is used and the material. It is therefore
necessary to determine which safety
precautions are required to protect the user,
based on an estimate of exposure in actual
operating conditions (taking into account all
stages of the work cycle, e.g. the time when
the tool is switched o and when it is idling,
in addition to the start-up time).
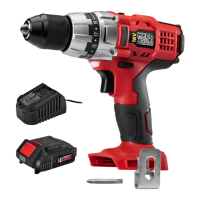
DESCRIPTION
1. Switch drilling/screwing
2. Rotation selector
3. Power switch
4. LED light
5. Torque selector
6. Chuck
7. Battery charger
8. Battery
9. Bits
10. Clips
FIG. 1
USE
BATTERY AND CHARGER
NOTE:
Only use the supplied charger to charge the
battery. Fully charge the battery before using
it for the rst time.
Charging the battery
1. Align the guide slots on the battery to the
slots on the charger and rmly push in the
battery until it clicks in place. The battery
is shaped so that it can only t one way in