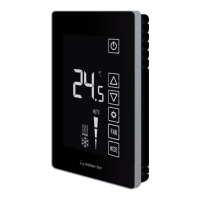
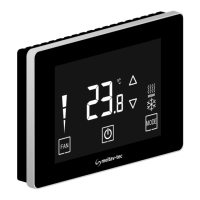
This document describes the Haften TRE24-PROG-HC11 thermostat, manufactured by Meitav-tec. It is an owner's manual providing installation and operating instructions for the US Program - Celsius version.
Function Description
The TRE24-PROG-HC11 is a programmable thermostat designed to control heating, cooling, and fan functions. It offers both programmable (5-1-1 schedule) and non-programmable configurations. The thermostat can be operated manually or through a weekly program with four events per day: Wake, Day, Return, and Sleep. It supports external temperature sensing and can be controlled via an optional infrared handheld remote control (RT08).
Important Technical Specifications
The manual provides wiring connections for various terminals:
- RC/RH: 24Vac RED (bridged if one transformer is in use, default from factory).
- C: 24Vac Common from transformer.
- W1: Heater.
- G2: Fan Medium.
- T: External Sensor (option) - two terminals for connection.
- G3: Fan High.
- G1: Fan Low.
- Y1: Compressor.
DIP switch configurations allow for customization of various functions:
- Switch 1: Internal/External Sensor Control (Default: Internal Sensor Control ON).
- Switch 2: Not in use (Default: OFF).
- Switch 3: Electrical Heat/Oil/Gas Heat (Default: Oil/Gas Heat OFF).
- Switch 4: 3 minutes compressor delay/Without delay (Default: 3 minutes compressor delay OFF).
- Switch 5: Internal/External Sensor Control (Default: Internal Sensor Control OFF).
- Switch 6: Internal/External Sensor Control (Default: Internal Sensor Control ON).
The external sensor is specified as a Meitav-tec type N.T.C. sensor. A table provides temperature-resistance characteristics for the sensor, ranging from 7.2°C (115.8 kΩ) to 36.6°C (26.7 kΩ). The wire length for the sensor can be up to 30 meters (100 feet) with standard cable; if the distance exceeds 30 meters, it must be shielded.
The thermostat maintains a minimum differential of at least 1 degree Celsius between the Heat set point and Cool set point, with the Heat set point always being less than the Cool set point.
Usage Features
Turning On/Off:
- Press the "On/Off" button on the thermostat to toggle between ON and OFF states.
Adjusting Temperature:
- Cool Mode/Fan Mode: Press "+" or "-" buttons. "COOL" will appear, and the set-point temperature will flash. Adjust using "+" or "-" buttons.
- Heat Mode: Press "+" or "-" buttons. "Heat" will appear, and the set-point temperature will flash. Adjust using "+" or "-" buttons.
- Auto Change-over Mode (2 set-points): Press "+" or "-" buttons. "COOL" will appear, and the cooling set-point will flash. Adjust, then after 3 seconds, "HEAT" will appear, and the heating set-point will flash. Adjust using "+" or "-" buttons.
Mode, Fan Speed, Auto Fan:
- Press the "Select" button to cycle through modes: "UnLo" (unlock), "Cool," "Heat," "Cool/Heat" (auto change-over), and "Fan Only."
- Press "Select" again to cycle through fan settings: "Fan" (continuous operation) or "Auto Fan" (fan operates only when there is a demand for cool or heat).
- Note: "Auto Fan" is not available in "Fan only" mode. In Heat mode with Oil/Gas heat, "AUTO FAN" means the fan will never be activated, while "FAN ON" means the fan will work continuously.
- Press "Select" again to cycle through fan speeds: "FnSP" (fan speed), "FanLo" (low), "FanMe" (medium), "FanHi" (high), and "A.Speed" (auto speed).
- Press "Select" again to return to normal display.
Lock/Unlock Buttons:
- To prevent unwanted changes, the thermostat buttons can be locked. Ensure both temperature set-points are different than 10°C.
- Lock: Press and hold the "Select" button for 20 seconds until "Loc" appears.
- Unlock: Press and hold the "Select" button for 20 seconds until "UnLo" appears.
Programming (5-1-1 Schedule):
- The thermostat supports a 5-1-1 programmable schedule (weekdays Monday-Friday, Saturday, and Sunday have individual programs).
- There are four program events per day: Wake, Day, Return, Sleep.
- Default Programs: The manual provides tables with default start times and set-points for cool and heat for Monday-Friday, Saturday, and Sunday.
- Modifying Programs: The manual includes a flowchart for modifying the clock set (hours, minutes, day) and program events (start time, cool set-point, heat set-point) for each day segment.
- To enter programming, press and hold "Select" for three seconds until "PROGRAM" and Mon-Fri flash.
- Use "+" or "-" to adjust values and "Select" to move to the next setting.
- The process is repeated for "PROGRAM 1" (Wake), "PROGRAM 2" (Day), "PROGRAM 3" (Return), and "PROGRAM 4" (Sleep) for Monday-Friday, then for Saturday and Sunday.
- During program modification, you can quickly switch between days by pressing the "On/Off" button.
- Press "Select" to exit the program. If no key is pressed for 30 seconds, the thermostat returns to normal display.
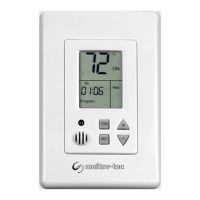
Handheld Remote Control (RT08 - Option):
- The RT08 is an infrared remote control. It must be pointed at the thermostat.
- After any parameter change on the remote, the "On/Send" button must be pressed to send the information to the thermostat.
- Turning On/Off and Update: Press "On/Send" to turn the thermostat ON/update, or "Off" to turn OFF/update.
- Auto Fan ON/OFF: Press "Fan" to toggle between Auto Fan OFF and Auto Fan ON. Press "On/Send" to send.
- Modes: Press "Mode" to cycle through Cool, Heat, Auto change-over, and Fan only. Press "On/Send" to send.
- Fan Speeds: Press "Fan" to cycle through High Speed, Medium Speed, Low Speed, and Auto Speed. Press "On/Send" to send.
- Temperature Set Point:
- Fan/Cool Mode: Press "+" or "-" to adjust the cooling set-point. "COOL" will flash. Press "On/Send" to send.
- Heat Mode: Press "+" or "-" to adjust the heating set-point. "HEAT" will flash. Press "On/Send" to send.
- Auto Change-over: Adjust cooling set-point, then adjust heating set-point. Press "Select" or "On/Send" to send.
- Real Time Clock and Day: Press "Select" to enter "CLOCK SET." Adjust hours, minutes, and day using "+" or "-". Press "Select" to exit or "On/Send" to send.
- Programming (Remote): The program can be set on the remote and sent later. Press "On/Send" when "SEND" flashes on the remote display.
- Enable/Disable Programmability (Remote):
- Press and hold "Select" for 3 seconds until "program" flashes.
- Press "Select" 3 more times until the "Timer icon" flashes.
- Use "+" or "-" to switch between "Clear icon" (Disable) and "shaded icon" (Enable) for programmability.
- "SEND" will flash. Point the remote and press "On/Off" to send the information.
Maintenance Features
Installation Instructions:
- It is crucial to find the correct installation location for accurate temperature readings.
- Separate the front panel from the back panel by depressing the top tongue.
- Mount the back panel to the wall or flat surface using three screws.
- Make electrical connections as per the wiring diagram.
- Install the front cover by engaging the bottom tabs first, then the top tongue, pushing until tight.
DIP Switch Configuration:
- Before making any changes to DIP switches, disconnect power to the main board.
- Use the provided table and illustration to configure the switches for specific functions (e.g., internal/external sensor, heat type, compressor delay).
External Sensor Connection:
- The external sensor must be a Meitav-tec type.
- Disconnect power before making changes.
- Move DIP switches 1, 5, and 6 to the OFF position for external sensor control.
- Connect the temperature sensor to the T-T terminals.
- Reconnect power to the thermostat.
Technician Settings (Room Temperature Offset):
- This feature allows calibrating the measured room temperature.
- Adjust the set-point temperature for cooling to 10°C.
- Press and hold the "Select" button for 5 seconds. "Offs" and the OFFSET temperature (a number between -6 and +6) will appear.
- Adjust the offset using "+" and "-" buttons (default is 0°C).
- Press "Select" to return to normal display.