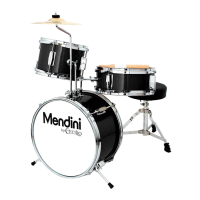
5-Piece Junior Drum Kit Assembly Instrucon
Thank you for choosing this quality set from Cecilio. Use the instrucons as a guide to help you assemble your new
drum set. Please note that this manual is designed for a number of Cecilio drum sets. If you are unsure of what
your drum set should be supplied with, please check with the Cecilio dealer you purchased the kit from. There are
many parts that make up a drum set, but don’t worry, once you get started the process is very intuive and fun.
Bass Drum:
1. Lay the Bass drum Shell (A) on a at surface with the front side up. You can idenfy the front side by the
locaon of the Bass Drum leg mount (B). The leg mounts are closer to the front side of the bass drum
(furthest from the playing posion).
2. The “logo drumhead” should be ed to the front of the bass drum and aligned straight.
3. Place the drum head (C) (same diameter as the drum) directly on the top of the drum shell followed by the
hoop (D).
4. Gently hang the claws (E) over the edge of the hoop, and line them up with the lugs. Take the longest ten-
sion screws (aka T-Rods), slip a washer on each, and insert them through the holes in the claws.
5. Tighten the screws into the lugs using your ngers two at a me, just enough so the hoops are secure, and
no wrinkles are in the head.
6. Now you may use a drum key (F) to ghten the tension bolts in equal amounts (1 quarter turn each for
example) unl pitch and tone of the drum begin to sound. The tension bolts should be ghtened in a star
formaon the same as when you change a wheel in a car (ghten the rst bolt, then opposite bolt, etc).
Repeat this process on the top and boom of bass drum.
7. Insert the drum legs (G) into the leg mounts and secure. Sit the drum upright and adjust the height so that
the front of the Bass Drum is elevated 1 inch o the oor and will not pivot. Be sure that the bass drum
legs are secured and even.
8. To aach the bass drum pedal (H), place the pedal base under the bass drum hoop and make sure the
clamp is over the hoop. Connect the footboard to the pedal frame. Tighten the pedal clamp by the wing
nut under the footboard so that it is rmly aached to the hoop.
9. Insert the felt bass drum beater (I) and adjust so that the beater strikes the middle of the bass drum head
(C). Tighten with the drum key.
Tom Mounng:
10. Insert the rack tom holder (J) into the rack tom mount (K) on the bass drum and ghten the screw. Use
this to adjust the height of the toms.
11. Slide each tom tom (L) on the le and right side of the rack tom mount.
Cymbal Mounng:
12. Locate the cymbal stand (M). Insert into the cymbal mount (N) on the bass drum and secure. Unscrew
cymbal topper (O) and one felt.
13. Place the cymbal (P) on the stand with one felt below the cymbal. Reaach the top felt and cymbal topper.
Please note that the topper doesn’t need to be screwed down hard on the felt and cymbal and the cymbal
should be free to move during play, its main operaon is to prevent the cymbal from falling o the stand
when struck.
Floor Tom:
14. Aer placing the heads and rims on the oor tom (Q) in the same way as you have aached the bass drum,
insert the long oor tom legs (R) that raise it o the oor.
Snare Drum Stand:
15. Open the snare drum stand base (S) so that the three legs are at on the oor. Align three cradle arms (T)
provided, insert wing nut (U) into the hole and loosely ghten onto snare stand.
16. Place the snare (V) onto the cradle arms, adjust the cradle arms so it ts snugly against the lower hoop of
the snare drum. Tighten the wing nut. When ng the snare drum, the drum head with logo faces up.