This document describes the Mercator FRM97 LCD Remote Controller for Ceiling Fans, an accessory designed to provide wireless control over ceiling fan functions.
Function Description:
The Mercator FRM97 is a remote control system comprising a transmitter (handset) and a receiver. It allows users to wirelessly control various aspects of a ceiling fan, including fan speed, fan on/off, light on/off, and a delayed fan-off timer. The system offers 16 possible code combinations for wireless communication, ensuring that multiple remote controllers can operate independently without interference, provided each set has a unique code.
Important Technical Specifications:
- Power Supply: The product requires a 220-240Vac 50Hz power supply.
- Compatibility: It is designed for use with ceiling fans and is suitable for use with fluorescent or compact fluorescent lamps, as well as energy-saving halogen globes or equivalent.
- Installation: The remote controller receiver must be installed inside the ceiling fan canopy and requires earthing during installation. An isolation switch (e.g., wall switch) must be installed to supply power to the input wires of the receiver.
- Wiring: The wiring diagram illustrates connections for AC input (Live and Neutral), motor connections (Live and Neutral), and light connection (Live). The antenna wire should be kept safely inside the canopy and not cut or damaged.
- DIP Switches: Both the transmitter and receiver feature 4-position DIP switches, allowing for 16 unique code combinations (0000 to 1111, where 1 represents ON and 0 represents OFF). The codes on both units must match for proper operation.
- Battery: The transmitter uses a battery (23A 12V) which is included. The battery should be replaced when weak to prevent leakage and damage to the transmitter.
Usage Features:
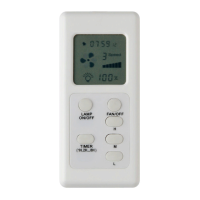
The remote control handset features an LCD display and several buttons for intuitive operation:
- FAN/OFF: Turns off the ceiling fan.
- H (High): Turns on the fan at high speed.
- M (Medium): Turns on the fan at medium speed.
- L (Low): Turns on the fan at low speed.
- LAMP ON/OFF: Toggles the light kit on or off.
- TIMER (1H, 2H...8H): Activates a delayed fan-off function. Possible delay settings range from 1 hour to 8 hours. The LCD display shows the current fan speed, light status, and timer settings.
Before operating remote control functions, any existing ceiling fan speed control rotary switch should be set to the HIGH setting, and the control switch for the light kit (if any) should be set to the ON position. For ceiling fans with pull chain switches, these should be set to HIGH speed and ON light position, respectively.
Maintenance Features:
- Battery Replacement: The battery in the transmitter will weaken over time and should be replaced before it leaks. Used batteries must be disposed of properly.
- Code Setting: The code setting on both the transmitter and receiver can be adjusted using a small screwdriver or ballpoint pen to slide the DIP switches. This is crucial for initial setup and for preventing interference if multiple remote-controlled fans are in use.
- Cleaning: While not explicitly detailed, general care for electronic devices applies, such as keeping the unit clean and dry.
Safety Precautions and Installation Guidelines:
- Qualified Electrician: Installation must be performed by a licensed and qualified electrician in accordance with SAA and local authority regulations.
- Power Disconnection: All electrical work must be undertaken only after disconnecting power by removing fuses or turning off the circuit breaker to ensure all-pole isolation of the electrical supply.
- Indoor Use Only: The product is for indoor use only and should not be exposed to water or moisture.
- No Variable Wall Controllers: Do not use this remote controller in conjunction with any variable (rheostat) wall controller.
- Receiver Placement: The receiver should be installed inside the ceiling fan canopy for proper protection. If the receiver cannot fit due to dimension limitations or the absence of a hanging bracket (e.g., in low-profile/hugger design fans), it can be enclosed in an Electrical Insulation Box (not supplied) placed in the ceiling, ensuring compliance with Australian wiring regulations. In such cases, the antenna wire must be drawn away from the insulation box through a small hole.
- Wiring Integrity: Do not pull or cut short lead wires. Ensure all wire connections are tidy and secure, and avoid breaking any wire connections when re-installing the fan canopy.
- Child Safety: Keep batteries out of reach of children. Young children should be supervised to ensure they do not play with the appliance.
- Compatibility Check: If using the remote controller with ceiling fans of other brands, low-profile designs, or those with smaller hanging brackets, electrical compatibility and physical fit of the receiver should be checked before installation.
The manual emphasizes that minor design changes may result in slight variations between the product illustrated and the actual product. It also states that Mercator Lighting assumes no liability for customer's failure to comply with the safety requirements.