23
90-10212R40
GB
goh83
6
7
9-10
8
a
cb
d
e
f
a
c
b
d
e
f
oh
MAINTENANCE
ohl34
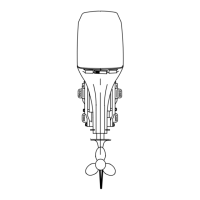
PROPELLER REPLACEMENT - 4-1/4 IN. (108MM)
DIAMETER GEAR CASE (CONTINUED)
6
Coat the propeller shaft with Quicksilver or Mercury Precision Lubricants
Anti-Corrosion Grease or 2-4-C Marine Lubricant with Teflon.
IMPORTANT: To prevent the propeller hub from corroding and seizing to the
propeller shaft, especially in salt water, always apply a coat of the
recommended lubricant to the entire propeller shaft at the recommended
maintenance intervals and also each time the propeller is removed.
7 Flo-Torq I Drive Hub Propellers – Install thrust washer (a), propeller (b),
continuity washer (c), thrust hub (d), propeller nut retainer (e), and propeller
nut (f) onto the shaft.
8 Flo-Torq II Drive Hub Propellers – Install forward thrust hub (a), replaceable
drive sleeve (b), propeller (c), thrust hub (d), propeller nut retainer (e) and
propeller nut (f) onto the shaft.
9 Place a block of wood between gear case and propeller and torque propeller
nut to 55 lb. ft. (75 N·m).
10Secure propeller nut by bending three of the tabs into the thrust hub grooves.
goh14
1
2
3
ohm16
SPARK PLUG INSPECTION AND REPLACEMENT
WARNING
Avoid serious injury or death from fire or explosion caused by damaged
spark plug boots (a). Damaged spark plug boots can emit sparks. Sparks
can ignite fuel vapors under the engine cowl. To avoid damaging spark
plug boots, do not use any sharp object or metal tool such as pliers,
screwdriver, etc. to remove spark plug boots.
1 Remove the spark plug boots (a) by twisting the rubber boots slightly and pull
off.
2 Remove the spark plugs to inspect. Replace spark plug if electrode is worn or
the insulator is rough, cracked, broken, blistered or fouled.
3 Set the spark plug gap. See Specification Chart in General Information Section.
4 Before reinstalling spark plugs, clean away dirt on the spark plug seats. Install
plugs finger tight, and tighten 1/4 turn or torque to 20 lb. ft. (27 N·m).
goh121
1
a
c
b
d
15
e
1
2
3
4
ohj12
FUSE REPLACEMENT
Models With Electronic Fuel Injection (Efi)
IMPORTANT: Always carry spare 20 AMP fuses.
The electrical wiring circuits on the outboard are protected from overload by fuses
in the wiring. If a fuse is blown, try to locate and correct the cause of the overload.
If the cause is not found, the fuse may blow again.
1 Open the fuse holder and look at the silver colored band inside the fuse. If band
is broken, replace the fuse. Replace fuse with a new fuse with the same rating.
The fuses and circuits are identified as follows:
a. (1) SmartCraft Data Bus Circuit – 15 AMP Fuse.
b. (2) Fuel Pump/Idle Air Control/Fuel Injector Circuits – SFE 20 AMP Fuse.
c. (3) Main Relay/Accessories – 20 AMP Fuse.
d. (4) Ignition Coil Circuit – 20 AMP Fuse.
e. Spare 20 AMP Fuse
goh95
1
2
a
omc7
FUSE REPLACEMENT
Electric Start Models With Carburetors
IMPORTANT: Always carry spare 20 AMP fuses.
The electric starting circuit is protected from overload by an 20 AMP fuse. If the
fuse is blown, the electric starter motor will not operate. Try to locate and correct
the cause of the overload. If the cause is not found, the fuse may blow again.
1 Open the fuse holder and look at the silver colored band inside the fuse. If band
is broken (a), replace the fuse. Replace fuse with a new fuse with the same
rating.
omd2
TIMING BELT INSPECTION
2
Inspect the timing belt and have it replaced by an authorized dealer if any of
the following conditions are found.
a. Cracks in the back of the belt or in the base of the belt teeth.
b. Excessive wear at the roots of the cogs.
c. Rubber portion swollen by oil.
d. Belt surfaces roughened.
e. Signs of wear on edges or outer surfaces of belt.