ZL6 Reference Barometer
SensorReplacement
ZL6 Reference Barometer
SensorReplacement
ZL6 Reference Barometer
SensorReplacement
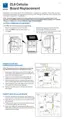
The reference barometer sensor in the ZL6 data logger should be replaced if it malfunctions
or if it needs to be calibrated. These step-by-step instructions will explain the replacement
process. A #1 Phillips screwdriver is required forinstallation.
ACCESS REFERENCE BAROMETER SENSOR
CAUTION: Do not disconnect anywiring.
TEST
Main board
Sensor
REMOVE AND REPLACE SENSOR
Remove old
Insert new
Main board
Sensor
REMOVE AND REPLACE SENSOR
Remove old
Insert new
Main board
Sensor
REMOVE AND REPLACE SENSOR
Remove old
Insert new
3. Carefully lift up
the main board
and rotate over to
exposetheunderside.
4. Lifting straight up,
remove the existing
sensor and discard.
2. Remove the four
screws from the
main board using a
Phillipsscrewdriver.
1. Remove a battery toturn
off theZL6, and press
TEST buttonto clear
power in logger.
5. Pressing straight
down,insert the
newsensor into
the daughterboard
connector.
18317-00
5.15.2019
18317-00
5.15.2019
18317-00
5.15.2019
NOTE: No need to
disconnectthe antenna.
1. Remove a battery toturn
off theZL6, and press
TEST buttonto clear
power in logger.
2. Remove the four
screws from the
main board using a
Phillipsscrewdriver.
3. Carefully lift up
the main board
and rotate over to
exposetheunderside.
NOTE: No need to
disconnectthe antenna.
4. Lifting straight up,
remove the existing
sensor and discard.
5. Pressing straight
down,insert the
newsensor into
thedaughterboard
connector.
1. Remove a battery toturn
off theZL6, and press TEST
buttonto clear power in logger.
2. Remove the four
screws from the
main board using a
Phillipsscrewdriver.
3. Carefully lift up
the main board
and rotate over to
exposetheunderside.
NOTE: No need to
disconnectthe antenna.
4. Lifting straight up,
remove the existing
sensor and discard.
5. Pressing straight
down,insert the
newsensor into
the daughterboard
connector.