Subject to technical changes I
Edition 04.2022
40
DE
FR
NL
EN
ES
IT
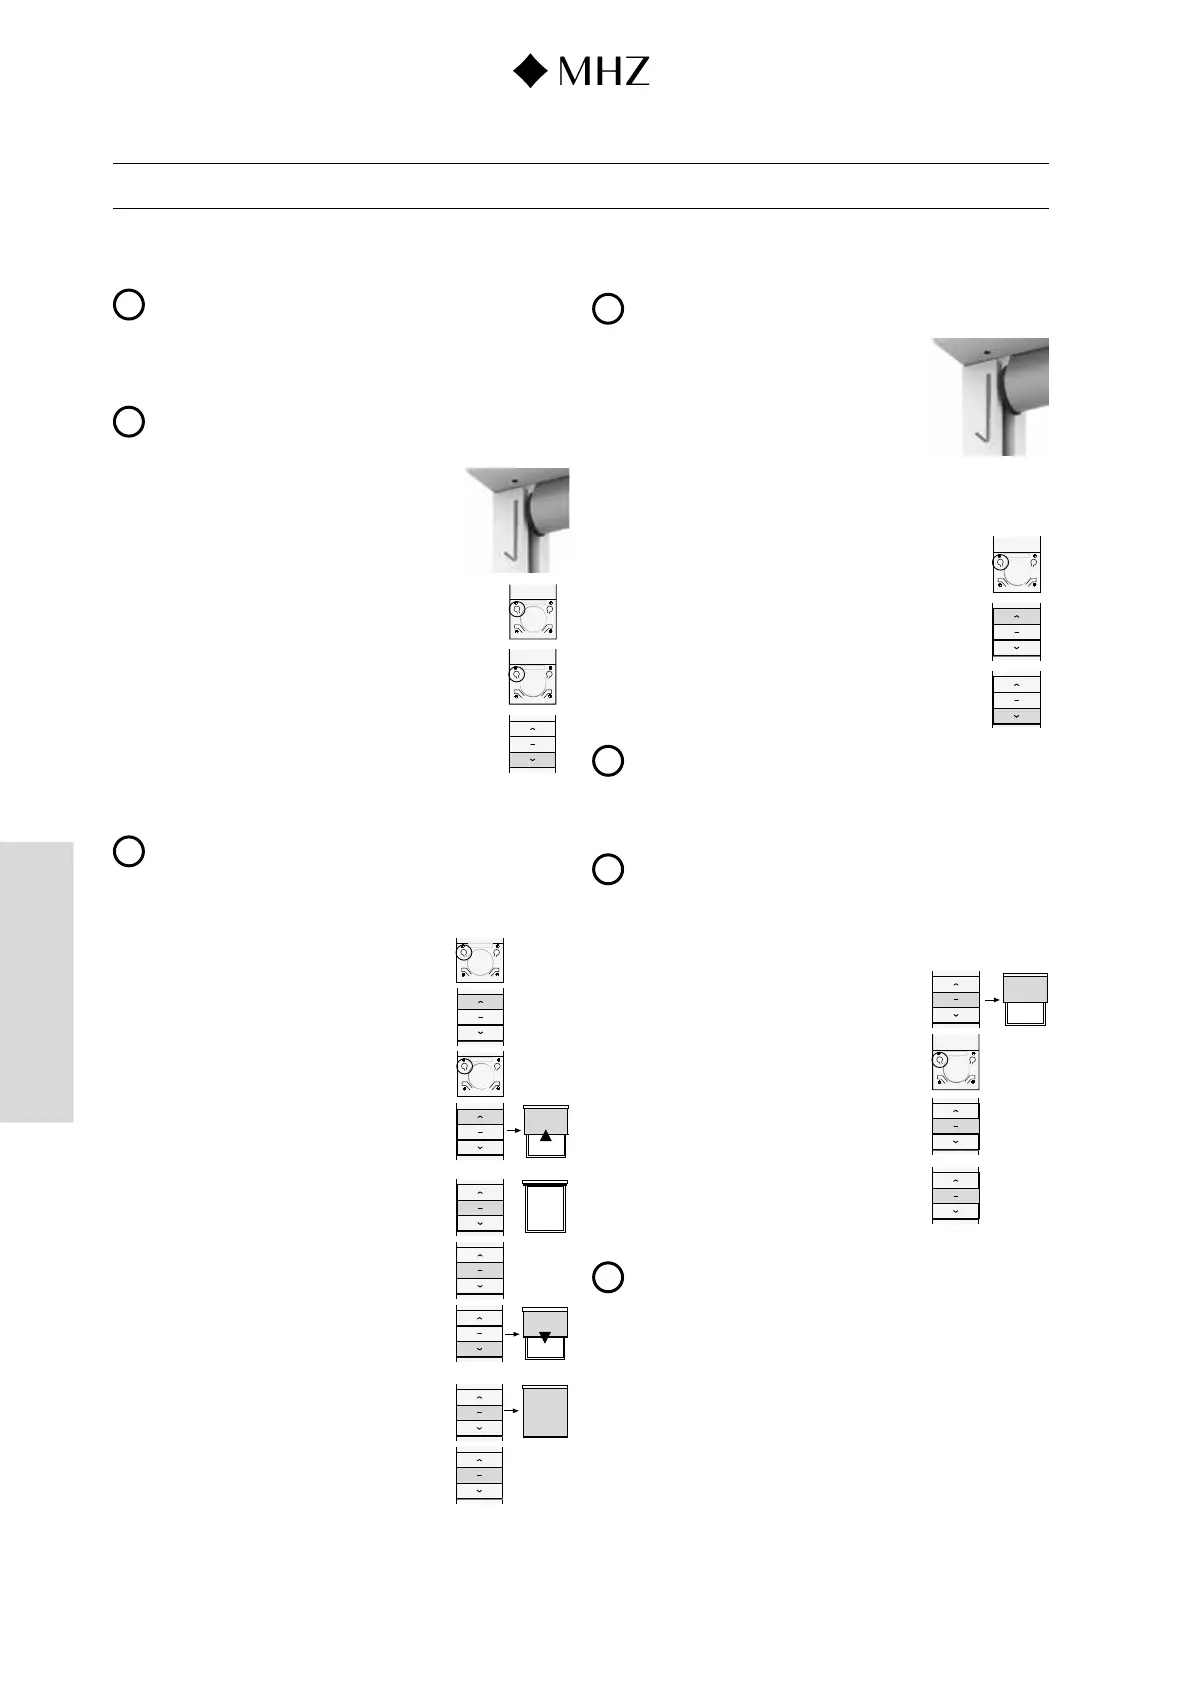
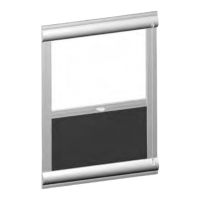
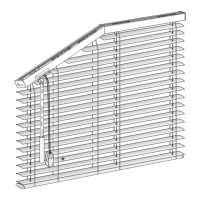
Adjustment instructions
Solix external roller blind
3.1 Pair motor and first remote control unit
(has generally already
been done at the factory)
i
The time between two entries must not be longer than 6 seconds.
Otherwise the entries get deleted. The entries then have to be repeated.
1. With hand-held remote control units pull off the back cover to make the setting.
Caution: Keep battery gently pressed down (contact).
After making the setting, push the cover back on.
i
When pairing a multi-channel remote control unit, before moving to the next
step use the P1 buttons on the RC unit to switch to the channel
to be assigned for this drive system.
2. Hold down setting button on
the motor for c. 3 seconds.
=> Roller blind conrms with 1 beep + short movement.
3. On the remote control unit press the P2 button once
=> Roller blind conrms with 1 beep + short movement.
P2
4. On the remote control unit press the P2 button once
=> Roller blind conrms with 1 beep.
5. On the remote control unit press the DOWN button once
=> Roller blind conrms with 6 beeps + short movement.
3.2 Setting the top and bottom end position
(has generally already been done at the factory)
i
n orer to ange te en oton te mut rt eter ae een eete a
at 3.6 or changed as described at 2.2.
1. With hand-held remote control units pull off the back cover to make the setting.
Caution: Keep battery gently pressed down (contact).
After making the setting, push the cover back on.
2. On the remote control unit press the P2 button once
=> Roller blind conrms with 1 beep + short movement.
STOP
P2
P2
STOP
3. On the remote control unit press the UP button once
=> Roller blinds with 1 beep + short movement.
4. On the remote control unit press the P2 button once
=> Roller blind conrms with beeps + short movement.
5. On the remote control unit press the UP button once
Option: Gradually move towards end positions: As a set-
ting aid this additional function can be used if necessary.
During the travel UP process, press the P2 button on the
remote control unit once => Roller blind moves gradually.
6. On the remote control unit, press the STOP button once
as soon as the desired top end position has been reached.
7. ress the STOP button on the remote control unit 5 times
=> Roller blind conrms the programming of the top end
position with a beep when the button is pressed +short
movement.
8. On the remote control unit press the DOWN button once
Option: Gradually move towards end positions: As a set-
ting aid this additional function can be used if necessary.
During the travel DOWN process, press the P2 button
on the remote control unit once => Roller blind moves
gradually.
9. On the remote control unit, press the STOP button once
as soon as the desired bottom end position has been
reached.
10. Press the STOP button on the remote control unit 5 times
=> Roller blind conrms the programming of the bottom
end position with a beep when the button is pressed +
short movement.
3.3 Change rotary direction of the drive system with end posi-
tions set
i
To change the rotary direction again, repeat point 1.
1. Keep the setting button on the drive unit pressed.
=> Roller blind conrms with short movements about
4 seconds apart + 3 beeps after release of the setting
button.
3.4 Set pin-point operating mode (option)
1. With hand-held remote control units pull off the back cover to make the setting.
Caution: Keep battery gently pressed down (contact).
After making the setting, push the cover back on.
P2
2. On the remote control unit press the P2 button once
=> Roller blind conrms with 1 beep + short movement.
3. On the remote control unit press the UP button once
=> Roller blind conrms with 1 beep + short movement.
4. On the remote control unit press the DOWN button once
=> Roller blind conrms with 2 beeps + short movement.
i
Pin-point operation through brief, simultaneous pressing of the UP/DOWN button.
Press the UP/DOWN button for a prolonged time for smooth movement.
To delete the setting, repeat steps 2 to 4.
3.5 Programming a third blind position (option)
i
It is possible to assign an additional stop position to the roller blind.
This position can only be between the two end positions.
1. With hand-held remote control units pull off the back cover to make the setting.
Caution: Keep battery gently pressed down (contact).
After making the setting, push the cover back on.
2. Using the UP or DOWN button, move the roller blind into
the desired position.
Press the STOP button
P2
STOP
3. On the remote control unit press the P2 button once
=> Roller blind conrms with 1 beep + short movement.
4. On the remote control unit press the STOP button once
=> Roller blind conrms with 1 beep + short movement.
5. On the remote control unit press the STOP button once
=> Roller blind conrms with beeps + short movement.
i
Press the STOP button for 3 seconds. The blind moves into the third blind
oton nont moe a een et te n rt moe to te ottom en
position and then into the third blind position. To delete the third blind position,
repeat points 3 to 5.