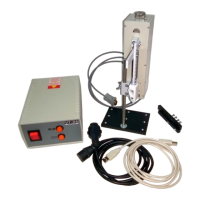
Some minor assembling will be necessary after the unpacking the delivery set.
1. Screw vertical rod into a hole on base plate
2. Mount the dipping unit on the vertical rod (stand) and fix its position with a fixing screw in
the clamp.
3. Using two screws attach arm to the mounting block of movable carriage.
4. Adjust position of vertical element with PTFE clamp on the arm if necessary.
After dipping unit assembly, connect the embedded control cable from the dipper to socket on rear side of control electronic unit.
And connect the control electronic unit to host PC with the USB AmBm cable from the set. Using power cord, connect the
control electronic unit to electrical network (220…240 V 50 Hz).