INSTALLATION & OPERATING INSTRUCTIONS
IIMMPPOORRTTAANNTT:: PPLLEEAASSEE RREEAADD TTHHEESSEE IINNSSTTRRUUCCTTIIOONNSS CCAARREEFFUULLLLYY BBEEFFOORREE AATTTTEEMMPPTTIINNGG TTOO IINNSSTTAALLLL TTHHIISS AALLAARRMM SSYYSSTTEEMM..
IIFF TTHHEE SSYYSSTTEEMM IISS BBEEIINNGG IINNSSTTAALLLLEEDD BBYY AA SSEECCUURRIITTYY IINNSSTTAALLLLEERR OORR EELLEECCTTRRIICCAALL EENNGGIINNEEEERR,, PPLLEEAASSEE EENNSSUURREE TTHHAATT AA
CCOOPPYY OOFF TTHHEESSEE IINNSSTTRRUUCCTTIIOONNSS IISS GGIIVVEENN TTOO TTHHEE CCUUSSTTOOMMEERR FFOORR RREETTEENNTTIIOONN AANNDD FFUUTTUURREE RREEFFEERREENNCCEE..
This alarm system can provide valuable protection for your home and property if used properly. However, the system cannot
guarantee complete protection against burglary or robbery. Therefore, the manufacturer, distributor or supplier will not be
held responsible for any loss or damage which may occur.
6-ZONE EASYFIT INTRUDER ALARM
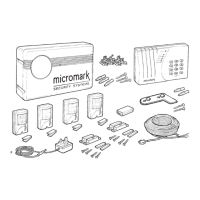
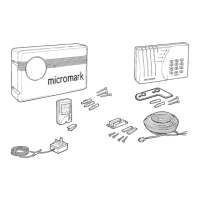
Check the contents of the
packaging:
• 1x6 zone control panel
• External siren
• 9V PP3 alkaline back up
system battery
• Mains adaptor
• 4 PIR sensors
• 2 sets of hardwired door
contacts
• 8 sticky pads
• Fixing screws
• Cable clips
• Wall plugs
• Screwdriver (fits PIR cover
screws)
• 50m of multi-core alarm
cable
• Fixing bracket
IMPORTANT
In certain areas of the country you are required by law to
notify the Police and Local Authority when you install an
Alarm System. Since the requirements of each Authority
differ, we suggest that you contact the Environmental Officer
of your local Borough for full information about your local
area‘s by-laws.
Please note that this equipment and its components have NO user serviceable parts.
If you experience any difficulties call our Helpline.
MMIICCRROOMMAARRKK HHEELLPPLLIINNEE TTEELL:: 00887700 224411 33002299
Monday to Friday (8.30am to 5pm)
www.micromark.co.uk
CCOONNTTEENNTTSS
Planning your system . . . . . . . . . . . . . . . . . . . . . . . . . . . . . . . . .2
Wiring diagrams . . . . . . . . . . . . . . . . . . . . . . . . . . . . . . . . . . . . .3
Start with installing the control panel and siren . . . . . . . . . . . .4
Fitting PIRs and door contacts . . . . . . . . . . . . . . . . . . . . . . . . . .6
Wiring the control panel . . . . . . . . . . . . . . . . . . . . . . . . . . . . . . .7
Control panel status . . . . . . . . . . . . . . . . . . . . . . . . . . . . . . . . . .8
Total immobilisation of system . . . . . . . . . . . . . . . . . . . . . . . . . .8
Checking the system – Walk test . . . . . . . . . . . . . . . . . . . . . . . .8
Checking the system – Bell test mode . . . . . . . . . . . . . . . . . . . .8
System entry time . . . . . . . . . . . . . . . . . . . . . . . . . . . . . . . . . . . .9
System exit time . . . . . . . . . . . . . . . . . . . . . . . . . . . . . . . . . . . . .9
Bell reset . . . . . . . . . . . . . . . . . . . . . . . . . . . . . . . . . . . . . . . . . .10
To change password . . . . . . . . . . . . . . . . . . . . . . . . . . . . . . . .10
To arm the system . . . . . . . . . . . . . . . . . . . . . . . . . . . . . . . . . . .11
To disarm the system . . . . . . . . . . . . . . . . . . . . . . . . . . . . . . . . .11
Panic alarm . . . . . . . . . . . . . . . . . . . . . . . . . . . . . . . . . . . . . . . .11
Chime zone . . . . . . . . . . . . . . . . . . . . . . . . . . . . . . . . . . . . . . . .11
Part Guard . . . . . . . . . . . . . . . . . . . . . . . . . . . . . . . . .Back cover
Troubleshooting . . . . . . . . . . . . . . . . . . . . . . . . . . . . .Back cover
KKIITT CCOONNTTEENNTTSS
PPlleeaassee nnoottee:: BBeeffoorree yyoouu ssttaarrtt ttoo iinnssttaallll tthhiiss MMiiccrroommaarrkk AAllaarrmm,, wwee aaddvviissee tthhaatt yyoouu sshhoouulldd ttaakkee aaddeeqquuaattee ssaaffeettyy pprreeccaauuttiioonnss
wwhheenn uussiinngg ppoowweerr ttoooollss aanndd llaaddddeerrss.. PPrrootteecctt yyoouurr eeyyeess wwhheenn ddrriilllliinngg aanndd
nneevveerr
uussee aapppplliiaanncceess iinn ddaammpp oorr wweett ccoonnddiittiioonnss..
PIR SENSORS
MAINS ADAPTOR
DOOR
CONTACTS
ALARM CABLE
FIXING BRACKET
CONTROL PANEL
SIREN