Indoor unit installation
204
Note:
3.4.4
1. Install the filter(optional) according to air inlet size.
2. Install the canvas tie
3. Air inlet and air outlet duct should be apart far enough to avoid air passage short
4. Recommended duct
5.Please refer to the following static pressure to install..
Change the fan motor static pressure
corresponding to external duct static pressure.
NOTE: 1.Do not put the
2.When connecting duct, use inflammable canvas tie
3.Insulation foam should be wrapped outside the duct to avoid condensate and internal duct underlayer shall
be added to reduce the noise
3.
①
②
Indoor unit installation
204
Note:
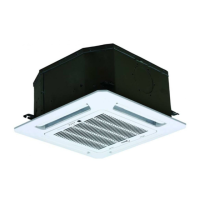
Confirm the minimum drain tilt is 1/100 or more.
3.4.4
Duct and a
1. Install the filter(optional) according to air inlet size.
2. Install the canvas tie
3. Air inlet and air outlet duct should be apart far enough to avoid air passage short
4. Recommended duct
5.Please refer to the following static pressure to install..
Change the fan motor static pressure
corresponding to external duct static pressure.
NOTE: 1.Do not put the
2.When connecting duct, use inflammable canvas tie
3.Insulation foam should be wrapped outside the duct to avoid condensate and internal duct underlayer shall
be added to reduce the noise
3.
4
.7 Adjust the air inlet direction(From rear side to under
①
Take off ventilation panel and flange,
②
Change the mounting positions of ventilation panel and air return flange .
Indoor unit installation
Confirm the minimum drain tilt is 1/100 or more.
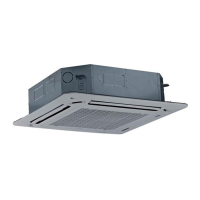
Duct and accessories installation
1. Install the filter(optional) according to air inlet size.
2. Install the canvas tie
-
in between the body and duct.
3. Air inlet and air outlet duct should be apart far enough to avoid air passage short
4. Recommended duct
connection.
5.Please refer to the following static pressure to install..
Change the fan motor static pressure
corresponding to external duct static pressure.
NOTE: 1.Do not put the connecting duct weight on the indoor unit.
2.When connecting duct, use inflammable canvas tie
3.Insulation foam should be wrapped outside the duct to avoid condensate and internal duct underlayer shall
be added to reduce the noise
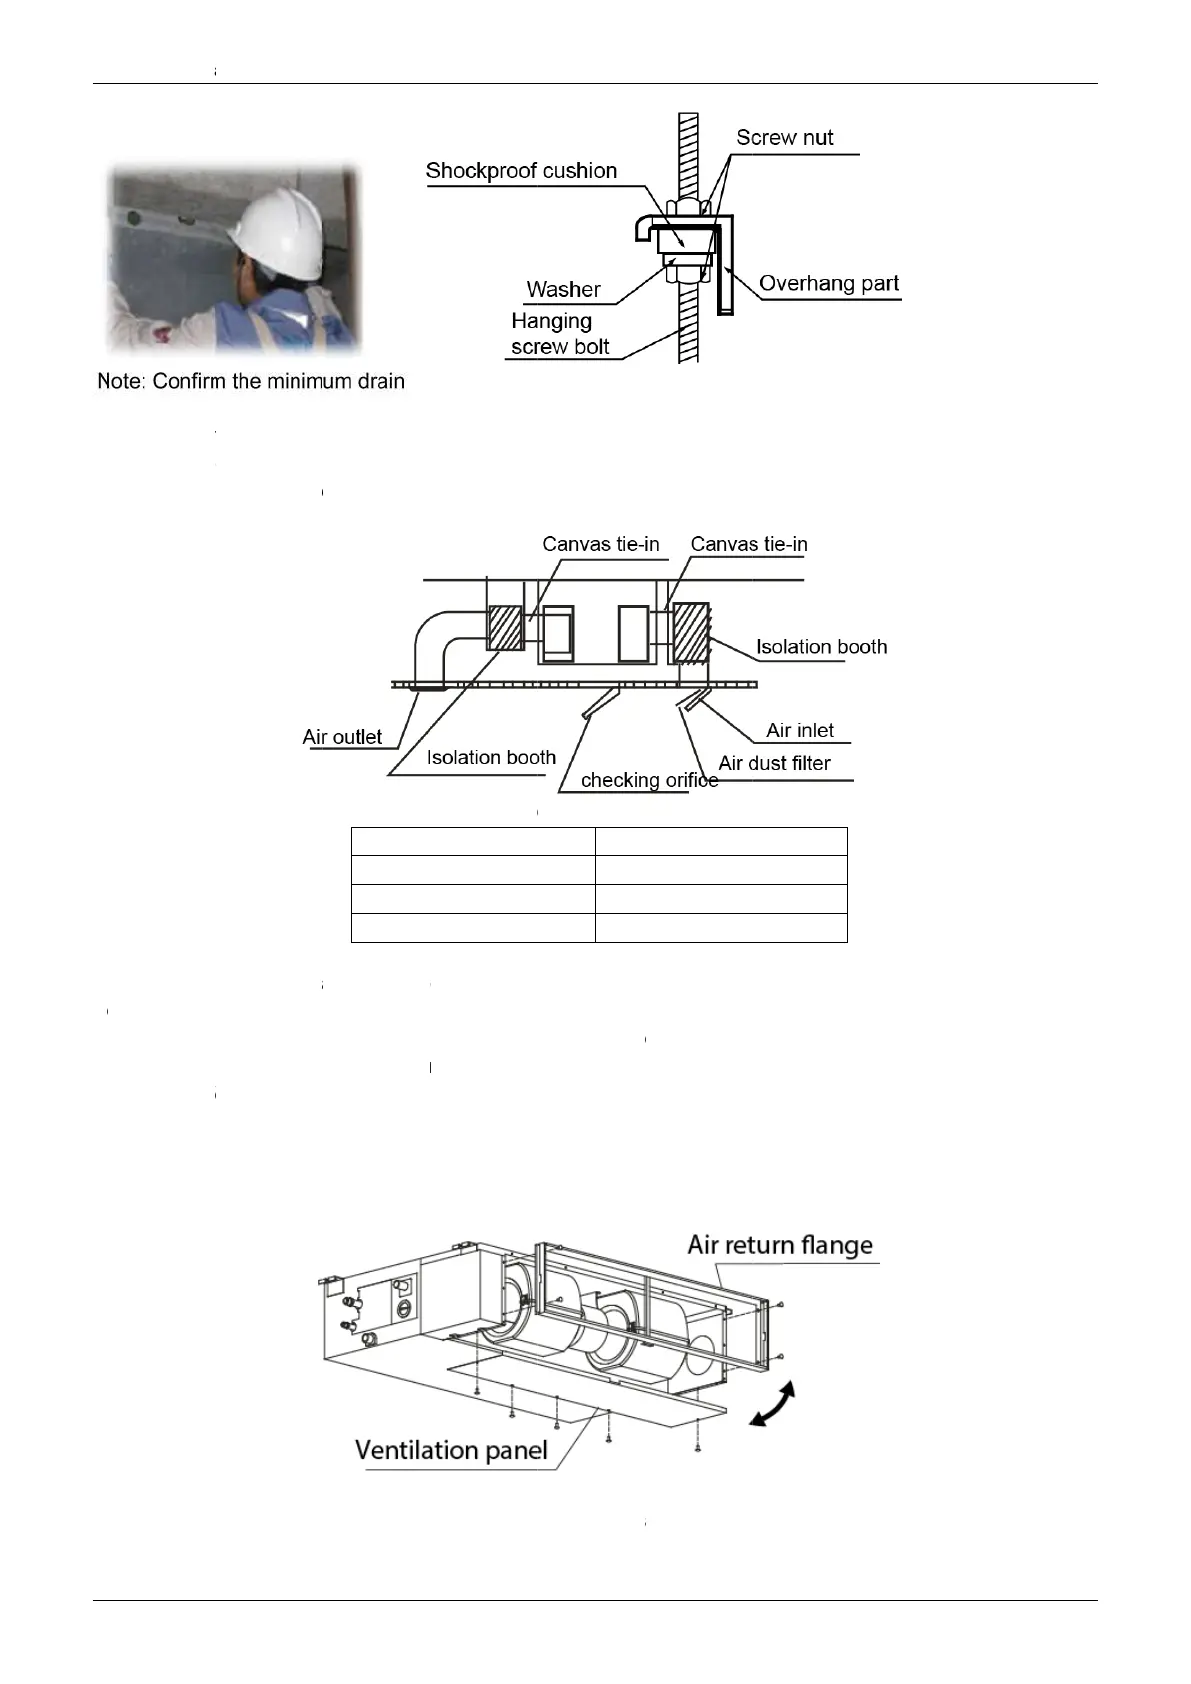
.7 Adjust the air inlet direction(From rear side to under
Take off ventilation panel and flange,
Change the mounting positions of ventilation panel and air return flange .
Confirm the minimum drain tilt is 1/100 or more.
ccessories installation
1. Install the filter(optional) according to air inlet size.
in between the body and duct.
3. Air inlet and air outlet duct should be apart far enough to avoid air passage short
connection.
5.Please refer to the following static pressure to install..
Change the fan motor static pressure
corresponding to external duct static pressure.
connecting duct weight on the indoor unit.
2.When connecting duct, use inflammable canvas tie
3.Insulation foam should be wrapped outside the duct to avoid condensate and internal duct underlayer shall
be added to reduce the noise for special requirement.
.7 Adjust the air inlet direction(From rear side to under
Take off ventilation panel and flange,
Change the mounting positions of ventilation panel and air return flange .
Confirm the minimum drain tilt is 1/100 or more.
ccessories installation
1. Install the filter(optional) according to air inlet size.
in between the body and duct.
3. Air inlet and air outlet duct should be apart far enough to avoid air passage short
5.Please refer to the following static pressure to install..
18~30
36
48~60
Change the fan motor static pressure
corresponding to external duct static pressure.
connecting duct weight on the indoor unit.
2.When connecting duct, use inflammable canvas tie
3.Insulation foam should be wrapped outside the duct to avoid condensate and internal duct underlayer shall
for special requirement.
.7 Adjust the air inlet direction(From rear side to under
Take off ventilation panel and flange,
Change the mounting positions of ventilation panel and air return flange .
Confirm the minimum drain tilt is 1/100 or more.
1. Install the filter(optional) according to air inlet size.
in between the body and duct.
3. Air inlet and air outlet duct should be apart far enough to avoid air passage short
5.Please refer to the following static pressure to install..
connecting duct weight on the indoor unit.
2.When connecting duct, use inflammable canvas tie
-
in to prevent vibrating.
3.Insulation foam should be wrapped outside the duct to avoid condensate and internal duct underlayer shall
for special requirement.
.7 Adjust the air inlet direction(From rear side to under
Change the mounting positions of ventilation panel and air return flange .
3. Air inlet and air outlet duct should be apart far enough to avoid air passage short
0~80
0~100
0~160
connecting duct weight on the indoor unit.
in to prevent vibrating.
3.Insulation foam should be wrapped outside the duct to avoid condensate and internal duct underlayer shall
.7 Adjust the air inlet direction(From rear side to under
-side.)
Change the mounting positions of ventilation panel and air return flange .
3. Air inlet and air outlet duct should be apart far enough to avoid air passage short
3.Insulation foam should be wrapped outside the duct to avoid condensate and internal duct underlayer shall
Change the mounting positions of ventilation panel and air return flange .
3. Air inlet and air outlet duct should be apart far enough to avoid air passage short
-circuit.
3.Insulation foam should be wrapped outside the duct to avoid condensate and internal duct underlayer shall
Installation
3.Insulation foam should be wrapped outside the duct to avoid condensate and internal duct underlayer shall
3.Insulation foam should be wrapped outside the duct to avoid condensate and internal duct underlayer shall
 Loading...