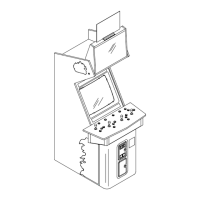
LATCHES
COIN
DOOR
CONTROL PANEL MODIFICATIONS
1.
From the top of the control panel, grasp the two upper corners and swing the panel up toward the front
of the game until it rests on the hinge stops. Caution! Do not jar cabinet or control panel while in this
position. Damage can occur if it
slams shut. Mark each of the wires going to a switch or a joystick,
noting both the location and function (for example, player 1 start button, player 4 joystick, etc)
Do not
disconnect any of the wires from the switches or the joysticks.
2.
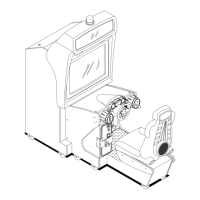
Separate each switch from its pushbutton. Gently bend the large prong away from the microswitch just
enough to slide the switch off of the pushbutton housing. Unscrew the nut from the housing and press
the housing through the front of the control panel Lay the pushbutton parts inside the control panel
housing Repeat this process until all switches are freed and all pus
,
ushbuttons are removed
3.
Remove
the tamper resistant screws holding the clear plastic cover to the control panel. Lift the cover
up and off of the control panel and set it aside. Do not damage or remove the existing artwork.
4.
Locate the control panel artwork supplied with the kit. Lay the large, wallpaper decal face up on a flat
work surface Locate the clear plastic control panel cover and center it over the wallpaper decal Mark
the outside shape of the panel and each of the joystick, pushbutton, and screw hole locations
5.
Cut out each of the holes and trim the decal to match the shape of the control panel. Use care not to
wrinkle or remove the backing during cutting. Locate the control panel add-on decals and place them
onto the trimmed wallpaper to form the new control panel artwork
6.
Do not remove the backing from the wallpaper decal! Lift
the completed artwork and lay it over the top
of the existing control panel. Align the holes. Ensure that none of the original game artwork is visible.
Install the clear cover and the tamper resistant mounting screws
5.
Group the Player Controls by color Start - orange, Pass / Change Player - red, Jump / Tackle - blue,
Turbo - white, Joystucks - black The joysticks are already in place, but the buttons must be installed
6.
Insert a push-button housing through its switch hole from the front side of the control panel. Screw the
nut finger tight onto the switch housing at the back of the panel. Snap the switch onto the housing.
7.
Repeat this step for each button of a different color. Continue until all button groups are mounted.
Rotate the housing so that the switch terminals will be properly oriented and tighten the nuts firmly
8.
Verify that the control panel ground braid is connected tightly to the metal ground stud on the hinge.
Close the control panel, ensuring that no wires are pinched or caught in the process. Reach up
through the open coin door and secure the latches at the sides of the control panel housing. Try each
of the joysticks and buttons to make certain that they do not stick or bind when operated rapidly.
HOUSING
PRONG
NUT-
SWITCH
'1
LOCATION OF CONTROL PANEL LATCHES
PUSHBUTTON COMPONENT ASSEMBLY
1-2
 Loading...