EasyManua.ls Logo

Midwest RDH - User Manual

Midwest RDH
9 pages
Print Icon
To Next Page IconTo Next Page
Loading...
Midwest RDH Handpiece
Repair Procedure
The Midwest RDH handpiece is fairly common and is used by hygienists to clean teeth.
The most common problems for this handpiece include a bad prophy head or a dirty
motor. Both of these problems can be easily solved. As always, try to determine the
problem before disassembling the nosecone.
Some signs to look for are:
The Motor is locked up:
o Try removing the prophy head and running the motor. If the motor now
runs freely without the head, simply replace the prophy head (Part# SO-
720445). If not, disassemble and overhaul.
There is little or no torque when the motor is running:
o You may have a cracked drive gear at the top of the nose section, or you
may have a dirty motor in need of overhaul.
The nose section spins when the motor is running
o This is a sign of a faulty prophy head, simply replace the head.
The repair procedures for each of these problems is addressed below
STEP 1
To remove the nose portion from the motor portion, secure the nose
assembly approximately ¾ up the shaft. Use about a ¾” collet to hold the
nose. Then wrap the motor housing with a strip of rubber and gently wiggle
the housing while simultaneously pulling up. This will allow the two pieces
to work apart.
STEP 2
Remove the two
pieces and set
them on your
work surface.
You can now see the retaining clip that was holding the two pieces together. Try to be
careful with this clip as it is hard to replace.
Question and Answer IconNeed help?

Do you have a question about the Midwest RDH and is the answer not in the manual?

Summary

Midwest RDH Handpiece Motor Repair

Troubleshooting and Initial Motor Separation

Identify common issues, signs of problems, and initial steps to separate the nose section from the motor housing.

Motor Canister Disassembly and Reassembly

Steps for disassembling the motor canister, cleaning components, and reassembling the motor parts.

Motor Reintegration into Housing

Reinserting the reassembled motor into the main housing and securing the components.

Midwest RDH Prophy Nosecone Repair

Nosecone Disassembly Procedures

Steps to detach the nose section from the handpiece body and disassemble internal components.

Spindle Assembly Repair and Reassembly

Detailed steps for reassembling the spindle assembly, including chuck, bearing, and nut.

Final Nosecone Attachment and Testing

Connecting the reassembled nose section to the motor assembly and final checks.

Overview

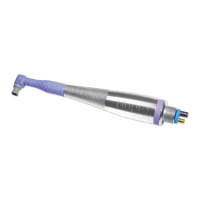
The Midwest RDH Handpiece is a dental instrument primarily used by hygienists for cleaning teeth. This manual details its repair and maintenance procedures, addressing common issues such as a locked motor, low torque, or a spinning nose section.

Function Description:

The handpiece operates by converting air pressure into mechanical rotation, driving a prophy head for dental cleaning. The internal mechanism consists of a motor assembly and a nose section, which houses the drive components for the prophy head. The motor assembly includes a canister with internal bearings and rotor blades, driven by air, which then transmits power to the nose section's planetary gears and spindle assembly.

Important Technical Specifications:

  • Collet Sizes: 9/16" collet for securing the motor and base pieces, and a 1/4" collet for the nose assembly.
  • Prophy Head Part Number: SO-720445 (for replacement).
  • Motor Canister Bearings: 40405C.
  • Planetary Gears: 40605.
  • Ring Gear: 40605R.
  • Spacer Plate: 40605P.
  • Rotor Blades: 40420.
  • Rotor Blade Springs: 10019.
  • Air Drive O-Ring: 40487-O.
  • Color Bands: 40422RDH.
  • Head or Base Piece: 40487.
  • Nose Section Top Gear: 60219 (with 60219A retaining pin).
  • Spindle Bearing: 60102.
  • Chuck: 40520.
  • Loading Spring: 40410.
  • Brass Clip Washer: 40520A.
  • Complete Nose Assembly: 40534 (as of 10/2011, $119ea).
  • Midwest Nosecone Tool: 00014.

Usage Features:

The handpiece is designed for ease of use in dental hygiene procedures. Its modular construction allows for targeted repair of specific sections. The prophy head is easily replaceable, which is often the first troubleshooting step for issues like a spinning nose section or a locked motor. The design also incorporates alignment posts and holes to ensure correct reassembly of the motor canister within the base piece.

Maintenance Features:

The manual provides detailed, step-by-step instructions for disassembling, cleaning, and reassembling the handpiece, addressing common problems:

  • Troubleshooting:

    • Locked Motor: First, remove the prophy head and test the motor. If it runs freely, replace the prophy head. If not, a full disassembly and overhaul of the motor are required.
    • Low Torque: This can indicate a cracked drive gear in the nose section or a dirty motor. Both require disassembly for inspection and repair.
    • Spinning Nose Section: This is typically a sign of a faulty prophy head, which should be replaced.
  • Disassembly and Reassembly:

    • Nose Section Removal: The nose portion is separated from the motor by securing the nose assembly in a 1/4" collet and gently wiggling and pulling the motor housing while wrapped in rubber.
    • Motor Housing Disassembly: The motor housing is unthreaded counterclockwise from the base piece after securing the motor threads in a 9/16" collet. The motor canister then lifts out.
    • Motor Canister Disassembly: The canister o-ring is removed, and the canister is secured in a collet. A 45-degree needle nose pliers is used to unscrew the top plate counterclockwise. Care is advised to avoid spilling blades and springs.
    • Internal Motor Cleaning: After disassembly, individual parts (especially rotor blades and springs) should be cleaned in an ultrasonic cleaner. Planetary gears should be greased before reassembly.
    • Nose Section Repair (Top Gear): The nose section should only be disassembled if there's a problem with the top gear. A gear retaining pin is tapped out, and the gear is replaced. The main shaft is not replaceable, requiring careful handling. The Midwest Nosecone Tool (00014) is recommended for access.
    • Spindle Assembly Repair: This involves removing a brass clip washer and spindle bearing. If the chuck is broken, a pin holding the chuck and drive fork is tapped out. Reassembly involves attaching the chuck to the drive fork, sliding on a new bearing, and securing the brass clip washer. The main spindle is then inserted into the spindle nut, followed by the bearing spacer and loading spring. The nosecone wrench is used to thread the spindle nut into the nosecone.
    • Final Assembly: The reassembled nose section is connected to the motor body by securing and compressing a large C-Clip with a zip-tie, then lowering the nose section onto the motor assembly secured in a 9/16" collet. The zip-tie is cut, and the nose section is firmly pushed into place.
  • Part Replacement: The manual provides part numbers for various components, including the prophy head, motor canister bearings, planetary gears, rotor blades, and the complete nose assembly. It also recommends replacing the colored rubber band (40422RDH) at the bottom of the motor for aesthetic improvement during repairs.

Midwest RDH Specifications

General IconGeneral
BrandMidwest
ModelRDH
CategoryDental equipment
LanguageEnglish

Related product manuals