This document is the operating instructions for the Miele Automatic Detergent Dispensing Unit AWD 10.
Function Description
The Miele Automatic Detergent Dispensing Unit AWD 10 is designed to automatically dispense detergent for washing machines. It consists of a base unit that holds two containers: one for liquid detergent and one for powder detergent. The unit connects to a compatible Miele washing machine, allowing for programmed automatic detergent dispensing during wash cycles. This system aims to simplify the washing process by ensuring the correct amount of detergent is used, thereby optimizing wash results and preventing issues related to under- or over-dosing. The unit is intended for domestic use with detergents designed for washing fabrics.
Important Technical Specifications
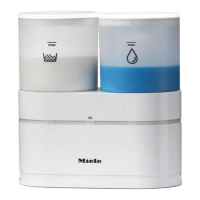
The unit features two distinct containers:
- Liquid Detergent Container (labeled with a droplet symbol): For liquid detergents.
- Powder Detergent Container (labeled with a washing tub symbol): For powder detergents.
It includes indicator lights on the front panel:
- Left light: Indicates when powder detergent dispensing is activated.
- Middle light: In-operation indicator.
- Right light: Indicates when liquid detergent dispensing is activated.
Connections at the rear of the unit include:
- Suds solution drainage connection (for detergent dissolved in water).
- Connection cable with a plug connector, which connects to a socket at the rear of the washing machine.
- Water inlet connection.
The unit is designed to be positioned in various ways: on the lid of the washing machine, beside the washing machine (e.g., on a shelf), fixed to a wall with an optional wall bracket, or in a unit next to the washing machine. A positioning guide is supplied to secure the unit, especially when placed on the washing machine lid, to prevent movement during spinning. The positioning guide has specific dimensions: >94 mm in length and >32 mm in width, to ensure the dispensing unit does not protrude over the washing machine lid.
Usage Features
Installation and Connection:
The unit can be positioned in multiple locations relative to the washing machine. A positioning guide is provided to secure the unit, particularly on the washing machine lid, to prevent movement during operation. The hoses connect to specific openings on both the washing machine and the dispensing unit, with different diameters to ensure correct connection. Screws are provided to secure the hoses. The electrical connection is made via a plug connector that attaches to a socket at the rear of the washing machine.
Adding Detergent:
Users must ensure the correct type of detergent is filled into each container (liquid into the liquid container, powder into the powder container). Both containers have lids that should be closed after filling to prevent drying out, clumping (for powder), and foreign objects from entering. The liquid detergent container has a valve at the bottom that opens automatically when placed on the base. For optimal filling, liquid detergent bottles can be placed upside down over the container.
Preparing the Washing Machine:
The washing machine needs to be programmed for automatic detergent dispensing. This process is detailed in the washing machine's operating instructions under the "Automatic detergent dispensing" section.
Safety Instructions:
- The unit must not be positioned above sockets, switches, lights, or other electrical appliances.
- It must be easily accessible for refilling.
- The positioning guide should be screwed in place if the washing machine is on a plinth or a vibrating surface.
- Only the supplied screws should be used to secure the positioning guide to avoid damaging the washing machine.
- The unit should not be installed in rooms where there is a risk of frost, as frozen hoses can tear or burst.
- If detergent comes into contact with eyes, rinse thoroughly with lukewarm water. If swallowed, seek medical assistance.
- Individuals with skin problems or sensitive skin should avoid contact with detergent.
- The unit is not a toy and children should be kept away from it.
- Only Miele original spare parts should be used for replacements.
- The unit is completely isolated from the electricity supply only when the connection cable is disconnected from the washing machine.
- The Miele "Water protection system" is effective only if the washing machine is correctly plumbed and connected to the electricity supply.
Maintenance Features
Cleaning and Care:
- General Cleaning: The base of the dispensing unit should be cleaned with a damp cloth. Solvents, abrasive cleaners, glass cleaners, or multi-purpose cleaning agents should not be used as they can damage plastic surfaces and components.
- Liquid Detergent Container: This container should be cleaned every six months or each time the brand of liquid detergent is changed. This involves removing both lids, turning the valve in the base to remove it, rinsing the valve under hot running water, rinsing the container with hot water to remove residues, cleaning the container with a mild non-abrasive cleaning agent or soap and water, drying it, and then replacing and securing the valve.
- Powder Detergent Container: The dosing cog inside the powder detergent container should be checked and cleaned monthly, especially if powder detergent is left standing for a long time, as it can clump. To clean:
- Remove the lid.
- Use a screwdriver to undo two screws in the lid of the detergent compartment and lift off the lid.
- Pour any remaining powder detergent into another container for future use.
- Turn the container over.
- Remove the cog and clean it with hot water, then dry it thoroughly (the cog must be dry to prevent clumping).
- Replace the cog and tighten the screws.
- Container and Agitator: The container and agitator should be cleaned every six months. This involves removing the lid, pouring out any remaining powder detergent, and removing the dosing cog (as described above). Before unscrewing the coupling, ensure the agitator is visible in the detergent compartment. Then, use a screwdriver to unscrew the screw from the coupling, remove the coupling from the agitator, turn the container over, and remove the agitator.
- Cleaning Agitator Residues: If hardened detergent residues are present on the agitator, soak it in hot water to soften them. Do not use force or sharp utensils to remove residues to avoid injury. Clean the dosing cog and lid with hot water.
- Drying: The container, agitator, dosing cog, and lid must be dry to prevent powder detergent from clumping together.
- Reassembly: Reassemble the container by reversing the disassembly steps and tightening the screws.
Troubleshooting:
The manual includes a problem-solving guide for common issues such as:
- In-operation light not lighting up: Check the connection to the washing machine.
- No detergent dispensed: Check if the container is empty, if automatic dispensing is activated, or if the dosing cog is clogged/not fitted.
- Powder detergent not dispensed: Could be due to a clogged dosing cog, clogged container, or overfilling.
- Liquid detergent not dispensed: Check for a clogged vent in the lid or if the liquid detergent has dried out.
- Not enough detergent dispensed: Adjust the dosage level and degree of soiling setting on the washing machine.
- Unsatisfactory wash result (liquid detergent): Liquid detergents may lack bleaching agents; consider using powder detergent or stain removers.
- Grey, greasy particles clinging to laundry: Insufficient detergent used for heavily soiled laundry; increase dosage or run a cleaning cycle with powder detergent.
- White residues on dark textiles: Caused by zeolites in powder detergent; try brushing off or use a zeolite-free liquid detergent.
- Dark specks in liquid detergent: Indicates mould; clean the container thoroughly and ensure the lid is securely replaced.