Do you have a question about the Miele FashionMaster B 4847 and is the answer not in the manual?
This document outlines the assembly, adjustment, connection, and maintenance of a steam ironing system.
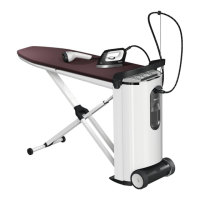
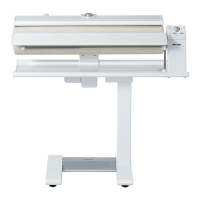
The steam ironing system is designed to provide efficient and convenient ironing. It features an ironing board that can be adjusted to various heights, a steam iron, and integrated storage compartments for the iron and its accessories. The system is designed for use with a properly installed earthed socket for AC 220-240 V, 50-60 Hz, ensuring safe and reliable operation. Its primary function is to simplify the ironing process by providing a stable ironing surface, powerful steam, and ergonomic adjustments.
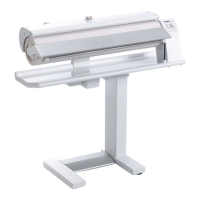
To begin, the steam ironing system should be moved to its installation location. The ironing board is initially in a folded position. To unfold it, one hand is used to pull the release mechanism upwards. This action releases the locking mechanism, allowing the X-frame to fold down. Once unlocked, both hands are used to pull the ironing board upwards into a horizontal position. It will audibly click into place on both sides of the tower, indicating it is securely locked. It is crucial to ensure the ironing board has locked into place on both sides of the tower, as this is a prerequisite for height adjustment and the fan in the ironing board to work. If the ironing board needs to be guided into an intermediate position, such as approximately 45°, the release mechanism should be held while guiding the board. The ironing board will remain in this position by itself. Once fully assembled, the lowest working height is approximately 83 cm.
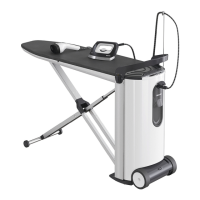
The steam ironing system offers adjustable height to suit personal preference, with a maximum working height of around 102 cm. To adjust the height, one of the rotary dials on the side of the tower handle must be turned as far as it will go in the specified direction. This dial should be held in position. Simultaneously, the handle on the tower should be pulled upwards or pressed down with the other hand to move the ironing board to the desired height. It is important not to push down on the ironing board itself while adjusting the height; always use the handle on the tower. When adjusting the height, care must be taken to ensure the mains connection cable does not become trapped in the mechanism. Once the desired working height is reached, the rotary dial can be released. It will spring back into the centre position, and the ironing board will remain at the adjusted height. For additional stability, the ironing board locks into place under extra pressure with an audible click, making the selected working height twice as secure. A useful tip for optimum comfort is to adjust the working position to approximately hip height.
Before connecting the steam ironing system to the electricity supply, the connection data (voltage and frequency) on the data plate must be checked against the local power supply. The data plate is located in the tower behind the water container. The system is supplied with a cable and moulded plug. To access the connection cable, the lower storage compartment is opened by swinging its lid downwards. The mains connection cable is then removed from this compartment. The plug is inserted into a suitable earthed socket. The mains connection cable is guided through the slot in the lid of the lower storage compartment, which is then closed. When closing the compartment, it is essential to ensure the mains connection cable does not become trapped between the lid and the housing or between the castor and the tower.
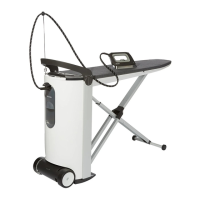
The iron and steam hose holder are stored in the top storage compartment on the tower. To access them, the lid of this compartment is opened. The iron is then taken out, and the storage compartment is closed. To connect the steam hose, the steam connection socket is opened by pulling it upwards. The sliding switch on the steam hose plug is pulled back, and the plug is inserted into the steam connection socket. Once the plug is locked into the socket, the sliding switch on the plug is released. The iron is now connected to the steam connection socket. The steam hose holder, supplied with the system, should be plugged into one of the provided sockets. A useful tip is to use the socket on the side on which you are ironing for convenience.
When the iron is not in use, it should always be placed onto the iron resting area with its soleplate down to prevent tipping over and falling. The resting surface can become hot if the iron is left on it for a long time, posing a burning risk. Direct contact with the resting surface should be avoided, and only the handle on the lid should be touched. It is crucial to switch off the continuous steam function before switching on the steam ironing system and before placing the iron on the resting surface. If the continuous steam function is not switched off, a message "Release stm. button" will appear in the display. The button can be unlocked by pushing the sliding switch on the iron forwards. Condensation may form on the iron resting surface, but this does not affect the function of the steam ironing system. To avoid damage or discolouration to the ironing board cover, the iron should always be placed on the resting surface before starting to iron and during breaks.
The steam ironing system requires a properly installed earthed socket for AC 220-240 V, 50-60 Hz. It is crucial that the connection data on the data plate matches the local power supply to prevent damage. If in doubt, a qualified electrician should be consulted. All electrical work must be carried out by a suitably qualified and competent person in accordance with current local and national safety regulations. The fuse must have a rating of at least 10 A. For extra safety, it is recommended to protect the appliance with a 30 mA residual current device (RCD). The socket should be next to the appliance and easily accessible. If the mains connection cable is faulty, it must only be replaced by a suitably qualified electrician.
Do not use a multi-socket adapter or an extension lead to connect the steam ironing system to the power supply, as these do not guarantee the required safety and can lead to overheating. The steam ironing system should not be connected to an off-grid inverter, such as those used for solar power systems, as power surges could cause a safety cut-out and damage the electronics. Additionally, avoid using the steam ironing system with "energy saving plugs," as these reduce the energy supply to the appliance and could generate excessive heat.
| Vertical steam function | Yes |
|---|---|
| Auto shut-off | Yes |
| Self-cleaning function | Yes |
| Anti-drip system | Yes |
| Iron type | Steam iron |