Do you have a question about the MightyOhm Geiger Counter and is the answer not in the manual?
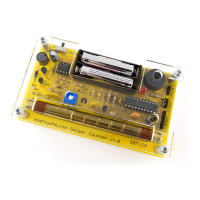
Verify all components against the Bill of Materials and sort them for assembly.
Mount and solder resistors onto the PCB, noting polarity is not important.
Solder diodes D1 and D2, paying close attention to their orientation and stripe markings.
Install the slide switch (S1), ensuring it sits flat and soldering all leads securely.
Solder capacitors C3, C4, C2 and the variable resistor VR1, ensuring proper placement.
Solder transistors Q1, Q2, and Q3, carefully observing their orientation and markings.
Install headers J5, J6, and J7 for data logging or hacking purposes.
Solder IC sockets, inductor L1, and piezo speaker LS1, noting orientation requirements.
Solder the polarized electrolytic capacitor C5, ensuring correct orientation.
Solder the Geiger tube holder clips (J1, J2) and the LED, ensuring correct orientation.
Solder the battery holder (B1) and push-button (S2), noting the push-button variant for case use.
Install ICs into sockets and carefully insert the fragile Geiger tube, observing polarity.
Test the assembled kit by powering it on and adjusting the VR1 potentiometer for clicks.
Understand LED flashing and speaker clicks indicate radiation detection. Use the push-button to mute sound.
Details the pinout for the PULSE connector (J6) including VCC, output, and GND.
Connect to a computer via serial port (J7) using a 3.3V TTL USB-serial converter.
Explains CSV data format, baud rate, and three logging modes: SLOW, FAST, and INST.
Verify case parts and install standoffs onto the PCB.
Attach the bottom and top cover plates using screws and lock-washers, avoiding overtightening.
Clean the case using a soft cloth; avoid harsh cleaners that can damage acrylic.
Verify battery freshness, contact, and check for a high-pitched whine indicating HV supply.
Inspect component placement, orientation, solder joints, and check for shorts.
Measure HV supply voltage and perform a test by shorting tube clips for clicks.
Consult forums or contact support for unresolved issues.
| Brand | MightyOhm |
|---|---|
| Model | Geiger Counter |
| Category | Cash Counter |
| Language | English |