RouterBOARD 500 Series User's Manual
cross/straight cable correction (Auto MDI/X), so you can use either straight or cross-over cable for
connecting to other network devices.
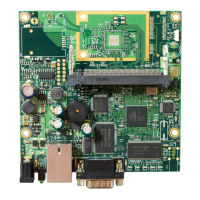
DB9 Serial Port
The RS232C standard male DB9 asynchronous serial port may be used for initial configuration, or for
attaching a modem or any other RS232 serial device. TxD (pin 3) of this port has -12V DC power when idle.
LEDs
Power LED
LED is on when the board is powered
User LED
User LED may be programmed at user's option. See RouterBOARD 500 SDK for more details.
MiniPCI LEDs
2 pairs of MiniPCI LEDs are connected to MiniPCI slots (two LEDs per slot) according to standards.
User's Guide
Assembling the Hardware
First to use the board:
● In most cases you do not need to use any additional boot devices, as you can boot the RouterBOARD
from the onboard NAND memory. You can also install a CompactFlash module or Microdrive hard drive,
which you can use as an alternative boot device or an additional storage medium. Warning! The
RouterBOARD 500 series does not support hot insert of CompactFlash/Microdrive devices.
● Configure jumpers. The board should have 4 jumpers already set in some positions. Be very careful
setting the jumpers as you can permanently damage the board should you set them incorrectly. See
the following section on how to choose the correct setting. Also the Jumper Index chapter of this
manual describes all possible jumper positions
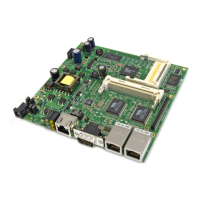
● Insert MiniPCI cards on the board itself, and on the Daughterboard if you have one
● Install the board in a case. Connect and secure the Daughterboard on top of it if you have one
● Connect other peripherals and cables
You can also order a pre-assembled system with RouterBOARD and extension cards of your choice already
installed in a case.
Powering
Power options:
● J13 power jack:
6..22V or 25..56V DC
● J14 power header:
6..22V or 25..56V DC (including -48V telecom power)
● IEEE802.3af Power over Ethernet (PoE) on the first Ethernet port:
48V DC
12V DC non-standard PoE powering support
RouterBOARD 500 series boards are equipped with a reliable 14W onboard power supply that accepts a wide
range of input voltage. The board has a power jack (5.5mm outside and 2mm inside diameter, female, pin
positive plug) and a power header wired serially (it is not recommended to connect power to both power
header and power jack simultaneously). JP3 and JP4 choose input voltage (1-2 for 25..56V DC, 2-3 for
6..22V DC). Note that because of wire resistance, PoE requires higher voltage (it is recommended to use
11V minimum). CAUTION! If JP3 and JP4 are switched to the 2-3 position, and a higher voltage
(e.g. 48V) power adapter or a standard PoE injector is used, the board will be irreparably broken
and exchange will not be covered by warranty.
7
 Loading...