page 6
OPERATION
WARNING!
To reduce the risk of injury, wear safety goggles
or glasses with side shields. Unplug the tool
before changing accessories or making
adjustments.
Starting and Stopping the Tool
1. To start bandfile, press paddle switch.
2. To stop bandfile, release paddle switch.
Bandfile General Use Instructions
• To increase belt life try to sand on the return side of the belt (the side
of the belt that is moving toward the drive wheel).
• Keep belt riding evenly on the contact arm by adjusting the belt
tracking knob.
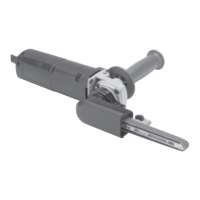
Bandfiles
These bandfiles sand, condition, polish metal in areas that general sand-
ing and grinding machines simply cannot. There are various contact
arms that are available for different uses. Refer to the accessory sec-
tion of this manual or the
MILWAUKEE
Electric Tool catalog.
Selecting Belts
There are two types of belts available:
Conditioning belts are made from abrasive minerals bonded to a non-
woven nylon belt. These belts are tough and chemically resistant. They
condition surfaces without removing or damaging the base material.
They are excellent for deburring, cleaning, blending and final finishing of
metal, wood, and plastics.
Aluminum oxide resin cloth belts are cloth belts with various grits
of aluminum oxide attached to them. These belts are good for grinding
and deburring high carbon steels, general metalworking and for sanding
hardwoods.
Abrasive materials are graded by coarseness. Start your work with an
abrasive grit just coarse enough to remove high spots and excessive
roughness. Follow with a second sanding using a grit one or two grades
finer. Continue with successively finer grits until you obtain the desired
finish.
Do not switch from a coarse grit to a very fine grit in one step because
it may be difficult to remove the marks made by the coarse grit abrasive.
Use the finest grits practical for the roughing operation, and finish by
using successively finer grits.
MAINTENANCE
Maintaining Tools
Keep your tool in good repair by adopting a regular maintenance pro-
gram. Before use, examine the general condition of your tool. Inspect
guards, switches, tool cord set and extension cord for damage. Check
for loose screws, misalignment, binding of moving parts, improper mount-
ing, broken parts and any other condition that may affect its safe opera-
tion. If abnormal noise or vibration occurs, turn the tool off immediately
and have the problem corrected before further use. Do not use a dam-
aged tool. Tag damaged tools “DO NOT USE” until repaired
(see “Repairs”).
Under normal conditions, relubrication is not necessary until the motor
brushes need to be replaced. After six months to one year, depending on
use, return your tool to the nearest
MILWAUKEE
service facility for the
following:
• Lubrication
• Brush inspection and replacement
• Mechanical inspection and cleaning (gears, spindles, bearings,
housing, etc.)
• Electrical inspection (switch, cord, armature, etc.)
• Testing to assure proper mechanical and electrical operation
To reduce the risk of injury, always unplug your
tool before performing any maintenance. Never
disassemble the tool or try to do any rewiring on
the tool's electrical system. Contact a
MILWAUKEE
service facility for ALL repairs.
Cleaning
Clean dust and debris from vents. Keep the tool handles clean, dry and
free of oil or grease. Use only mild soap and a damp cloth to clean your
tool since certain cleaning agents and solvents are harmful to plastics
and other insulated parts. Some of these include: gasoline, turpentine,
lacquer thinner, paint thinner, chlorinated cleaning solvents, ammonia
and household detergents containing ammonia. Never use flammable or
combustible solvents around tools.
Repairs
If your tool is damaged, return the entire tool to the nearest service
center listed on the back cover of this operator’s manual.
Every
MILWAUKEE
tool is thoroughly inspected and tested before leav-
ing our manufacturing facilities. Should any trouble develop, return the
complete tool prepaid to our Corporate Office, Branch Office/Service
Center or nearest Authorized
MILWAUKEE
Service Station. If inspection
shows the trouble is caused by defective workmanship or material, all
repairs will be made without charge, and the tool will be returned, trans-
portation prepaid. Battery packs for cordless tools are warranted for
one year from the date of purchase.
This warranty does not apply where: (1) repairs or attempted repairs
have been made by persons other than
MILWAUKEE
personnel or Au-
thorized Service Station personnel; (2) repairs are required because of
normal wear; (3) the tool has been abused or involved in an accident; (4)
misuse is evident, such as caused by overloading the tool beyond its
rated capacity; (5) the tool has been used after partial failure or (6) the
tool has been used with an improper accessory. No other warranty,
written or verbal, is authorized.
WARRANTY
WARNING!
To reduce the risk of injury, electric shock and
damage to the tool, never immerse your tool in
liquid or allow a liquid to flow inside the tool.
WARNING!