Do you have a question about the Mimosa CAIRO and is the answer not in the manual?
Instructions for attaching upright poles to the pole feet using screws for stability.
Guide to connecting long and short side poles using linked parts and screws.
Details on connecting side poles and fixing crossing ribs to upright poles with screws.
Instructions for inserting corner, central, and horizontal ribs into the top joint plate, then placing the cover.
Instructions for reinforcing the frame using angles and fixing central ribs with bolts.
Illustration showing the attachment of the canopy cover to the gazebo frame.
Diagram showing the attachment of mosquito nets with zippers to the gazebo.
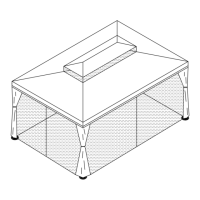
A visual overview of the fully assembled gazebo structure.
| Brand | Mimosa |
|---|---|
| Model | CAIRO |
| Category | Outdoor Furnishing |
| Language | English |