L
x 4
DD
x 16
N
x 2
O
x 2
135
135
135
135
DD
L
N
I
DD
L
O
I
DD
L
O
I
DD
N
L
I
31
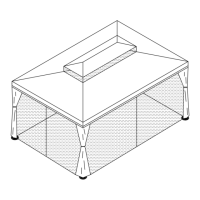
Fig.1
Fig.1
Fig.2
Fig.2
Step 2: Flip the assembled roof rafter with roof panles
over. Connect the Connecting rafter (L)
with L shape bracket (N) using Wood Bolt (DD)
at the bottom of both sides of Roof rafter (I).
* Tips: Distance between Connecting rafter (L) and the
bottom is 135MM as shown in ( Fig.1).
Connect the Connecting rafter (L) with L shape
bracket (O) using Wood Bolt (DD) at the
bottom of both sides of Roof rafter (I).
* Tips: Distance between Connecting rafter (L) and
the bottom is 135MM as shown in ( Fig.2).
 Loading...